Electrolux Complete Guide on How to Clean and Remove Oven Door Glass

Page 33

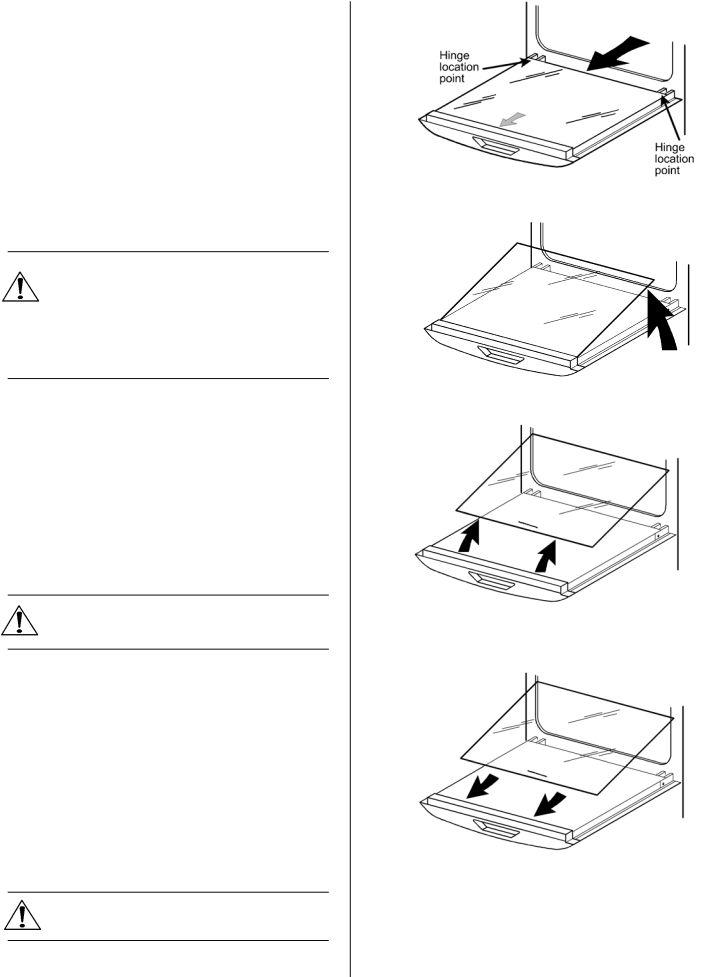
TO REMOVE THE INNER GLASS

1.Fully open the oven door.

2.Firmly grasp the rear edge of the inner glass panel with both hands.

3.Push the glass panel towards you until it clears the hinge location points at the rear.

4.With one hand, carefully lift the glass panel to disengage it from the location points under the handle. (With your other hand, hold the outer door to ensure it does not spring shut on removing the inner panel).

5.Close the oven door.

If the door glass panel becomes chipped or has deep scratches the glass will be weakened and must be replaced to prevent the possibility of the panel shattering. Please contact your local Service Force Centre who will be pleased to advise further.

TO CLEAN THE INNER GLASS DOOR PANELS

Clean the inner door glass panels using a soft cloth and hot water to which a little washing up liquid has been added. If the inner panel is heavily soiled, Hob Brite may be used. Do not use abrasive cleaning materials on the door glass. Ensure that all parts are well rinsed and thoroughly dried before attempting to replace the glass.

Do not clean stainless steel outer panels (where fitted) with Hob Brite as damage to the finish will occur.

TO REPLACE THE INNER GLASS PANEL

1.Holding the glass panel in your right hand fully open the oven door with your left.

2.Gently ease and push the glass into the location points under the handle before lowering and sliding the glass into position under the hinge location points at the rear.

Ensure the glass is properly located and the text 'This way up' is facing towards you and at the top edge of the door.

Do Not attempt to use the oven without the glass being in place.

33

Image 33
Contents Competence D4101-4 Important Safety Information Contents BUILT-IN Electric Multifunction Double Oven Description of the ApplianceGetting to Know Your Appliance Control PanelC D EF G H Telescopic Runners Grill and Oven FurnitureBefore Using the Appliance Electronic Timer HOW to SET the Time of DAYHOW to SET the Countdown To Cancel the Countdown Setting the Oven Timer ControlTo SET the Timer to Switch on and OFF Automatically To SET the Timer to Switch OFF only To Cancel AN Automatic ProgrammeTo Return the Appliance to Manual Automatic Cooking Things to NoteFull Width Dual Grill Using Full Width Dual GrillHints and Tips Grill PAN and HandlesFood Shelf Grill Time Grilling ChartUsing Second Oven Second OvenTo FIT the Second Oven Shelf Hints and Tips Second Oven Food Shelf Cooking Approx Position Tempc Second Oven Cooking ChartUsing Ventitherm FAN Operated Cooking Ventitherm FAN Operated CookingTo FIT the Main Oven Shelves Where fitted Using the Telescopic RunnersConventional Cooking Using Conventional CookingHints and Tips Ventitherm FAN Operated Conventional Cooking Oven Main Oven Cooking ChartRoasting Chart Internal TemperaturesMeat Temperature Cooking Time Main Oven Full Width Dual Grill Using the Main Oven Full Width Dual GrillHints and Tips Pizza Using PizzaUsing Speedcook SpeedcookCooking Times Rotitherm Roasting Using Rotitherm RoastingFood Shelf Temp Rotitherm Roasting ChartFAN Controlled Defrosting Using FAN Controlled DefrostingCleaning Materials Care and CleaningCleaning the Outside of the Appliance Removing and Replacing Wirework RunnersCleaning Inside the Ovens Cleaning the Second and Main Oven RoofCleaning the Door Glass To Clean the Inner Glass Door Panels To Remove the Inner GlassTo Replace the Inner Glass Panel Replacing AN Oven Light Bulb Cleaning the Grill and Oven FurnitureSomething not Working SL1 1DZ AEGStandard guarantee conditions Guarantee ConditionsTechnical Details Do not lift the appliance by the handles Installation InstructionsPreparing Cabinet for Fitting Oven Choice of Electrical ConnectionBuilt In Installation Recommended Cabinet Dimensions in MillimetresTo Remove Cover of Mains Terminal HOW to Finish UnpackingConnecting to the Mains Terminal Connecting to a HOB or Cooker PointChecking Electrical Connections Fitting Into the Cabinet Page Page Page AEG