Marantz PMD670 manual See Display on, 43 for, Details, REC Pause button, REC 4. REC indicator

Page 39

Front

1

2

3

4

5

6


REC PAUSE


REC


HP/SPK VOLUME


L


PHONES


R


DISPLAY

LIGHT

KEY LOCK

REC

LEVEL

1.HP/SPK VOLUME control Turn to adjust the volume of

HP/SPK VOLUME

headphones plugged into the


PHONE jack or the built-in


speaker.

Audio on the built-in speaker is automatically interrupted when recording with the internal microphone.

During playback what is heard on the L or R headphone depends on the recording and for a Stereo or Dual Mono recording, the setting of the ANALOG OUT switch.

REC REMAIN kbps

A-B

L


2.

Display

TOTAL TRACKTIME


kHz-dB 00

40

20

12

6

2

0

over

See Display on


AM R


S.SKIP


-dB


PM


TRACK


INT


MIC


page 43 for

MARK


LINE


details.

REC PAUSE

3. REC PAUSE button


During recording push and release to pause.

When paused the REC indicator will flash.

Example

TRACKTIME

R


L


display.


-dB

00


40


20


12

620

over


TRACK


MIC


-dB


INT


b


a


c

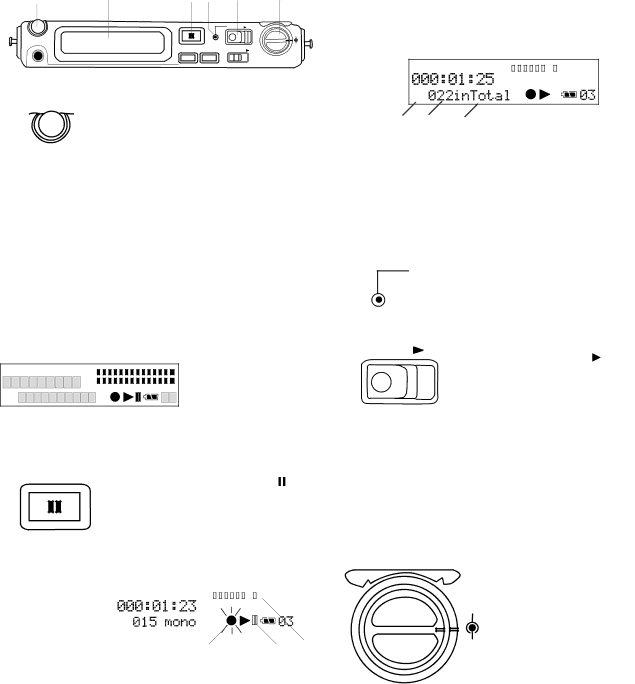
The Pause symbol (a) will be displayed.

The Record symbol (b) will flash in the display

The Level meter (c) will remain active.

To resume recording slide the REC switch to the right and release.

A REC PAUSE does not increment the track.

If the AUTO MARK switch is at ON, a REC PAUSE adds an EDL mark. When recording is resumed the following is displayed for a couple of seconds.

TRACK TIME


L


-dB

00

40

20

12

6

2

0 over

R


-dB

MARK

d e f

MARK (d) is displayed to indicate that the num- ber (e) indicates the count of EDL marks. "inTotal" (f) reminds you that EDL marks are counted from the beginning the Flash memory card not the beginning of the current track.

REC 4. REC indicator

Red indicator light is lit and steady during

Record, flashing during Record pause.

REC

5. REC switch


From Stop slide to the right and release to start recording.

From REC PAUSE slide to the right and release to resume recording.

During recording slide to the right and release to increment the track (start a new audio file).

To stop recording press and release STOP .

6.REC LEVEL controls Turn to adjust the

Lrecord level when the

LEVEL CONT. switch

Ris at MANUAL.

REC

LEVEL

The inside control (Right channel) and outside control (Left channel) turn together unless you hold one while turning the other.

The optimum record level is when the level meter goes as close to 0dB as possible but does not go OVER.

- 39 -

Image 39
Contents Model PMD670 User Guide Risk of Electric Shock Important Safety Instructions Copyright CE marking only EU version English Quick Start Table of Contents Recording setup controlsWhat the Input selections do Left side How to connect via I/O port Right sideInstalling the carry strap Bottom Package contentsMARK/ Edit controls Control and Connection Diagrams TopSetup controls MIC internal microphoneControl Front Bottom Battery compartmentControl Display Audio outputs may be from Security Input settingsIntroduction Audio inputs may be fromEDL marks FeaturesTracks Automatic recordingControls and Connections Power switchAuto Mark switch Mark feature on or offChannel for playback Analog OUT switch0dB -20dB9. MIC Atten switch Selects the audio outputLevel CONT. switch Repeat switchANC switch EDL Play switchMono With INT MIC Switch a to onInput button DisplayLR mono with Line input Input devices and channels Mono with INT MIC inputStereo with Line input Mono with Line inputLocating EDL Marks Custom playback sequences16, 17, 18. MARK/ Edit buttons Adding EDL MarksSkip Edit modeHow to renumber tracks How to erase tracksHow to erase all EDL marks within one track Displayed How to erase all EDL marksHow to format a CF card BlankCard will beTrack Jump reverse button Controls and Connections Top19, 20. Track Jump buttonsMENU/STORE button Margin RESET/ I/0 MENU/STORE buttonMargin Reset button Ing the Margin Reset buttonMenu choices are Page How to set or change the Date Form Algorithm Chart of Algorithm/File ParametersAlgor/File Recording TypeHow to set or change the Algor/File parameter defaults How to set or change the Algor/File param- eters Seamless Play Other menu choices Manual track incrementingSilent Skip Auto Cue Beep Single PlayBattery Type Automatic Power OffBroadcast Wave ID numbers Remote ModeMenu Default Enter button PLAY/PAUSE buttonSee Display on REC 4. REC indicatorREC switch REC Level controls Turn to adjustPress file pa Default displayDisplay button After the thirdCard eject button KEY Lock switchCharge 11. Charge indicator CF card compartmentSecurity Digital IN/OUT jacks15. I/O port How to connect via the I/O port RemoteMode JacksLine OUT jacks Remote jackInstalling the carry strap Battery power Installing AA size batteriesInstalling an optional Ni-Cd or Ni-MH battery Remain label REC labelTotal label Track labelRecord BatteryMIC/INT MIC label Line labelMp3 Troubleshooting Specifications Limited Warranty Marantz is a registered trademark 2003/6