Manuals
/
3Com
/
Computer Equipment
/
Network Router
3Com
WBR-6000
user manual
Dynamic DNS Screen, DDNS Screen
Models:
WBR-6000
1
101
160
160
Download
160 pages
47.93 Kb
98
99
100
101
102
103
104
105
Troubleshooting
Specifications
Install
Password
Login
Administration
NOne Wireless Broadband Router
Configuration & Management
General Problems
Diagnostics
Page 101
Image 101
Page 100
Page 102
Page 101
Image 101
Page 100
Page 102
Contents
LevelOne
NOne Wireless Broadband Router
WBR-6000
FCC Radiation Exposure Statement
Safety
FCC WARNING
CE Marking Warning
CE Declaration of conformity
Page
Table of Contents
Access Control
Internet Access Features
1.1 Wireless Broadband Router Features
This Chapter provides an overview of the Wireless
Broadband Routers features and capabilities
Advanced Internet Functions
LAN Features
Wireless Features
Security Features
Configuration & Management
Wireless Broadband Router incorporates protection against DoS attacks
WBR-6000 Cat.5 Cable Power Adapter Quick Installation Guide CD Manual
1.2 Package Contents
Wireless Broadband Router
This Chapter covers the physical installation of the
On - Wireless security is enabled
Off - Wireless security is disabled
Rear Panel
Reset Button Reset to Defaults Power port
WPS Button 10/100BaseT LAN connections WAN port 10/100BaseT
Figure 2 Rear Panel
2.2 Requirements
Figure 3 Installation Diagram
2.3 Installation
1. Choose an Installation Site
2. Connect LAN Cables
4. Power Up
3. Connect ADSL Cable
5. Check the LEDs
IP Address 192.168.0.1 LAN
2.4 Default Setting
This Chapter provides Setup details of the Wireless Broadband Router
3 Setup
3.1 Overview
To Do this
Features
features
Access Control
Use any of the following Administration
Preparation
3.2 Configuration Program
Using your Web Browser
If you cant connect
3.3 Setup Wizard
Cable Modems
Common Connection Types
DSL Modems
Type
SingTel RAS
Other Modems e.g. Broadband Wireless
Big Pond Telstra, Australia
Main Menu
3.4 Home Screen
Navigation & Data Input
Figure 4 Home Screen
Page
Data - LAN Screen
3.5 LAN Screen
Figure 5 LAN Screen
TCP/IP
DHCP
Using the Wireless Broadband Routers DHCP Server
What DHCP Does
DHCP Server
To Configure your PCs to use DHCP
Using another DHCP Server
Figure 6 Wireless Screen
3.6 Wireless Screen
Identification
Data - Wireless Screen
Region
Station
Setting
Wireless Security
Configure
MAC Level Access Control
Wireless QoS
EWC Setting
Enable
Internet
Figure 7 Wi-Fi Protected Screen
Wi-Fi Protected Setup
Wi-Fi Protected Setup
Data - WPS Screen
Figure 8 WEP
3.7 Wireless Security
WEP Wireless Security
WEP Data Encryption
Data - WEP Screen
Key Size
Passphrase
Authentication
WPA-PSK Wireless Security
Data - WPA-PSK Screen
Figure 9 WPA-PSK
Data - WPA2-PSK Screen
WPA2-PSK Wireless Security
Figure 10 WPA2-PSK
WPA2-PSK
Data - WPAM-PSK Screen
WPAM-PSK Wireless Security
Figure 11 WPAM-PSK
WPAM-PSK
Figure 12 Password Screen
3.8 Password Screen
Old Password
Enter the existing password in this field
The User Name is always admin
Figure 13 Password Dialog
TCP/IP Settings - Overview
4 PC Configuration
4.1 Overview
4.2 Windows Clients
The DNS should be set to the address provided by your ISP
1. Select Control Panel - Network and Dial-up Connection
Checking TCP/IP Settings - Windows
Figure 22 Network Configuration Win
Figure 23 TCP/IP Properties Win
Using DHCP
Using a fixed IP Address Use the following IP Address
you of the IP Address they assigned to the Wireless Broadband Router
1. Select Control Panel - Network Connection
Checking TCP/IP Settings - Windows XP
Figure 24 Network Configuration Windows XP
Figure 25 TCP/IP Properties Windows XP
Page
1. Select Start Menu - Settings - Control Panel - Internet Options
Internet Access
2. Select Set up or change your Internet Connection
For Windows
Accessing AOL
4.3 Macintosh Clients
4.5 Other Unix Systems
4.4 Linux Clients
Fixed IP Address
To act as a DHCP Client recommended
Mode
4.6 Wireless Station Configuration
ESSID
Note! The SSID is case sensitive
Figure 26 Network Connections Windows XP
4.7 Wireless Configuration on Windows XP
Figure 27 Wireless Networks Windows XP
If Wireless Security is Disabled
Figure 28 Insecure Wireless Network Windows XP To connect
If using WEP Data Encryption
Figure 29 WEP Windows XP
To connect
Figure 30 Advanced - Wireless Networks
For Data Encryption, select WEP
Figure 31 Wireless Network Properties - WEP
Configure this screen as follows
Click OK to save and close this dialog
Figure 32 Preferred Networks
Click OK to establish a connection to the Wireless Broadband Router
Figure 33 Wireless Networks Windows XP
If using WPA-PSK Data Encryption
Figure 34 Advanced - Wireless Networks
For Data Encryption, select TKIP
Figure 35 Wireless Network Properties- WPA-PSK
Set Network Authentication to WPA-PSK
Figure 36 Preferred Networks
If the SSID is not listed
1. Click the Advanced button to see a screen like the example below
Figure 37 Wireless Networks Windows XP
2. Click the Add button. You will see a screen like the example below
Figure 38 Unlisted Wireless Network
Figure 39 Add Wireless Network
Figure 40 Preferred Networks
in the Setup Wizard
This Chapter details the status of the Wireless Broadband Router
5 Status
5.1 Status
Address
Internet IP
WAN MTU
Network Mask
Version
Firmware
Buttons
System Data
Data - PPPoE Screen
5.2 Connection Status - PPPoE
Figure 42 PPPoE Status Screen
Physical
Status
PPPoE Link
Connection Log
Connect
Description
Connection Log Messages
Message
Error Invalid or unknown packet type
Figure 43 PPTP Status Screen
5.3 Connection Status - PPTP
Data - PPTP Screen
Status
Figure 44 L2TP Status Screen
5.4 Connection Status - L2TP
Data - L2TP Screen
Status
Figure 45 Telstra Big Pond Status Screen
5.5 Connection Status - Telstra Big Pond
Data - Big Pond Screen
Connection Log
Data - RAS Screen
5.6 Connection Details - SingTel RAS
Figure 46 Connection Details - RAS
RAS Plan
Gateway
Default
DNS IP
DHCP Client
Data - Fixed/Dynamic IP address Screen
5.7 Connection Details - Other e.g. Fixed Wireless
Figure 47 Connection Details - Other e.g. Fixed Wireless
Network
6.1 Overview
6 Advanced Features
Figure 48 Internet Screen
6.2 Internet
Communication Applications
Special Applications Screen
Special Applications
Communication Applications
Select an
Checkbox Name
Data - Special Applications Screen
Figure 49 Special Applications Screen
Incoming Ports Outgoing Ports
Using a Special Application
Multi-DMZ
To use this feature
Figure 50 Multi-DMZ
Enable this DMZ
Select the PC to be the DMZ PC for traffic sent to this IP address
Access Control Screen
6.3 Access Control
To use this feature
If required, you can also define your own Services
Figure 51 Access Control Screen
Data - Access Control Screen
User Group
Select Group
Block all Internet access - All traffic via the
Internet Access
Block selected Services - You can select
Services
Figure 52 Access Control - Services
Services Screen
Available Services
Data - Services Screen
Add New Service
Available
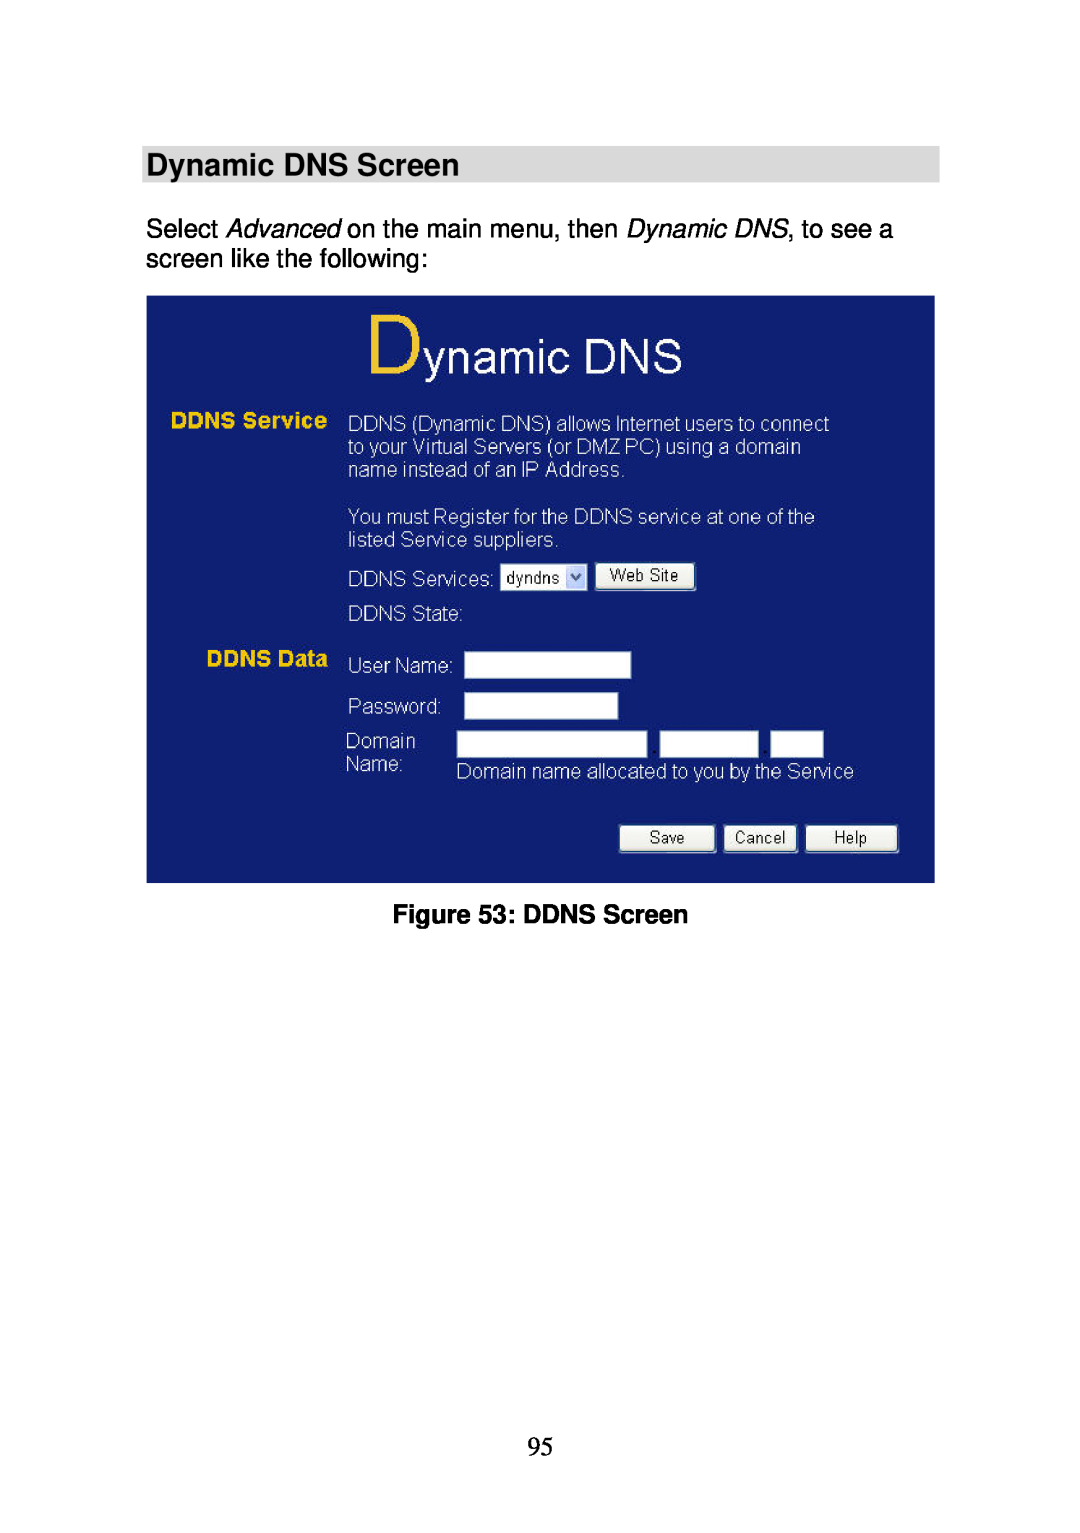
6.4 Dynamic DNS
DDNS Services work as follows
Figure 53 DDNS Screen
Dynamic DNS Screen
Service
DDNS Service
Password
Data - Dynamic DNS Screen
6.5 URL Filter
Figure 54 URL Filter Screen
Data - URL Filter Screen
Current Filter Strings
Filter
Figure 55 User Groups Screen
6.6 User Groups
PCs deleted from any other Group will be added to the Default group
PCs not assigned to any group will be in the Default group
Data - User Groups Screen
Group
Figure 56 Options Screen
6.7 Options
Enable UPnP
Backup DNS
Configuration
access to be
6.8 Schedule
Default Schedule
Data - Schedule Screen
Figure 57 Schedule Screen
Figure 58 Virtual Servers
6.9 Virtual Servers
Wireless
Using Web Server
Virtual Servers Screen
IP Address seen by Internet Users
Figure 59 Virtual Servers Screen
Data - Virtual Servers Screen
Servers
Properties
Disable All
Defaults
Update
Defining your own Virtual Servers
Delete a Server
Connecting to the Virtual Servers
Modify Edit a
Figure 60 WAN Port Screen
6.10 WAN Port
Data - WAN Port Screen
Port Settings
MTU Size
Hostname
Automatically
Specified IP Address
obtain from
Serve
Login Method
Login
default value None Direct connection
Login User
Behavior
Automatic Connect/Disconnect setting
Automatic Connect/Disconnect
Manual Connect/Disconnect
Config File
7 Advanced Administration
Diagnostics
Remote Admin
Figure 61 PC Database
7.2 PC Database
PC Database Screen
Known PCs
Data - PC Database Screen
Generate
Report
Figure 62 Advanced PC Database
Advanced PC Database
Edit
Data - Advanced PC Database Screen
PC Properties
DCHP Client - Reserved IP Address - Select
Entry
Add as New
Selected PC
Standard
Figure 63 Config File Screen
7.3 Config File
Backup
Data - Config File Screen
Config
Restore
Figure 64 Logs Screen
7.4 Logs
Access Control
Enable Logs
Data - Logs Screen
Outgoing
Send Logs
E-Mail Logs
Every day, Every Monday ... - The log is
Include
Check the setting Server requires login to send mail
Server requires Login to send mail
If your SMTP Server requires you to login in order to send mail
Figure 65 Network Diagnostics Screen
7.5 Diagnostics
Ping
Data - Network Diagnostics Screen
Ping this IP
Ping Button
Figure 66 QoS Screen
7.6 QoS
Data - QoS Screen
QoS Setting
Category
Summary
Data - Remote Administration Screen
7.7 Remote Administration
Figure 67 Remote Administration Screen
Remote Administration
To connect from a remote PC via the Internet
Routing Screen
Open Routing and Remote Access
7.8 Routing
Figure 68 Routing Screen
Using this Screen
Static Routing Table
Data - Routing Screen
Enable RIP
Static Routing
Static
Local Router
Configuring Other Routers on your LAN
Destination IP
Gateway IP Address
Figure 69 Routing Example
Static Routing - Example
Other Routers on the Local LAN
For Router Bs Default Route
For Router As Default Route
For the Broadband Routers Routing Table
Entry 1 Segment
Figure 70 Security Screen
7.9 Security Options
Settings
Enable DoS
Data - Security Screen
DoS Firewall
Pass through
Allow VPN
Drop
fragmented
Figure 71 Upgrade Firmware Screen
7.10 Upgrade Firmware
To perform the Firmware Upgrade
8.1 Overview
8 Troubleshooting
This Chapter covers the most likely problems and their solutions
8.2 General Problems
Problem 1 When I enter a URL or IP address I get a time out error
8.3 Internet Access
Problem 2 Wireless connection speed is very slow
8.4 Wireless Access
Problem 1 My PC cant locate the Wireless Access Point
Wireless Broadband Router Wireless Channel
9.1 Modes
9 About Wireless LANs
Ad-hoc Mode
Infrastructure Mode
9.2 BSS/ESS
9.3 Channels
9.4 WEP
Pre-shared
9.5 WPA-PSK
WPA PSK
9.6 Wireless LAN Configuration
10.1 Multi-Function Wireless Broadband Router
10 Specifications
10.2 Wireless Interface
Top
Page
Image
Contents