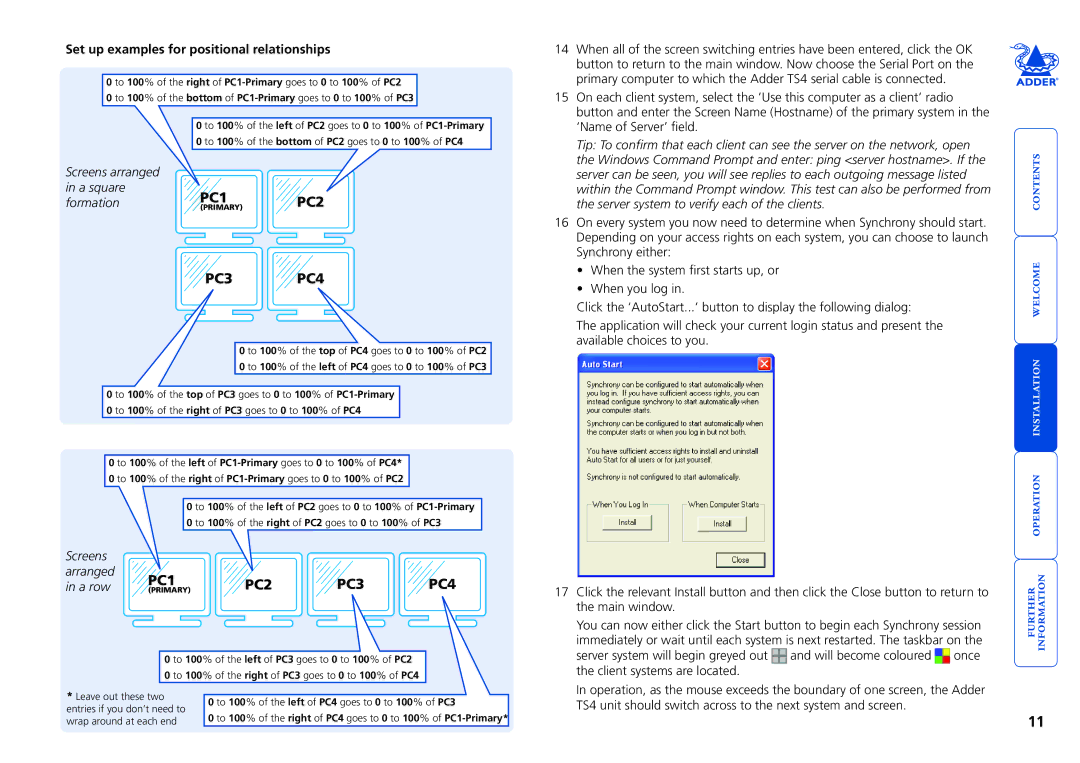
Set up examples for positional relationships
0 to 100% of the right of
0 to 100% of the bottom of
0 to 100% of the left of PC2 goes to 0 to 100% of
Screens arranged
in a square
formationPC1 PC2
(PRIMARY)
PC3 PC4
0 to 100% of the top of PC4 goes to 0 to 100% of PC2 0 to 100% of the left of PC4 goes to 0 to 100% of PC3
0 to 100% of the top of PC3 goes to 0 to 100% of
0 to 100% of the left of
0 to 100% of the left of PC2 goes to 0 to 100% of
Screens |
|
|
|
| |
arranged | PC1 | PC2 | PC3 | PC4 | |
in a row | |||||
(PRIMARY) |
0 to 100% of the left of PC3 goes to 0 to 100% of PC2
0 to 100% of the right of PC3 goes to 0 to 100% of PC4
* Leave out these two | 0 to 100% of the left of PC4 goes to 0 to 100% of PC3 | ||
entries if you don’t need to | |||
0 to 100% of the right of PC4 goes to | 0 to 100% of | ||
wrap around at each end | |||
|
| ||
14When all of the screen switching entries have been entered, click the OK button to return to the main window. Now choose the Serial Port on the primary computer to which the Adder TS4 serial cable is connected.
15On each client system, select the ‘Use this computer as a client’ radio button and enter the Screen Name (Hostname) of the primary system in the ‘Name of Server’ field.
Tip: To confirm that each client can see the server on the network, open
the Windows Command Prompt and enter: ping <server hostname>. If the server can be seen, you will see replies to each outgoing message listed within the Command Prompt window. This test can also be performed from the server system to verify each of the clients.
16On every system you now need to determine when Synchrony should start. Depending on your access rights on each system, you can choose to launch Synchrony either:
•When the system first starts up, or
•When you log in.
Click the ‘AutoStart...’ button to display the following dialog:
The application will check your current login status and present the available choices to you.
17Click the relevant Install button and then click the Close button to return to the main window.
You can now either click the Start button to begin each Synchrony session immediately or wait until each system is next restarted. The taskbar on the
server system will begin greyed out ![]() and will become coloured
and will become coloured ![]() once the client systems are located.
once the client systems are located.
In operation, as the mouse exceeds the boundary of one screen, the Adder TS4 unit should switch across to the next system and screen.
11