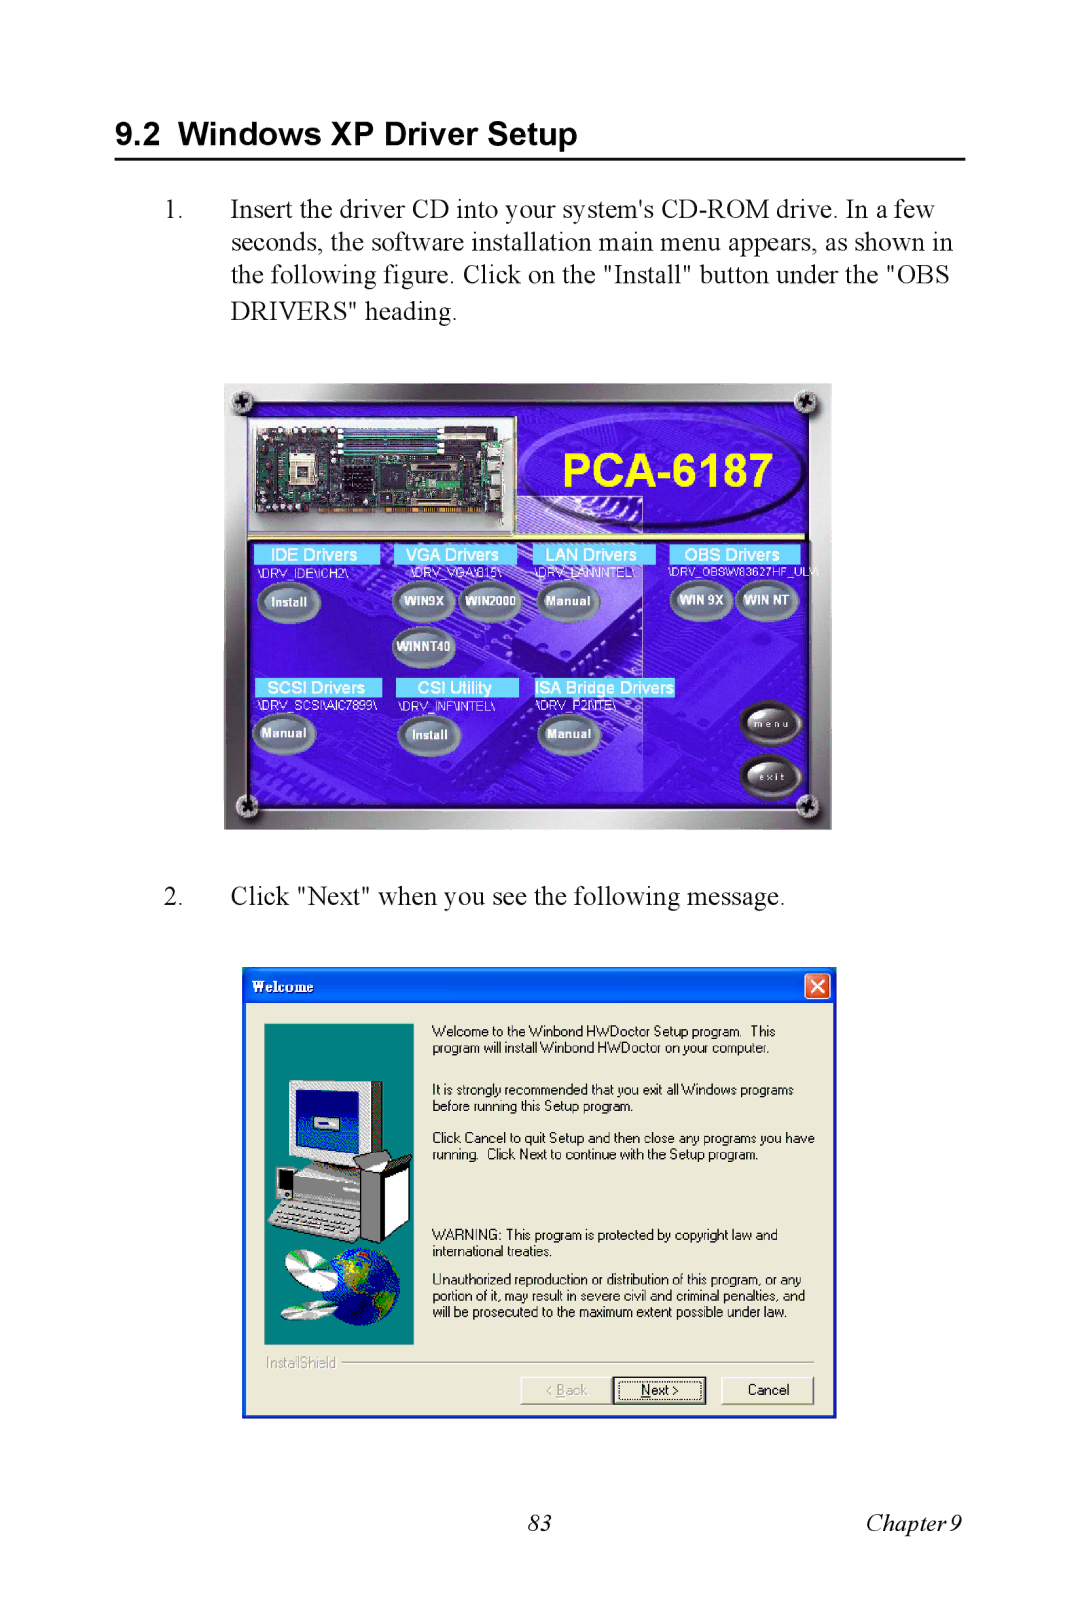
PCA-6187
User’s Manual
Copyright Notice
Technical support
Advantech customer services
1.0.1 A Message to the Customer
PCA-6187 User’s Manual iv
Table 1.1 PCA-6187 comparison table
1.0.2 Product warranty
1.0.4 Release Note
1.0.3 Initial Inspection
Contents
2.12.1
Memory Hole At 15M-16M
Advanced Chipset Features
Integrated Peripherals
3.6.21
VGA Setup
LAN Configuration
Onboard Security Setup
USB Connector CN6
CHAPTER
General Information
about the specifications of a particular model
Chapter 1 Hardware Configuration
1.1 Introduction
Some of the features mentioned above are not
1.3.1 System
1.2 Features
1.3 Specifications
1.3.4 VGA interface
1.3.2 Memory
1.3.3 Input/Output
1.3.5 Ethernet LAN
1.3.7 Industrial features
1.3.8 Mechanical and environmental specifications
Power supply voltage +5 V, ±12
Table 1.1 Jumpers
1.4 Jumpers and Connectors
Table 1.2 Connectors
Table 1.3 SCSI Daughter Board Connectors
Table 1.2 Connectors
PCA-6187 User’s Manual
1.5 Board Layout Jumper and Connector Locations
Figure 1.1 Jumper and Connector locations
68 Pin for Ultra 50 Pin for Ultra wide SCSI Adaptec AIC-7899
Figure 1.2 I/O Connectors
CN 32 CN 31 CN 33 CN
CN CN CN CN
Intel ICH5
1.6 PCA-6187 Block Diagram
PCA-6187 User’s Manual
Intel 865G
can be damaged by sudden power surges. Only
1.7 Safety Precautions
Always completely disconnect the power cord
power is on. Sensitive electronic components
1.8.2 CMOS clear J1
1.8 Jumper Settings
1.8.1 How to set jumpers
1.8.3 Watchdog timer output J2
low level signal. It will be held low until the
1.9 System Memory
Table 1.5 Watchdog timer output J2
The interrupt output of the watchdog timer is a
Table 1.6 CPU FSB and memory speed
1.9.2 Dual channel configuration
1.9.1 CPU FSB and memory speed
1.11 Processor Installation
1.10 Memory Installation Procedures
PCA-6187 User’s Manual
Chapter2
Connecting Peripherals
CHAPTER
2.1 Introduction
Chapter 2 Connecting Peripherals
2.2 1st & 2nd CN1, CN2 IDE Connectors
2.4 Parallel Port CN4
2.3 Floppy Drive Connector CN3
2.5 USB Ports CN6
2.6 VGA Connector CN7
2.8 Serial Ports COM1 CN9 COM2 CN10
2.7 Ethernet Connector CN8 and CN34
CN12
2.9 PS/2 Keyboard/Mouse Connector CN11/CN33
2.10 External Keyboard Connector CN12
CN11
2.12.2 External speaker CN17
2.11 CPU Fan Connector CN14
2.12 Front Panel Connectors CN16, 17, 18, 19, 21&29
2.12.1 Power LED CN16
2.12.4 HDD LED CN19
2.12.3 Reset CN18
2.12.5 ATX soft power switch CN21
2.12.6 SM Bus Connector CN29
CN20
2.13 ATX feature connector CN20
2.14 AC-97 Audio interface CN43
2.15 Serial ATA interface SA0 and SA1
SNMP-1000
2.16 Connecting to SNMP-1000 remote manager
2.17 Auxiliary 4-pin power connector ATX1
CPU Card
Chapter3
Award BIOS Setup
CHAPTER
If you intend to change the CMOS setting with
Chapter 3 Award BIOS Setup
3.1 Introduction
3.1.1 CMOS RAM Auto-backup and Restore
Figure 3.2 Standard CMOS features screen
3.2 Entering Setup
3.3 Standard CMOS Setup
Figure 3.1 Award BIOS Setup initial screen
3.4.2 Virus Warning
3.4 Advanced BIOS Features
3.4.1 Hard Disk Boot Priority
Figure 3.3 Advanced BIOS features screen
3.4.9 Boot UP Floppy Seek
3.4.5 Quick Power On Self Test
3.4.6 First/Second/Third Boot Device
3.4.7 Boot Other Device
DRAM default timings have been carefully cho
3.5 Advanced Chipset Features
To disable security, select “PASSWORD SET
be asked to enter a password. Simply press
3.5.1 DRAM Timing Selectable
3.5.3 Active to Precharge Delay
3.5.4 DRAM RAS# to CAS# Delay
Figure 3.4 Advanced chipset features screen
3.5.9 Memory Hole At 15M-16M
3.5.7 System BIOS Cacheable
3.5.8 Video Bios Cacheable
3.5.10 Delay Prior to Thermal
Chapter3
3.6 Integrated Peripherals
Figure 3.5 Integrated peripherals Figure 3.6 On-Chip IDE Device
3.6.4 Serial ATA Port0/Port1 Mode
3.6.1 IDE HDD Block Mode
3.6.2 On-Chip IDE Device
3.6.3 On-Chip Serial ATA
3.6.7 USB Keyboard/Mouse Support
3.6.11 Onboard LAN Boot ROM
3.6.5 USB Controller
3.6.6 USB 2.0 Controller
3.6.13 Onboard Serial Port
3.6.17 IR Transmission Delay
3.6.19 Use IR Pins
3.6.12 Onboard FDC Controller
3.6.23 ECP Mode Use DMA
3.7 Power Management Setup
Figure 3.9 Power management setup screen
3.6.22 EPP Mode Select
3.7.4 Video Off Method
3.7.1 Power-Supply Type
3.7.3 Power Management
3.7.2 ACPI function
3.7.9 CPU THRM-Throttling
3.8 PnP/PCI Configurations
3.7.12 Resume on Alarm
Figure 3.10 PnP/PCI configurations screen
3.9.3 Current CPU Temperature
3.9 PC Health Status
3.8.1 Reset Configuration Data
3.9.1 CPU Warning Temperature
3.9.5 VCORE, +1.5V, VCC3, +5V, +12V, -12V, -5V, VBATV, 5VSBV
3.11 Password Setting
3.10 Spread Spectrum Control
3.9.4 Current CPUFAN Speed
Please Confirm Your Password
3.12 Save & Exit Setup
3.13 Exit Without Saving
Please Enter Your Password
Chapter4
Chipset Software Installation Utility
CHAPTER
The files on the software installation CD are
Chapter 4 Chipset Software Install Utility
4.1 Before you begin
4.2 Introduction
This utility is used for the following versions of
4.3 Windows XP Driver Setup
Windows system, and it has to be installed
before installing all the other drivers
PCA-6187 User’s Manual
2. Click Next when you see the following message
3. Click Yes when you see the following message
Chapter4
4. Click Next when you see the following message
PCA-6187 User’s Manual
Chapter5
VGA Setup
CHAPTER
5.2 Dynamic Video Memory Technology
Chapter 5 VGA Setup
5.1 Introduction
Chapter 4 for information on installing the CSI
5.3 Windows XP Driver Setup
Before installing this driver, make sure the CSI
utility has been installed in your system. See
PCA-6187 User’s Manual
1. Please click on Next to continue the installation
Chapter5
3. Click Yes when you see the following message
PCA-6187 User’s Manual
4. Click on Yes to continue the installation
Chapter6
LAN Configuration
CHAPTER
6.1 Introduction
Chapter 6 LAN Configuration
6.2 Features
See Chapter 4 for information on installing the
6.3 Installation
6.4 Win XP Driver Setup Intel 82547/41/62/51
CSI utility has been installed in your system
PCA-6187 User’s Manual
3. Click Next to continue
Chapter6
4. Click Install Software to start the installation procedure
PCA-6187 User’s Manual
Chapter7
SCSI Setup & Configuration
CHAPTER
Ultra 160 SCSI segment will run at speeds up to
Chapter 7 SCSI Setup & Configuration
7.1 Introduction
If any peripheral is running at SE mode, the
7.3 SCSI IDs
7.2 Understanding SCSI
7.4 Terminating the SCSI Bus
systems. Run SCSISelect if you need to
7.5 Configuring the SCSI interface with SCSISelect
The default settings are appropriate for most
change or view current settings, or if you would
PCA-6187 User’s Manual
Advanced Configuration Options
Sync Transfer Rate MBytes/sec
F5 to toggle between color and monochrome
7.6 Starting SCSISelect
modes. This feature may not work on some
If you have difficulty viewing the display, press
SCSI Bus Interface Definitions
Boot Device Options
SCSI Device Configuration
To configure settings for a SCSI device, you
Do not change the Advanced Configuration
using an 8-bit SCSI device that hangs or exhib
its other performance problems with 16-bit data
transfer rate enabled
drives before changing the translation scheme
Changing the translation scheme destroys all
data on the drive. Be sure to back your disk
7.7 Using SCSI Disk Utilities
7.9 Windows 9X Driver setup procedure
7.8 Installation under Windows
3. Click on Update Driver
PCA-6187 User’s Manual
4. Click on “Next” 5. Recommend to search for a better driver
Chapter7
7. In the Update Device Driver Wizard click on Next
PCA-6187 User’s Manual
8. The installation is completed. Click on Finish
9. Click on Yes to restart the system
Chapter8
USB 2.0 Configuration
CHAPTER
8.1 Introduction
Chapter 8 USB 2.0 Configuration
8.2 Features
8.3 Installation
Chapter9
Onboard Security Setup
CHAPTER
9.1 Introduction
Chapter 9 Onboard Security Setup
Chapter9
9.2 Windows XP Driver Setup
2. Click Next when you see the following message
PCA-6187 User’s Manual
3. Click Next when you see the following message
4. Click Next when you see the following message
Chapter9
6. Click Finish when you see the following message
5. Click Next to continue
9.3 Using the OBS Hardware Doctor Utility
Chapter9
PCA-6187 User’s Manual
AppendixA
Programming the Watchdog Timer
Appendix
A.1.2 Reset/ Interrupt selection
A.1 Programming the Watchdog Timer
Appendix A Programming the watchdog
A.1.1 Watchdog timer overview
AppendixA
Unlock W83627H Select register of watchdog timer
Enable the function of the watchdog timer
Use the function of the watchdog timer Lock W83627HF
PCA-6187 User’s Manual
Address of register 2E
Attribute
A.1.4 Example Program
Table A.1 Watchdog timer registers
Set timeout interval as 10 seconds and start counting
Dec dx
Out dx,al
Out dx,al
Out dx,al
AppendixB
I/O Pin Assignments
Appendix
Signal
B.1 IDE Hard Drive Connector CN1, CN2
Appendix B Pin Assignments
Table B.1 IDE hard drive connector CN1, CN2
Signal
B.2 Floppy Drive Connector CN3
Table B.2 Floppy drive connector CN3
Signal
Signal
B.3 Parallel Port Connector CN4
Table B.3 Parallel port connector CN4
Signal
USB1 Signal
B.4 USB Connector CN6
B.5 VGA Connector CN7
Table B.4 USB1/USB2 connector CN6
Table B.6 COM1/2 RS-232 serial port CN9/10
B.6 COM1/COM2 RS-232 Serial Port CN9, CN10
B.7 Keyboard and Mouse Connnector CN11
Signal
Table B.8 External keyboard connector CN12
B.8 External Keyboard Connector CN12
Table B.7 Keyboard and mouse connector CN11
Signal
Table B.10 Power LED and keylock conn CN16
B.9 CPU Fan Power Connector CN14
B.10 Power LED CN16
Table B.9 CPU Fan Power Connector CN14
Table B.12 Reset connector CN18
B.11 External Speaker Connector CN17
B.12 Reset Connector CN18
Table B.11 External Speaker Connector CN17
Table B.14 ATX feature connector CN20
B.13 HDD LED Connector CN19
B.14 ATX Feature Connector CN20
Table B.13 HDD LED connector CN19
Table B.15 ATX soft power switch CN21
B.15 ATX Soft Power Switch CN21
B.16 H/W Monitor Alarm CN22
B.17 AC-97 Audio Interface CN43
Table B.17 AC-97 Audio Interface CN43
B.18 SM Bus Connector CN29
Table B.18 SM Bus Connector CN
Signal
Device
B.19 System I/O Ports
Table B.19 System I/O ports
Addr. range Hex
Channel
B.20 DMA Channel Assignments
B.21 Interrupt Assignments
Table B.20 DMA channel assignments
Addr. range Hex
B.22 1st MB Memory Map
B.23 PCI Bus Map
Table B.22 1st MB memory map
PCA-6187 User’s Manual