a
b
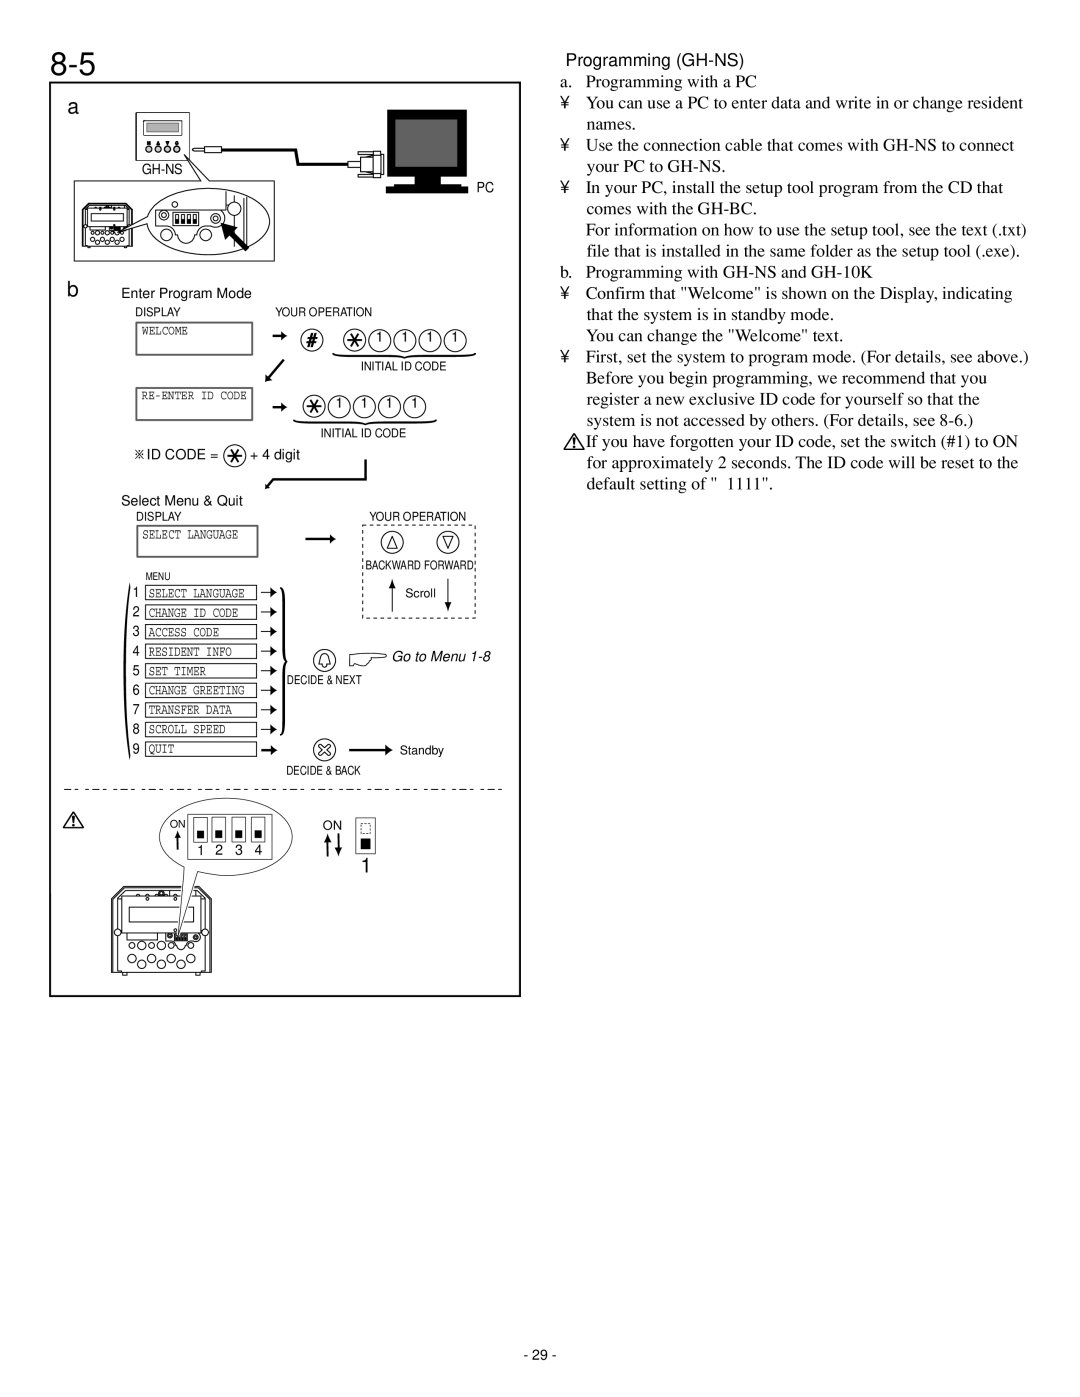
Programming (GH-NS)
a. Programming with a PC
•You can use a PC to enter data and write in or change resident
|
|
|
|
|
|
|
|
|
|
|
|
|
|
|
|
|
|
|
|
|
|
| names. |
|
|
|
|
|
|
|
|
|
|
|
|
|
|
|
|
|
|
|
|
|
|
| |
|
|
|
|
|
|
|
|
|
|
|
|
|
|
|
|
|
|
|
|
|
|
| • Use the connection cable that comes with |
|
|
|
|
|
|
|
|
|
|
|
|
|
|
|
|
|
|
|
|
|
|
| your PC to |
|
|
|
|
|
|
|
|
|
|
|
|
|
|
|
|
|
|
|
| ||||
|
|
|
|
|
|
|
|
|
|
|
|
|
|
|
|
|
|
|
|
|
| PC | • In your PC, install the setup tool program from the CD that |
|
|
|
|
|
|
|
|
|
|
|
|
|
|
|
|
|
|
|
|
|
| ||
|
|
|
|
|
|
|
|
|
|
|
|
|
|
|
|
|
|
|
|
|
|
| comes with the |
|
|
|
|
|
|
|
|
|
|
|
|
|
|
|
|
|
|
|
|
|
|
| ∗ For information on how to use the setup tool, see the text (.txt) |
|
|
|
|
|
|
|
|
|
|
|
|
|
|
|
|
|
|
|
|
|
|
| |
|
|
|
|
|
|
|
|
|
|
|
|
|
|
|
|
|
|
|
|
|
|
| file that is installed in the same folder as the setup tool (.exe). |
|
|
|
|
|
|
|
|
|
|
|
|
|
|
|
|
|
|
|
|
|
|
| b. Programming with |
Enter Program Mode |
|
|
|
|
|
|
|
| • Confirm that "Welcome" is shown on the Display, indicating | ||||||||||||||
DISPLAY |
| YOUR OPERATION |
|
|
|
|
|
|
|
| that the system is in standby mode. | ||||||||||||
| WELCOME |
|
|
|
|
|
| 1 | 1 | 1 1 |
|
| ∗ You can change the "Welcome" text. | ||||||||||
|
|
|
|
|
|
|
|
|
|
|
|
|
|
|
| ||||||||
|
|
|
|
|
|
|
|
|
|
|
|
| |||||||||||
|
|
|
|
|
|
|
|
|
|
|
|
| INITIAL ID CODE | • First, set the system to program mode. (For details, see above.) | |||||||||
|
|
|
|
|
|
|
|
|
|
|
|
| |||||||||||
|
|
|
|
|
|
|
|
|
|
|
|
| ∗ Before you begin programming, we recommend that you | ||||||||||
|
|
|
|
|
|
|
|
|
|
|
|
|
|
|
|
|
|
|
|
|
|
| |
|
|
|
|
| 1 1 | 1 |
| 1 |
|
|
| register a new exclusive ID code for yourself so that the | |||||||||||
|
|
|
|
|
|
|
|
|
|
|
|
|
|
|
| ||||||||
|
|
|
|
|
|
|
|
|
|
| INITIAL ID CODE |
|
|
|
|
| system is not accessed by others. (For details, see | ||||||
|
|
|
|
|
|
|
|
|
|
|
|
|
|
|
| ||||||||
|
|
|
|
|
|
|
|
|
|
|
|
|
|
|
| If you have forgotten your ID code, set the switch (#1) to ON | |||||||
|
| ID CODE = |
|
| + 4 digit |
|
|
|
|
|
|
|
| ||||||||||
|
|
|
|
|
|
|
|
|
|
|
| for approximately 2 seconds. The ID code will be reset to the | |||||||||||
|
|
|
|
|
|
|
|
|
|
| |||||||||||||
|
|
|
|
|
|
|
|
|
|
|
|
|
|
|
|
|
|
|
|
|
|
| |
Select Menu & Quit |
|
|
|
|
|
|
|
|
|
|
|
|
|
|
| default setting of "∗1111". | |||||||
|
|
|
|
|
|
|
|
|
|
|
|
|
|
|
| ||||||||
| DISPLAY |
|
|
|
|
|
| YOUR OPERATION |
| ||||||||||||||
SELECT LANGUAGE
MENU
1SELECT LANGUAGE
2CHANGE ID CODE
3ACCESS CODE
4RESIDENT INFO
5SET TIMER
6CHANGE GREETING
7TRANSFER DATA
8SCROLL SPEED
9QUIT
BACKWARD FORWARD
Scroll
Go to Menu 1-8
DECIDE & NEXT
Standby |
DECIDE & BACK
ON |
|
| ON |
1 | 2 | 3 | 4 |
1
- 29 -