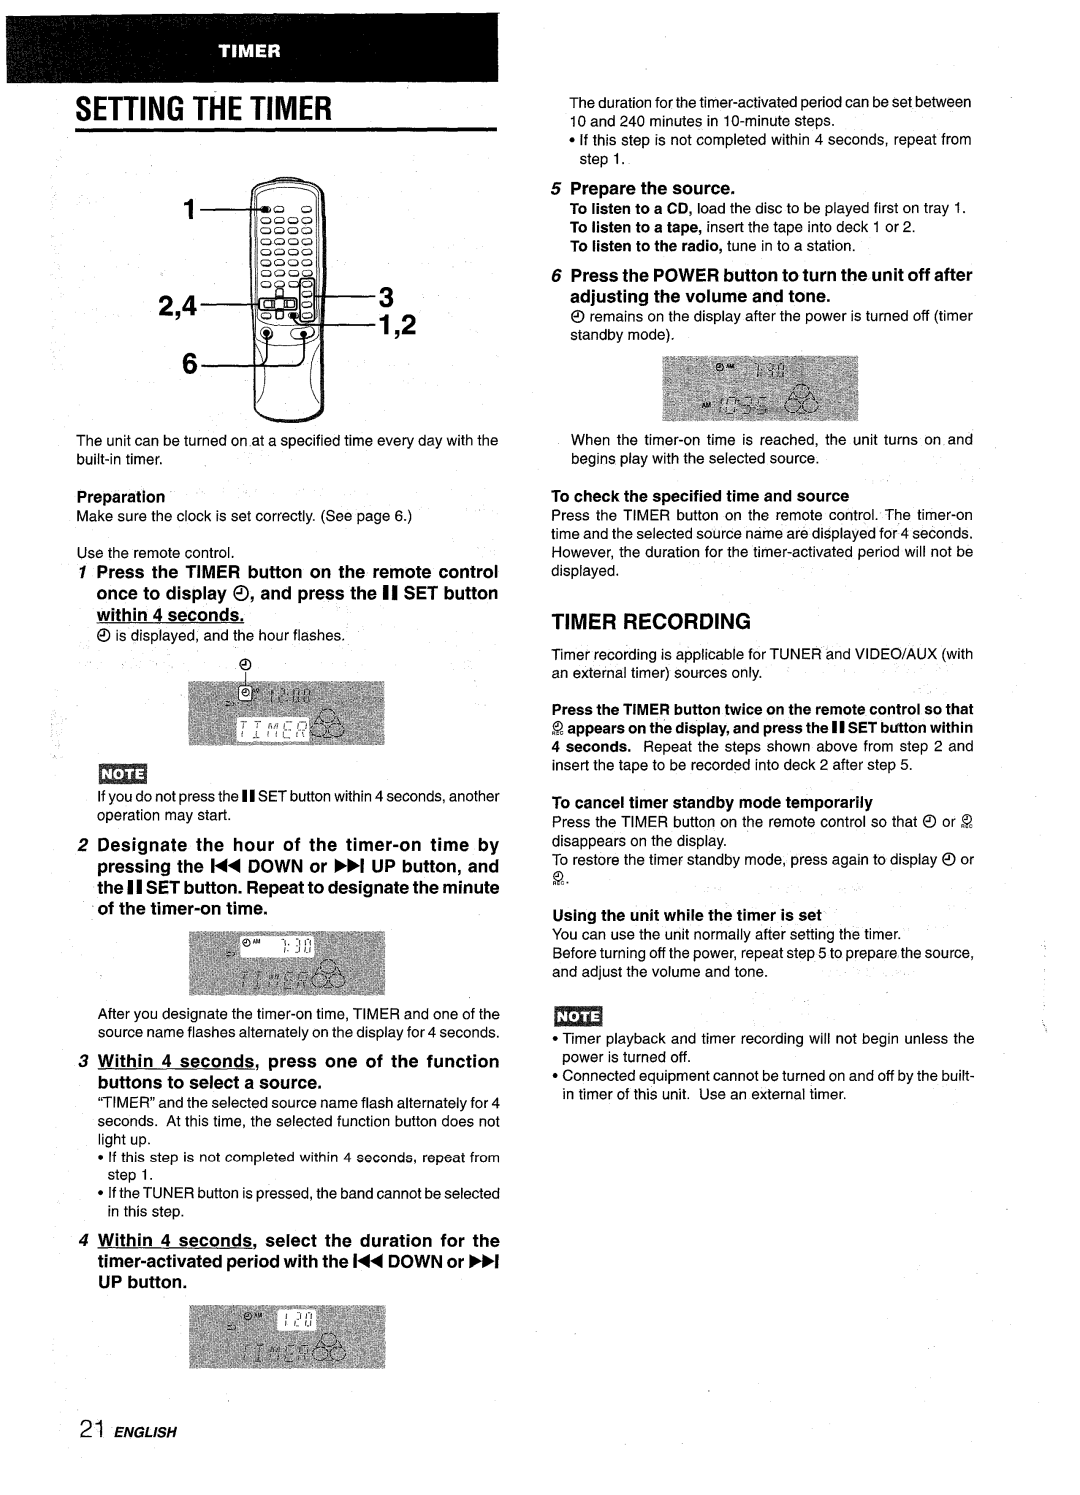
SETTING THE TIMER

1

2,4

3

1,2


‘-M

The unit can be turned on at a specified time every day with the built-in timer.

Preparation

Make sure the clock is set correctly. (See page 6.)

Use the remote control.

Press the TIMER button on the remote control once to display 0, and press the II SET button within 4 seconds.

@k displayed, and the hour flashes. q

m

If you do not press the 1[ SET button within 4 seconds, another operation may start.

Designate the hour of the timer-on time by pressing the 1<< DOWN or >1 UP button, and the II SET button. Repeat to designate the minute of the timer-on time.

After you designate the timer-on time, TIMER and one of the source name flashes alternately on the display for 4 seconds.

Within 4 seconds, press one of the function buttons to select a source,

“TIMER and the selected source name flash alternately for 4 seconds. At this time, the selected function button does not light up.

If this step is not completed within 4 seconds, repeat from step 1.

If the TUNER button is pressed, the band cannot be selected in this step.

Within 4 seconds, select the duration for the timer-activated period with the l<< DOWN or P>l UP button.

The duration for the timer-activated period can beset between 10 and 240 minutes in 10-minute steps.

if this step is not completed within 4 seconds, repeat from step 1.

5 Prepare the source.

To listen to a CD, load the disc to be played first on tray 1. To listen to a tape, insert the tape into deck 1 or 2.

To listen to the radio, tune in to a station.

6Press the POWER button to turn the unit off after adjusting the volume and tone.

@ remains on the display after the power is turned off (timer standby mode).

When the timer-on time is reached, the unit turns on and begins play with the selected source.

To check the specified time and source

Press the TIMER button on the remote control. The timer-on time and the selected source name are displayed for 4 seconds. However, the duration for the timer-activated period will not be displayed.

TIMER RECORDING

Timer recording is applicable for TUNER and VIDEO/AUX (with an external timer) sources only.

Press the TIMER button twice on the remote control so that

~appears on the display, and press the II SET btiton within

4 seconds. Repeat the steps shown above from step 2 and insert the tape to be recorded into deck 2 after step 5.

To cancel timer standby mode temporarily

Press the TIMER button on the remote control so that @ or $2 disappears on the display.

To restore the timer standby mode, press again to display 0 or

Using the unit while the timer is set

You can use the unit normally after setting the timer.

Before turning off the power, repeat step 5 to prepare the source, and adjust the volume and tone.

Timer playback and timer recording will not begin unless the power is turned off.

Connected equipment cannot be turned on and off by the built- in timer of this unit. Use an external timer.

21 ENGLISH

Page 22
Image 22
Aiwa NSX-AV900 manual Setting the Timer, Timer Recording, Prepare the source

NSX-AV900 specifications

The Aiwa NSX-AV900 is a remarkable piece of audio equipment that gained popularity in the late 1990s and early 2000s. This mini component system is widely recognized for its impressive combination of features, sound quality, and design, making it a favorite among audiophiles and casual listeners alike.

One of the standout features of the NSX-AV900 is its powerful 300-watt output, which allows for an immersive listening experience. The system incorporates a high-performance amplifier that not only enhances sound clarity but also provides deep, resonant bass. This capability makes it an ideal choice for a variety of music genres, from classical to rock.

The NSX-AV900 is designed with versatility in mind. It includes several playback options, supporting CD, cassette, and radio, allowing users to enjoy their favorite tunes from multiple sources. The CD player is capable of playing CD-R and CD-RW discs, ensuring compatibility with a wide range of media. Additionally, the system features a dual cassette deck, allowing for both playback and recording, which was quite appealing during its time.

Another technological highlight of the Aiwa NSX-AV900 is its built-in digital signal processing (DSP) capabilities. This technology enables the system to enhance audio performance through various sound modes, such as 3D sound, hall effect, and equalization presets. Users can customize their listening experience based on their preferences, making it easy to enjoy music exactly how they like it.

In terms of connectivity, the NSX-AV900 offers multiple inputs and outputs, including RCA connectors and even optical inputs for digital devices. This allows users to connect the system to a wide array of external devices, including televisions and gaming consoles, expanding its functionality beyond just music playback.

The design of the NSX-AV900 is another aspect worth highlighting. It features a sleek, modern aesthetic that fits seamlessly into any home entertainment setup. The system’s layout is user-friendly, with clearly labeled buttons and a vibrant display, making operation straightforward for users of all ages.

Overall, the Aiwa NSX-AV900 is a well-rounded audio system that combines power, versatility, and advanced technology. Its outstanding features and quality make it a noteworthy choice for anyone looking to enhance their listening experience, whether for casual enjoyment or serious listening sessions.