RT-AC68U
Copyright 2013 ASUSTeK Computer Inc. All Rights Reserved
Table of contents
Configuring the Advanced Settings
Utilities
112
Package contents
Welcome
Your wireless router
LAN 1~4 LED
Specifications
Positioning your router
Setup Requirements
Wired connection
Router Setup
To set up your wireless router via wired connection
Wireless connection
To set up your wireless router via wireless connection
Page
Logging into the Web GUI
To log into the web GUI
To use QIS with auto-detection
Quick Internet Setup QIS with Auto- detection
Log into the Web GUI. The QIS page launches automatically
For Automatic IP Dhcp For PPPoE, PPTP, and L2TP
For Static IP
Auto-detection of your ISP connection type takes place when
Page
Connecting to your wireless network
To connect to your network
Configuring the General settings
Using the Network Map
Setting up the wireless security settings
To set up the wireless security settings
Key in your security passkey Click Apply when done
Managing your network clients
To manage your network clients
From the navigation panel, go to General Network Map tab
Monitoring your USB device
To monitor your USB device
Safely removing the USB disk
To safely remove the USB disk
Click Enable
Creating a Guest Network
To create a guest network
From the navigation panel, go to General Guest Network
To configure additional options, click Modify
Click Yes on the Enable Guest Network screen
Select an Authentication Method
Select Disable or Enable on the Access Intranet item
Managing QoS Quality of Service Bandwidth
Using the Traffic Manager
To set up bandwidth priority
Enter all IP addresses as *.*.*.* or leave the field blank
Page
Monitoring Traffic
Click OK Click Apply to save the settings
Setting up Parental Control
To use the parental control function
Using AiDisk
Using the USB Application
To use AiDisk
Page
Using Servers Center
Using Media Server
To launch the Media Server setting page, go to General USB
Application Servers Center Media Servers tab. Refer to
Following for the descriptions of the fields
To use Samba share
Follow the steps below to add, delete, or modify an account
To create a new account
Click to add new account
To delete an existing account
Using the FTP Share service
To use FTP Share service
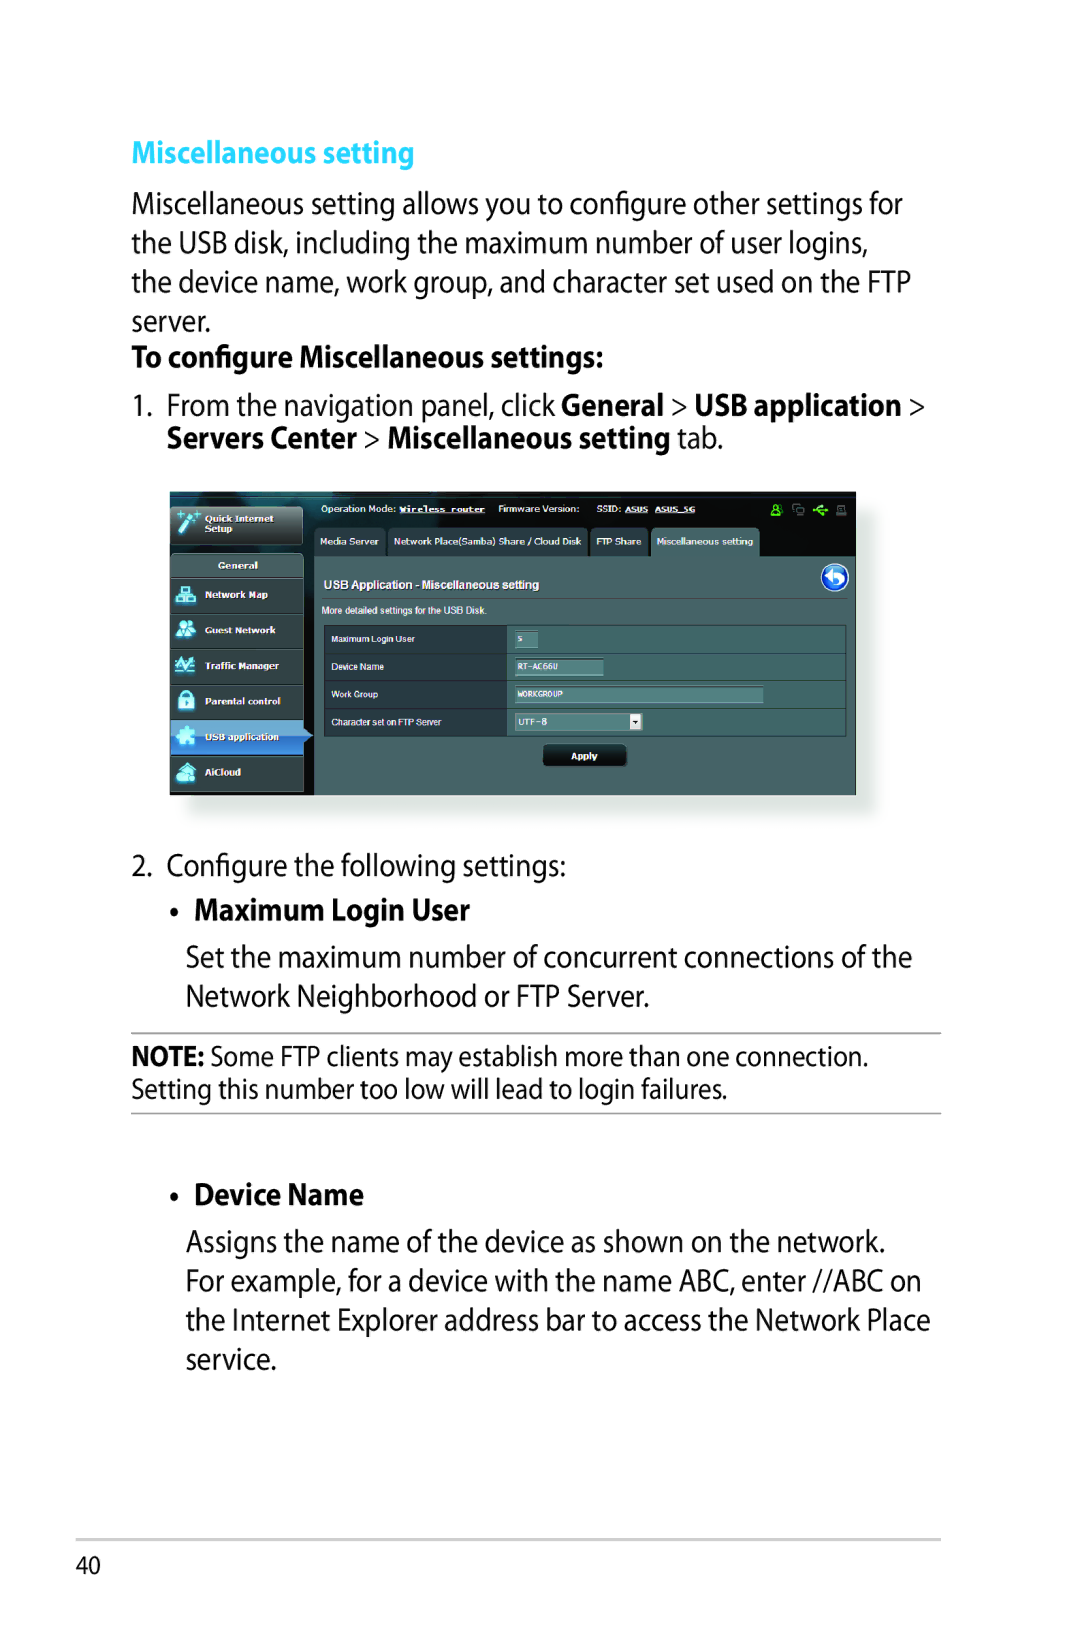
To configure Miscellaneous settings
Configure the following settings
Maximum Login User
Device Name
Work Group
3 3G/4G
Character set on FTP Server
To set up 3G/4G internet access
Click Apply
Using AiCloud
To use AiCloud
Insert a USB storage device into the wireless router
Cloud Disk
To create a cloud disk
Turn on Cloud Disk
Page
Smart Access
To use Smart Sync
Smart Sync
Click Add new account
Wireless
General
Page
Radius with
To enable WPS on your wireless network
2 WPS
Page
Bridge
Page
Wireless MAC Filter
To set up the Wireless MAC filter
Radius Setting
To set up wireless Radius settings
Professional
Page
LAN
LAN IP
To modify the LAN IP settings
To configure the Dhcp server
Enable the Dhcp Server field, tick Yes
Dhcp Server
Page
To configure the LAN Routing table
On the Enable static routes field, choose Yes
Route
On the Static Route List, enter the network information
Iptv
WAN
To configure the WAN connection settings
Internet Connection
Page
Page
To set up Port Trigger
Port Trigger
Page
To set up Port Forwarding
Virtual Server/Port Forwarding
Page
Local IP Key in the client’s LAN IP address
Differences between port trigger and port forwarding
4 DMZ
To set up DMZ
To remove DMZ
To set up Ddns
Ddns
Ddns service will not work under these conditions
NAT Passthrough
To set up IPv6
From the navigation panel, go to Advanced Settings IPv6
Enter your IPv6 LAN and DNS settings Click Apply
IPv6
To set up access to a VPN server
VPN Server
Firewall
To set up basic Firewall settings
URL Filter
To set up a keyword filter
To set up a URL filter
Keyword filter
Network Services Filter
Enter a word or phrase and click the Add button Click Apply
To set up a Network Service filter
Administration
Operation Mode
To set up the operating mode
Select any of these operation modes
System
To set up the System settings
Time Zone Select the time zone for your network
Firmware Upgrade
Restore/Save/Upload Setting
To upgrade the firmware
To restore/save/upload wireless router settings
System Log contains your recorded network activities
System Log
To view your system log
To launch the Device Discovery utility
Device Discovery
From your computer’s desktop, click
Unplug the wireless router from the power source
Firmware Restoration
Asus EZ Printer Sharing
Setting up your printer server
Specify a firmware file, then clickUpload
To set up the EZ Printer sharing mode
Page
Page
To share your LPR printer
Using LPR to Share Printer
Select Add a local printer and then click Next
Page
Select Custom then click Settings
Click Next to finish setting up the standard TCP/IP port
Page
Download Master
To use Download Master
Use the navigation panel to configure the advanced settings
Configuring Bit Torrent download settings
To configure BitTorrent download settings
NZB settings
Troubleshooting
Basic Troubleshooting
Restart your network in the following sequence
101
Frequently Asked Questions FAQs
Cannot access the router GUI using a web browser
Dhcp server has been disabled
Move the router closer to the wireless client
Out of Range
104
Internet is not accessible
You forgot the Ssid network name or network password
How to restore the system to its default settings?
Firmware upgrade failed
Click Tools Internet options Connections tab LAN settings
Cannot access Web GUI
Click OK when done
Settings
Cllick Apply Now when done
Windows Click Start Control Panel Network and Internet
Internet Protocol Version 6 TCP/IPv6, then click Properties
Click the Apple icon located on the top left of your screen
Disable the dial-up connection, if enabled Windows
Tick Never dial a connection
Asus Recycling/Takeback Services
Federal Communications Commission Statement
Against harmful interference in a residential installation
Prohibition of Co-location
Declaration of Conformity for R&TTE directive 1999/5/EC
Safety Information
CE Mark Warning
Canada, Industry Canada IC Notices
Radio Frequency RF Exposure Information
Canada, avis d’Industry Canada IC
Cet appareil numérique de classe B est conforme aux normes
GNU General Public License
NCC 警語
Version 2, June
Preamble
Terms & conditions for copying, distribution, & modification
119
Page
Page
Page
123
No Warranty
Authorised distributors in Turkey
For Turkey only
Tel. No Address
ASUSTeK Computer INC. Asia Pacific
Asus Contact information
Asus Computer International America
Networks Global Hotline Information
Country Hotline Number
128
Authorised Asus Computer GmbH Representative
Manufacturer ASUSTeK Computer Inc Tel +886-2-2894-3447
Europe