Remote control
See "Using the menus" on page 42 for details.
67. Keystone/Arrow buttons (  /
/ Up,
Up,  /
/
1 |
|
|
|
|
|
|
|
|
|
|
|
|
|
|
|
|
|
|
|
|
|
| 7 |
| Down) | |||
|
|
|
|
|
|
|
|
|
|
|
|
|
|
|
|
|
|
|
|
|
| |||||||
2 |
|
|
|
|
|
|
|
|
|
|
|
|
|
|
| Manually corrects distorted images | ||||||||||||
|
|
|
|
|
|
|
|
|
|
|
|
|
|
|
|
|
|
| ||||||||||
|
|
|
|
|
|
|
|
|
|
|
|
|
|
|
|
|
|
|
|
|
|
|
| 8 |
| |||
|
|
|
|
|
|
|
|
|
|
|
|
|
|
|
|
|
|
|
|
|
|
|
|
|
|
|
| resulting from an angled projection. See |
|
|
|
|
|
|
|
|
|
|
|
|
|
|
|
|
|
|
|
|
|
|
|
|
|
|
|
| |
3 |
|
|
|
|
|
|
|
|
|
|
|
|
|
|
|
|
|
|
|
|
|
|
|
| 9 |
| "Correcting keystone" on page 29 for | |
|
|
|
|
|
|
|
|
|
|
|
|
|
|
|
|
|
|
|
|
| details. | |||||||
4 |
|
|
|
|
|
|
|
|
|
|
|
|
|
|
|
|
|
|
|
|
|
|
|
| 10 |
| ||
|
|
|
|
|
|
|
|
|
|
|
|
|
|
|
|
|
|
|
| 8. | AUTO | |||||||
|
|
|
|
|
|
|
|
|
|
|
|
|
|
|
|
|
|
|
|
|
| |||||||
|
|
|
|
|
|
|
|
|
|
|
|
|
|
|
|
|
|
|
|
| 11 |
| Automatically determines the best picture | |||||
|
|
|
|
|
|
|
|
|
|
|
|
|
|
|
|
|
|
|
|
|
| |||||||
|
|
|
|
|
|
|
|
|
|
|
|
|
| 7 |
| timings for the displayed image. See | ||||||||||||
|
|
|
|
|
| |||||||||||||||||||||||
|
|
|
|
|
|
|
|
|
|
|
|
|
|
|
|
|
|
|
|
|
|
|
|
| 12 |
| ||
5 |
|
|
|
|
|
|
|
|
|
|
|
|
|
|
|
|
|
|
|
|
|
|
| details. | ||||
|
|
|
|
|
|
|
|
|
|
|
|
|
|
|
|
|
|
| ||||||||||
|
|
|
|
|
|
|
|
|
|
|
|
|
|
|
|
|
|
|
|
|
|
|
|
| 13 |
| ||
|
|
|
|
|
|
|
|
|
|
|
|
|
|
|
|
|
|
|
|
|
|
|
|
| 9. | Right/ | ||
|
|
|
|
|
|
|
|
|
|
|
|
|
|
|
|
|
|
|
|
|
| |||||||
|
|
|
|
|
|
|
|
|
|
|
|
|
|
|
|
|
|
|
|
|
|
| ||||||
|
|
|
|
|
|
|
|
|
|
|
|
|
|
|
|
|
|
|
|
|
|
|
|
|
|
|
| Activates panel key lock. See "Locking |
|
|
|
|
|
|
|
|
|
|
|
|
|
|
|
|
|
|
|
|
|
|
|
|
|
|
|
| control keys" on page 36 for details. |
|
|
|
|
|
|
|
|
|
|
|
|
|
|
|
|
|
|
|
|
|
|
|
|
|
|
|
| When the |
1. |
|
|
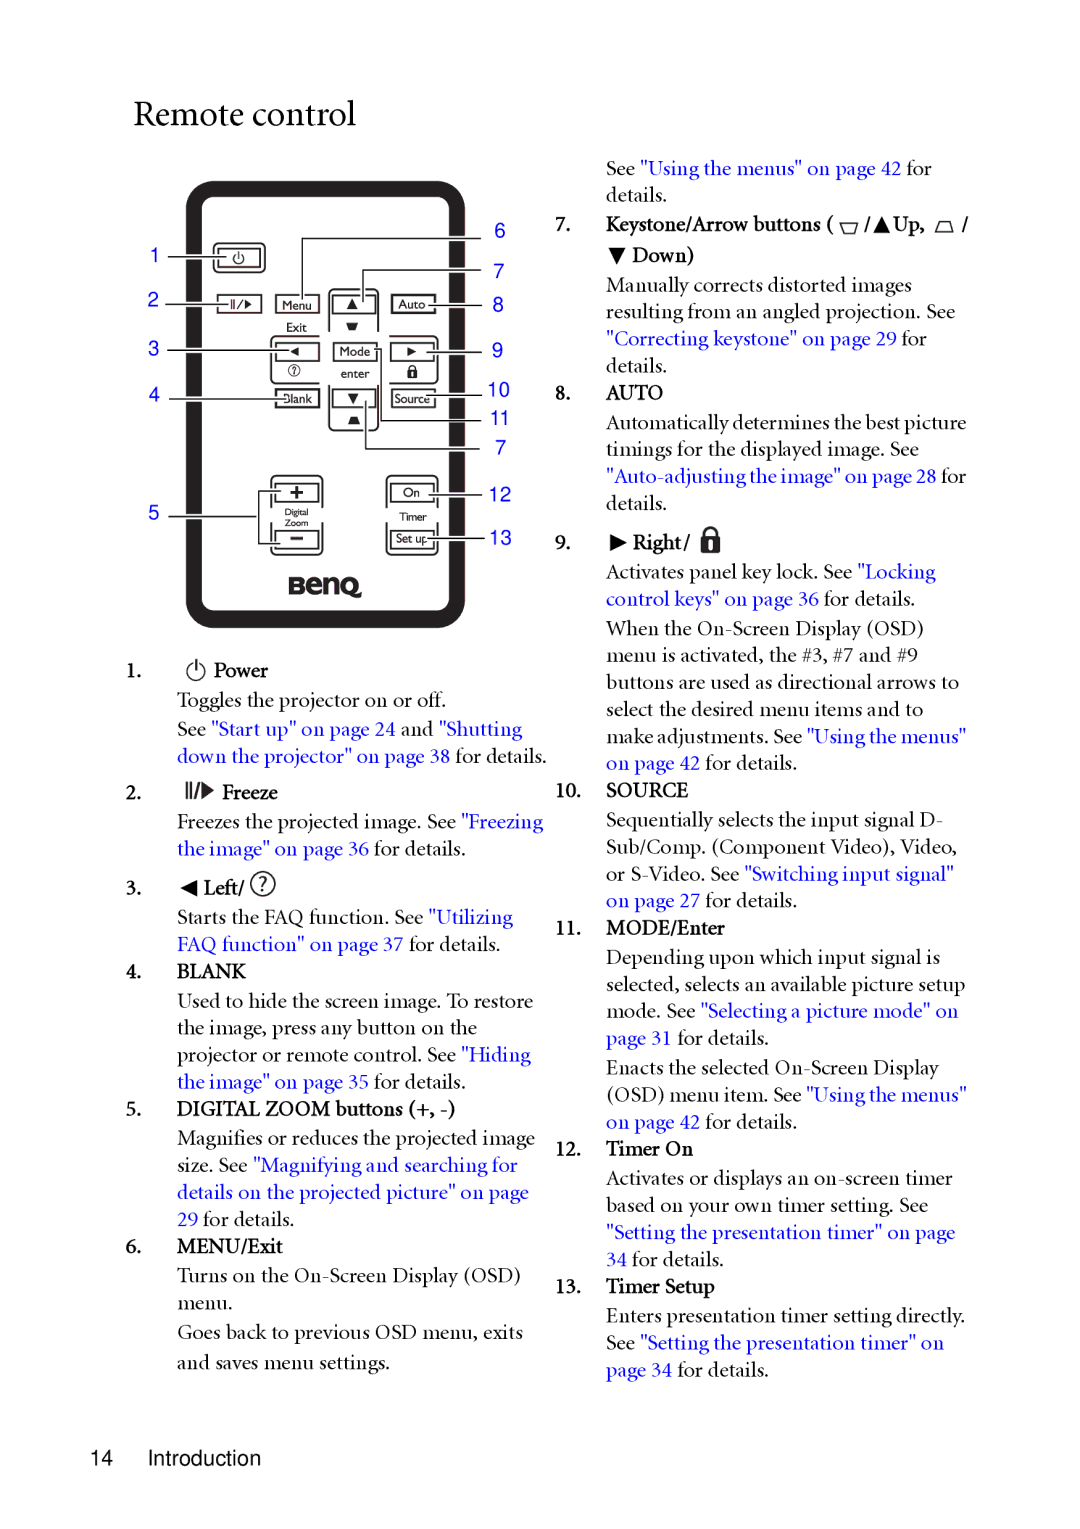
| Power |
| menu is activated, the #3, #7 and #9 | ||||||||||||||||||||||
|
|
|
| |||||||||||||||||||||||||
|
|
|
| buttons are used as directional arrows to | ||||||||||||||||||||||||
|
| Toggles the projector on or off. |
| |||||||||||||||||||||||||
|
|
| select the desired menu items and to | |||||||||||||||||||||||||
|
| See "Start up" on page 24 and "Shutting |
| |||||||||||||||||||||||||
|
|
| make adjustments. See "Using the menus" | |||||||||||||||||||||||||
|
| down the projector" on page 38 for details. |
| |||||||||||||||||||||||||
|
|
| on page 42 for details. | |||||||||||||||||||||||||
|
|
|
|
|
|
|
|
|
|
|
|
|
|
|
|
|
|
|
|
|
|
|
|
|
|
|
| |
2. |
|
|
|
| Freeze | 10. | SOURCE | |||||||||||||||||||||
|
|
|
| |||||||||||||||||||||||||
|
|
|
| |||||||||||||||||||||||||
|
| Freezes the projected image. See "Freezing |
| Sequentially selects the input signal D- | ||||||||||||||||||||||||
|
| the image" on page 36 for details. |
| Sub/Comp. (Component Video), Video, | ||||||||||||||||||||||||
3. |
|
|
| Left/ |
| or | ||||||||||||||||||||||
|
|
|
| on page 27 for details. | ||||||||||||||||||||||||
|
| Starts the FAQ function. See "Utilizing |
| |||||||||||||||||||||||||
|
| 11. | MODE/Enter | |||||||||||||||||||||||||
|
| FAQ function" on page 37 for details. | ||||||||||||||||||||||||||
|
|
| Depending upon which input signal is | |||||||||||||||||||||||||
4. |
| BLANK |
| |||||||||||||||||||||||||
|
| selected, selects an available picture setup | ||||||||||||||||||||||||||
|
| Used to hide the screen image. To restore |
| |||||||||||||||||||||||||
|
|
| mode. See "Selecting a picture mode" on | |||||||||||||||||||||||||
|
| the image, press any button on the |
| |||||||||||||||||||||||||
|
|
| page 31 for details. | |||||||||||||||||||||||||
|
| projector or remote control. See "Hiding |
| |||||||||||||||||||||||||
|
|
| Enacts the selected | |||||||||||||||||||||||||
|
| the image" on page 35 for details. |
| |||||||||||||||||||||||||
|
|
| (OSD) menu item. See "Using the menus" | |||||||||||||||||||||||||
5. |
| DIGITAL ZOOM buttons (+, |
| |||||||||||||||||||||||||
|
| on page 42 for details. | ||||||||||||||||||||||||||
|
| Magnifies or reduces the projected image |
| |||||||||||||||||||||||||
|
| 12. | Timer On | |||||||||||||||||||||||||
|
| size. See "Magnifying and searching for |
| Activates or displays an | ||||||||||||||||||||||||
|
| details on the projected picture" on page |
| |||||||||||||||||||||||||
|
|
| based on your own timer setting. See | |||||||||||||||||||||||||
|
| 29 for details. |
| |||||||||||||||||||||||||
|
|
| "Setting the presentation timer" on page | |||||||||||||||||||||||||
6. |
| MENU/Exit |
| |||||||||||||||||||||||||
|
| 34 for details. | ||||||||||||||||||||||||||
|
| Turns on the |
| |||||||||||||||||||||||||
|
| 13. | Timer Setup | |||||||||||||||||||||||||
|
| menu. | ||||||||||||||||||||||||||
|
|
| Enters presentation timer setting directly. | |||||||||||||||||||||||||
|
|
|
|
|
|
|
|
|
|
|
|
|
|
|
|
|
|
|
|
|
|
|
|
|
|
|
| |
Goes back to previous OSD menu, exits | See "Setting the presentation timer" on | |
and saves menu settings. | ||
page 34 for details. | ||
|