•You can change the temperature from ˚F to ˚C by pressing the Timer (▲) and (▼) button at the same time.
•Once the selected temperature has been reached both the time and temperature can be changed at anytime during the cooking.
•When using convection it is not necessary to change the temperature from that suggested by the package or the recipe. However, the baking time may be shorter; check foods frequently during baking to check for doneness.
•When using the rotisserie it is suggested that foods be placed into a cold oven.
•The oven is preset for temperature and time for medium toast (4 setting). Use this for your first cycle then adjust lighter or darker to suite your taste.
•What is convection? Convection uses an internal fan that provides continuous circulation of hot air around the cooking food; the food is more evenly cooked and in some cases, is cooked faster.
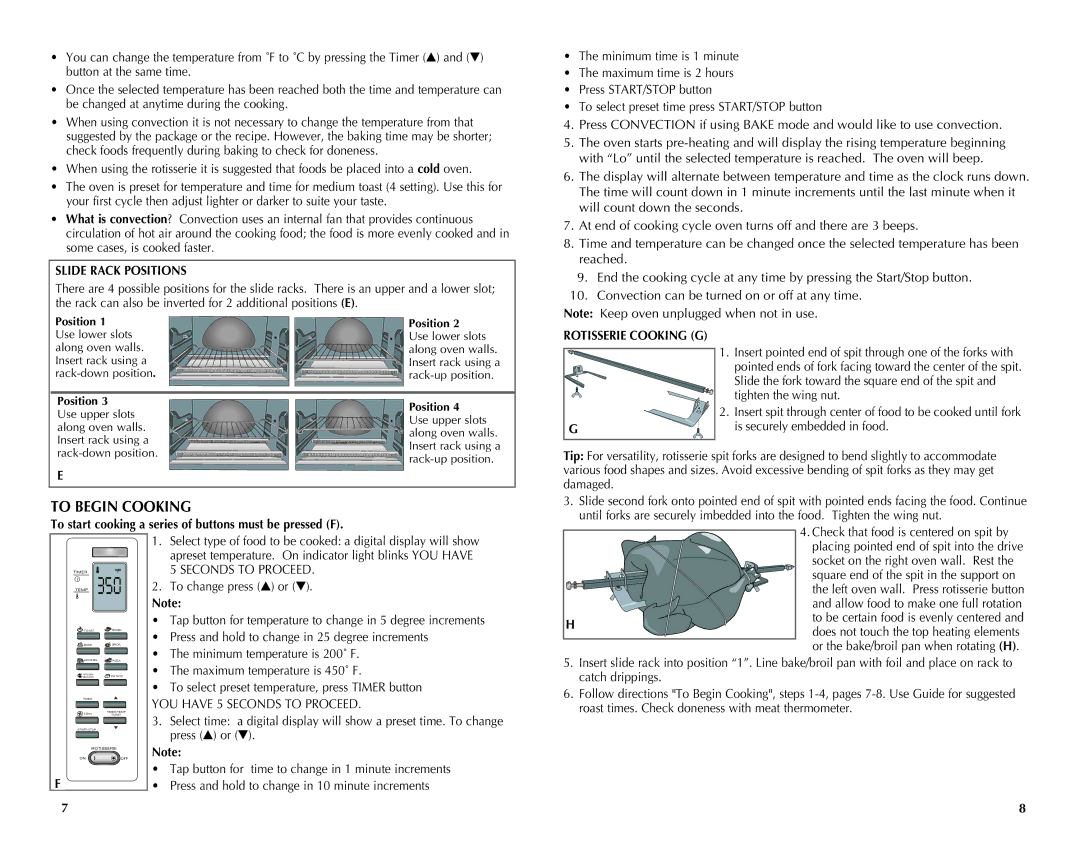
SLIDE RACK POSITIONS
There are 4 possible positions for the slide racks. There is an upper and a lower slot; the rack can also be inverted for 2 additional positions (E).
•The minimum time is 1 minute
•The maximum time is 2 hours
•Press START/STOP button
•To select preset time press START/STOP button
4.Press CONVECTION if using BAKE mode and would like to use convection.
5.The oven starts
6.The display will alternate between temperature and time as the clock runs down. The time will count down in 1 minute increments until the last minute when it will count down the seconds.
7.At end of cooking cycle oven turns off and there are 3 beeps.
8.Time and temperature can be changed once the selected temperature has been reached.
9.End the cooking cycle at any time by pressing the Start/Stop button.
10.Convection can be turned on or off at any time.
Note: Keep oven unplugged when not in use.
Position 1
Use lower slots along oven walls. Insert rack using a
Position 3
Use upper slots along oven walls. Insert rack using a
E
Position 2
Use lower slots along oven walls. Insert rack using a
Position 4
![]() Use upper slots
Use upper slots
along oven walls.
![]() Insert rack using a
Insert rack using a ![]()
ROTISSERIE COOKING (G)
1. | Insert pointed end of spit through one of the forks with |
| pointed ends of fork facing toward the center of the spit. |
| Slide the fork toward the square end of the spit and |
| tighten the wing nut. |
2. | Insert spit through center of food to be cooked until fork |
G | is securely embedded in food. |
Tip: For versatility, rotisserie spit forks are designed to bend slightly to accommodate various food shapes and sizes. Avoid excessive bending of spit forks as they may get damaged.
TO BEGIN COOKING
To start cooking a series of buttons must be pressed (F).
3.Slide second fork onto pointed end of spit with pointed ends facing the food. Continue until forks are securely imbedded into the food. Tighten the wing nut.
4. Check that food is centered on spit by |
TIMER
TEMP 350
![]() TOAST
TOAST ![]() BAGEL
BAGEL
![]() BAKE
BAKE ![]() BROIL
BROIL
![]() COOKIES
COOKIES ![]() PIZZA
PIZZA
FROZEN | POTATO |
SNACKS | |
TIMER |
|
CONV | TIMER/TEMP |
TOAST | |
START/STOP |
|
ROTISSERIE
ONOFF
F
7
1.Select type of food to be cooked: a digital display will show apreset temperature. On indicator light blinks YOU HAVE 5 SECONDS TO PROCEED.
2.To change press (▲) or (▼).
Note:
•Tap button for temperature to change in 5 degree increments
•Press and hold to change in 25 degree increments
•The minimum temperature is 200˚ F.
•The maximum temperature is 450˚ F.
•To select preset temperature, press TIMER button
YOU HAVE 5 SECONDS TO PROCEED.
3.Select time: a digital display will show a preset time. To change press (▲) or (▼).
Note:
•Tap button for time to change in 1 minute increments
•Press and hold to change in 10 minute increments
| placing pointed end of spit into the drive | |
| socket on the right oven wall. Rest the | |
| square end of the spit in the support on | |
| the left oven wall. Press rotisserie button | |
| and allow food to make one full rotation | |
H | to be certain food is evenly centered and | |
does not touch the top heating elements | ||
| ||
| or the bake/broil pan when rotating (H). |
5.Insert slide rack into position “1”. Line bake/broil pan with foil and place on rack to catch drippings.
6.Follow directions "To Begin Cooking", steps
8