STEP6

INSTALLTHE DOWNDRAFTUNIT

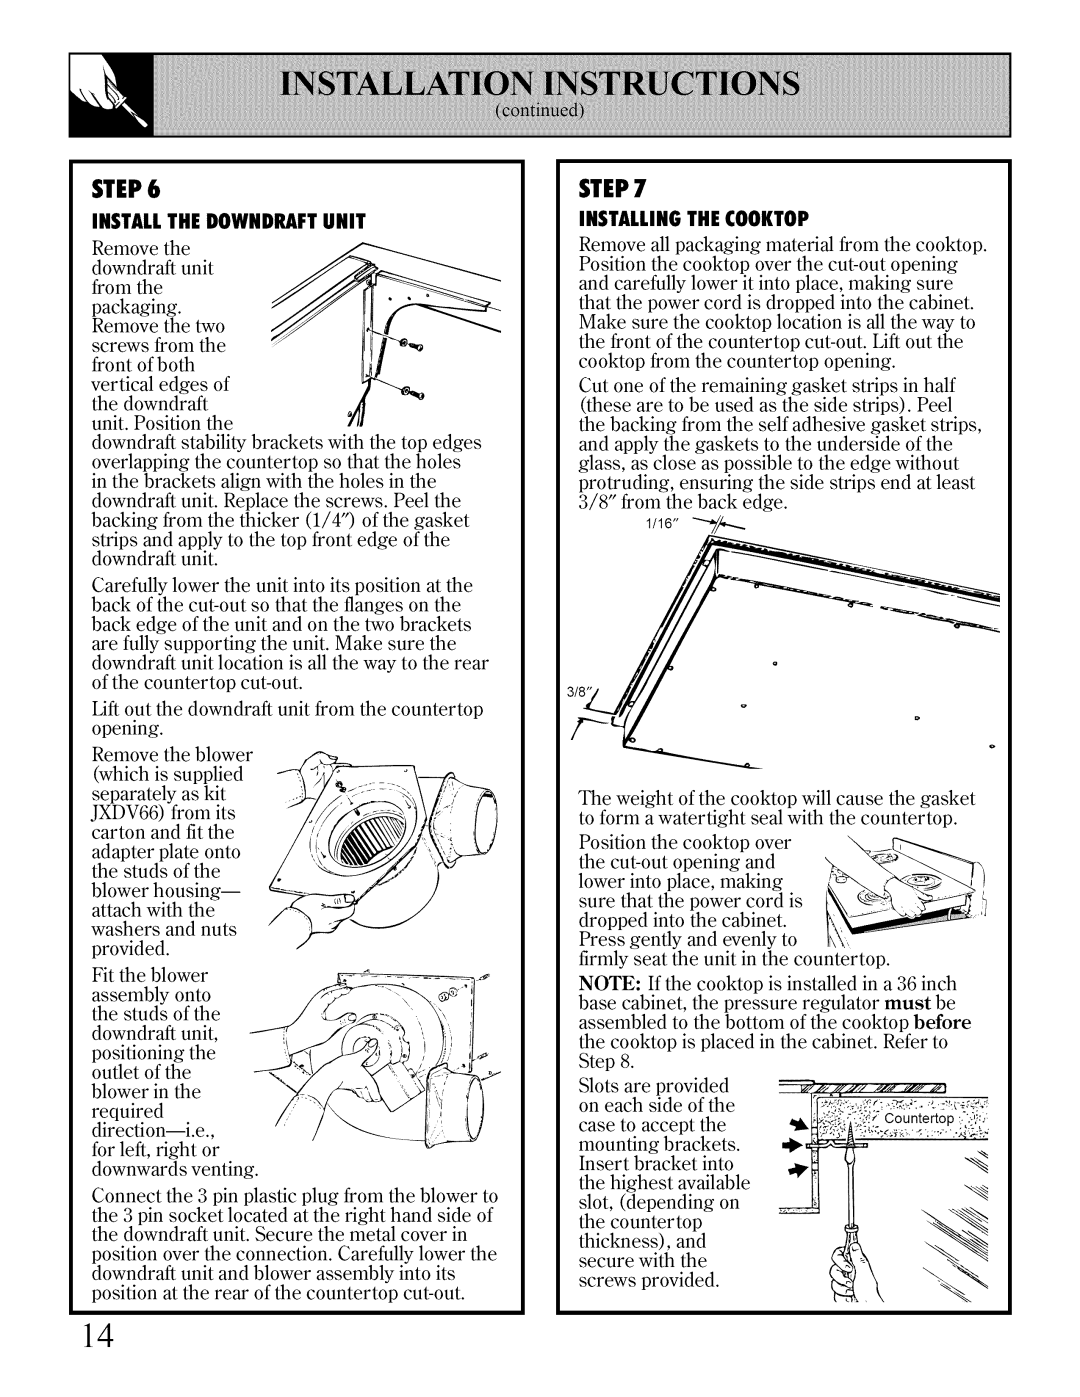
Remove the

downdraft unit from the

packaging. Remove the two

screws from the front of both

vertical edges of the downdraft

unit. Position the

downdraft stability brackets with the top edges overlapping the countertop so that the holes in the brackets align with the holes in the

downdraft unit. Replace the screws. Peel the backing from the thicker (1/4") of the gasket

strips and apply to the top front edge of the downdraft unit.

Carefully lower the unit into its position at the back of the cut-outso that the flanges on the back edge of the unit and on the two brackets

are fully supporting the unit. Make sure the downdrafl unit location is all the way to the rear

of the countertop cut-out.

Lift out the downdrafl unit from the countertop opening.

Remove the blower (which is supplied

separately as kit JXDV66) from its carton and fit the

adapter plate onto the studs of the

blower housing-- attach with the

washers and nuts provided.

Fit the blower

assembly onto the studs of the

downdraft unit,

positioning the

outlet of the

blower in the

required direction--i.e.,

for left, right or

downwards venting.

Connect the 3 pin plastic plug from the blower to

the 3 pin socket located at the right hand side of the downdraft unit. Secure the metal cover in

position over the connection. Carefully lower the downdraft unit and blower assembly into its position at the rear of the countertop cut-out.

STEP7

INSTALLINGTHE COOKTOP

Remove all packaging material from the cooktop. Position the cooktop over the cut-out opening and carefully lower it into place, making sure that the power cord is dropped into the cabinet. Make sure the cooktop location is all the way to

the front of the countertop cut-out. Lift out the

cooktop from the countertop opening.

Cut one of the remaining gasket strips in half (these are to be used as the side strips). Peel the backing from the self adhesive gasket strips,

and apply the gaskets to the underside of the

glass, as close as possible to the edge without

protruding, ensuring the side strips end at least 3/8" from the back edge.

1/16--'-f/,-..

The weight of the cooktop will cause the gasket

to form a watertight seal with the countertop.

Position the cooktop over the cut-out opening and lower into place, making sure that the power cord is dropped into the cabinet. Press gently and evenly to

firmly seat the unit in the countertop.

NOTE: If the cooktop is installed in a 36 inch

base cabinet, the pressure regulator must be

assembled to the bottom of the cooktop before the cooktop is placed in the cabinet. Refer to

Step


8.


Slots

are provided

--_

on each side of the


case


to

accept

the


mounting

brackets.


Insert


bracket

into

,4"

the

highest

available


slot,


(depending

on


the

countertop


thickness),

and


secure


with the


screws

provided.


14

Page 14
Image 14
Bosch Appliances JGP641 Installthe Downdraftunit, Vertical edges of the downdraft Unit. Position, Installingthe Cooktop

JGP640, JGP641 specifications

Bosch Appliances has long been synonymous with quality and innovation, particularly in the kitchen appliance sector. Among its impressive lineup, the Bosch JGP641 and JGP640 gas cooktops stand out as exemplary choices for culinary enthusiasts seeking performance, style, and advanced technology in their kitchens.

The Bosch JGP641 and JGP640 gas cooktops are designed with functionality in mind, offering a blend of powerful burners and a sleek, contemporary aesthetic. Both models feature a durable stainless steel surface, which not only enhances the overall look of the kitchen but also promotes easy cleaning and maintenance. The low-profile design of these cooktops ensures they fit seamlessly into any countertop, providing a modern touch while optimizing kitchen space.

One of the key features of both the JGP641 and JGP640 is their array of powerful burners. These cooktops are equipped with various burner sizes, ranging from high-output burners that deliver maximum heat for quick boiling to simmer burners designed to gently cook delicate sauces. The JGP641, in particular, features a Dual-Stacked Power Burner, capable of providing intensive heat while also allowing for precision cooking at lower temperatures.

Both models incorporate Bosch's innovative Infinite Continuous Grates, which provide a stable cooking surface that makes it easy to slide pans around effortlessly. This thoughtful design not only enhances cooking efficiency but also improves safety by preventing spills during the cooking process.

The FlameSelect feature is another impressive technology found in these cooktops. This allows users to achieve precise cooking results by utilizing a unique control knob system designed to select from precise flame settings. This feature aligns with Bosch’s commitment to creating user-friendly appliances that cater to the needs of home cooks.

For added peace of mind, both models have been designed with safety in mind. Equipped with flame failure safety devices, they automatically turn off the gas supply if the flame goes out. This crucial feature helps prevent accidents, making the cooking experience safer for all users.

Together, the Bosch JGP641 and JGP640 gas cooktops epitomize Bosch’s dedication to quality, performance, and innovation in kitchen appliances. Their powerful burners, thoughtful design, and advanced safety features make them a compelling choice for both casual cooks and culinary aficionados alike. Whether upgrading an existing kitchen or installing a new one, these cooktops promise a blend of style and functionality that can elevate any cooking experience.