8. | Attach |
| the | 2 power cord | outer |
|
|
|
|
|
|
|
|
|
|
|
|
|
| Exhaust | air |
| connection |
| |||||||||||||||||||||
|
| conductors (red and black) to the 2 |
|
|
|
|
|
|
|
|
|
|
|
|
|
|
|
|
|
|
|
|
|
|
|
|
|
|
|
| |||||||||||||||
|
| terminals labeled L and the |
|
|
|
|
|
|
|
|
|
|
|
|
|
|
| d WARNING | d |
| |||||||||||||||||||||||||
|
| remaining | power | cord | conductor |
|
|
|
|
|
|
|
|
|
|
|
|
|
|
| |||||||||||||||||||||||||
|
| (white) | to | the | terminal | labeled | N. |
|
|
|
|
|
|
|
|
|
|
|
|
|
|
| |||||||||||||||||||||||
|
|
|
|
|
|
|
|
|
|
|
|
|
|
|
|
|
|
|
|
|
|
|
|
|
|
|
|
|
|
|
|
| |||||||||||||
9. | Tighten | all | 3 screws | (3 Nm) so that |
|
|
|
|
|
|
|
|
|
|
| 1. | To | reduce | the | risk | of | fire, | this | drye | |||||||||||||||||||||
|
| the | power | conductors | are | held |
|
|
|
|
|
|
|
|
|
|
|
|
|
| |||||||||||||||||||||||||
|
|
|
|
|
|
|
|
|
|
|
|
|
|
|
|
| MUST | BE | EXHAUSTED |
|
|
|
| ||||||||||||||||||||||
|
| securely | in | place . |
|
|
|
|
|
|
|
|
|
|
|
|
|
|
|
|
|
|
|
|
|
|
| ||||||||||||||||||
|
|
|
|
|
|
|
|
|
|
|
|
|
|
|
|
|
|
|
|
| OUTDOORS. |
|
|
|
|
|
|
|
|
|
| ||||||||||||||
|
|
|
|
|
|
|
|
|
|
|
|
|
|
|
|
|
|
|
|
|
|
|
|
|
|
|
|
|
|
|
|
|
|
|
|
|
|
| |||||||
|
|
|
|
|
|
|
|
|
|
|
|
|
|
|
|
|
|
|
|
|
|
|
|
|
|
|
| 2. | To | reduce | the | risk | of | fire, | do | not | |||||||||
|
|
|
|
|
|
|
|
|
|
|
|
|
|
|
|
|
|
|
|
|
|
|
|
|
|
|
|
| use | the |
|
| ductwork | longer | than |
| |||||||||
|
|
|
|
|
|
|
|
|
|
|
|
|
|
|
|
|
|
|
|
|
|
|
|
|
|
|
|
| recommended. |
|
|
|
|
|
|
|
|
| |||||||
|
|
|
|
|
|
|
|
|
|
|
|
|
|
|
|
|
|
|
|
|
|
|
|
|
|
|
| 3. | DO NOT use a plastic or |
|
|
| |||||||||||||
|
|
|
|
|
|
|
|
|
|
|
|
|
|
| 9. Check |
| the | U.L. | strain | relief clamp |
| nonometal |
| duct | with | this | dryer. |
| |||||||||||||||||
|
|
|
|
|
|
|
|
|
|
|
|
|
|
|
| 4. | DO NOT use a duct smaller than | ||||||||||||||||||||||||||||
|
|
|
|
|
|
|
|
|
|
|
|
|
|
|
|
| to make sure that it is tight and | ||||||||||||||||||||||||||||
|
|
|
|
|
|
|
|
|
|
|
|
|
|
|
|
|
| inches | in |
| diameter. |
|
|
|
|
|
| ||||||||||||||||||
|
|
|
|
|
|
|
|
|
|
|
|
|
|
|
|
| cannot |
| be turned. |
|
|
|
| 5. | DO | NOT |
| use | exhaust | hoods with | |||||||||||||||
|
|
|
|
|
|
|
|
|
|
|
|
|
|
| 10. Replace | the | cover | on | the terminal |
| |||||||||||||||||||||||||
|
|
|
|
|
|
|
|
|
|
|
|
|
|
|
| magnetic | latches. |
|
|
|
|
|
|
| |||||||||||||||||||||
|
|
|
|
|
|
|
|
|
|
|
|
|
|
|
|
| block and | fasten | in | place. |
|
|
|
|
|
|
|
|
| ||||||||||||||||
|
|
|
|
|
|
|
|
|
|
|
|
|
|
|
|
|
| 6. | DO | NOT |
| exhaust the dryer into a | |||||||||||||||||||||||
|
|
|
|
|
|
|
|
|
|
|
|
|
|
|
|
|
|
|
|
|
|
|
|
|
|
|
|
| |||||||||||||||||
|
|
|
|
|
|
|
|
|
|
|
|
|
|
| i |
|
|
|
|
|
|
|
|
|
|
|
|
| |||||||||||||||||
10. | Check |
| the | U.L. | strain | relief clamp |
| Make | sure | that | the | U.L. strain relief | chimney, |
| furnace cold | air | duct, |
| |||||||||||||||||||||||||||
|
|
| clamp | is | outside | the | cover! |
|
| attic, crawl space, or any other |
| ||||||||||||||||||||||||||||||||||
|
| to | make | sure | that | it | is tight | and |
|
|
|
|
| ||||||||||||||||||||||||||||||||
|
| Additional |
| grounding | procedure |
| ductwork | used | for | venting. |
|
|
| ||||||||||||||||||||||||||||||||
|
| cannot |
| be | turned. |
|
|
|
|
|
| 7. | DO | NOT |
| install | a | flexible | duct | in a | |||||||||||||||||||||||||
|
|
|
|
|
|
|
|
|
|
|
|
|
|
|
|
|
|
|
|
|
| ||||||||||||||||||||||||
11. | Replace | the cover | on | the | terminal |
|
|
|
|
|
|
|
|
|
|
|
|
|
| ||||||||||||||||||||||||||
- |
| Some | local | regulations | may |
|
| enclosed |
| wall, | ceiling | or | floor. |
| |||||||||||||||||||||||||||||||
|
| block | and | fasten | in place. |
|
|
|
|
|
|
| |||||||||||||||||||||||||||||||||
|
|
|
|
|
| 8. | DO | NOT |
| crush or kink the duct. | |||||||||||||||||||||||||||||||||||
|
|
|
|
|
|
|
|
|
|
|
|
|
|
|
|
| require |
| a | separate | ground. In such |
| |||||||||||||||||||||||
i |
| Make | sure | that the U.L. strain relief |
|
| |||||||||||||||||||||||||||||||||||||||
| cases, |
| the | required | accessory |
| 9. | Do | clean |
| and | inspect | the | exhaust | |||||||||||||||||||||||||||||||
|
| clamp is outside the cover! |
|
|
|
| ground |
| wire, clamp | and screw |
| system on a regular basis; at least | |||||||||||||||||||||||||||||||||
The appliance is now ready to be |
|
|
| must be | purchased | separately. |
|
| once | a | year. |
|
|
|
|
|
|
|
|
| |||||||||||||||||||||||||
plugged into the 4owire receptacle | of |
| - |
| Never | ground the | dryer to plastic | 10. | The | exhaust | duct | must terminate | |||||||||||||||||||||||||||||||||
the | power |
| rating. |
|
|
|
|
|
|
|
|
| plumbing lines, gas lines or water |
| in a | manner |
| to | prevent | back drafts | |||||||||||||||||||||||||
Connecting | 3Wwire | power | supply |
|
|
|
|
| |||||||||||||||||||||||||||||||||||||
|
|
| pipes. |
|
|
|
|
|
|
|
|
|
| or | entry |
| of | birds | or | other | wildlife. | ||||||||||||||||||||||||
cord |
|
|
|
|
|
|
|
|
|
|
|
| Grounding | instruction |
|
|
|
|
|
|
|
|
|
|
|
|
|
|
|
|
|
|
|
| |||||||||||
|
|
|
|
|
|
|
|
|
|
|
|
|
|
| The | Siemens | dryers | are | intended to | be | |||||||||||||||||||||||||
1. | Remove | the screws | from | the | coverThis | appliance | must | be | grounded. | In | |||||||||||||||||||||||||||||||||||
vented outdoors. | To | prevent | buildoup | ||||||||||||||||||||||||||||||||||||||||||
|
| of | the |
| terminal | block | located | at | the | event | of | a | malfunction or |
| |||||||||||||||||||||||||||||||
|
| top | rear | of | the | appliance. |
|
|
| the |
| of moisture and accumulation of lint |
| ||||||||||||||||||||||||||||||||
2. |
|
|
| breakdown, |
| grounding | will | reduce | the | indoors, as well as to maintain |
|
|
| ||||||||||||||||||||||||||||||||
Make | sure | that | there | is |
|
|
| risk | of | electric shock | by |
| providing | a | maximum | drying | efficiency, | it | is |
|
|
| |||||||||||||||||||||||
|
| a grounding | strap. |
|
|
|
|
| path | of | least | resistance | for the electricrecommended |
| that | the | dryer | is | vented | ||||||||||||||||||||||||||
3. | Fix | the | strain | relief | clamp | to | the |
| current. |
|
|
|
|
|
|
|
|
|
| outdoors. |
|
|
|
|
|
|
|
|
|
|
|
|
|
| |||||||||||
|
| angle | bracket. | Tighten | the | nut. |
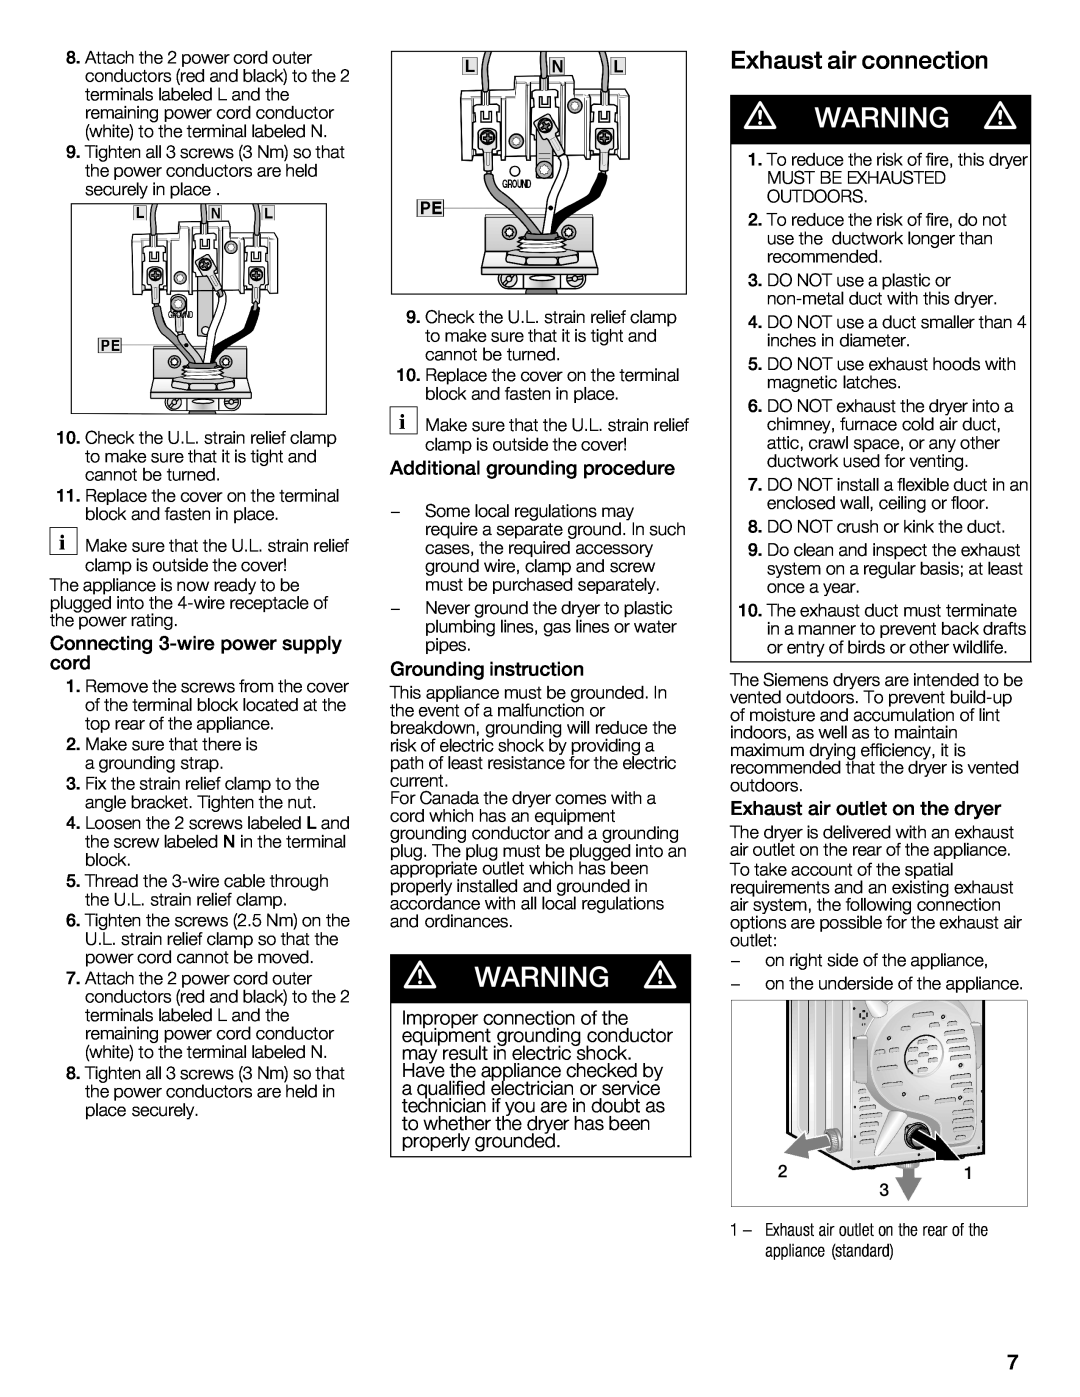
| For | Canada | the | dryer | comes with | a | Exhaust | air |
| outlet | on | the | dryer | |||||||||||||||||||||||||
4. | Loosen | the | 2 | screws | labeledL and |
| cord | which | has | an | equipment |
| The | dryer | is | delivered | with an | exhaust | |||||||||||||||||||||||||||
| grounding conductor and a grounding | ||||||||||||||||||||||||||||||||||||||||||||
|
| the | screw | labeledN in | the | terminal |
| ||||||||||||||||||||||||||||||||||||||
|
|
| plug. The | plug | must |
| be | plugged | into | airn outlet | on | the |
| rear | of | the | appliance. | ||||||||||||||||||||||||||||
|
| block. |
|
|
|
|
|
|
|
|
|
|
| appropriate |
| outlet which | has been |
| To | take | account | of | the | spatial |
|
|
| ||||||||||||||||||
5. | Thread |
| the | 3owire cable through |
|
|
|
|
|
| |||||||||||||||||||||||||||||||||||
|
| properly installed and grounded in |
| requirements | and |
| an existing | exhaust | |||||||||||||||||||||||||||||||||||||
|
| the | U.L. | strain | relief clamp. |
|
|
|
| ||||||||||||||||||||||||||||||||||||
6. |
|
| accordance |
| with | all | local | regulations | air system, the following connection |
| |||||||||||||||||||||||||||||||||||
Tighten | the | screws (2.5 Nm) on theand ordinances. |
|
|
|
|
|
| options are possible for the exhaust air | ||||||||||||||||||||||||||||||||||||
|
| U.L. strain relief clamp so that the |
|
|
|
|
|
|
|
|
|
|
| outlet: |
|
|
|
|
|
|
|
|
|
|
|
|
|
|
| ||||||||||||||||
|
| power | cord cannot | be moved. |
| d WARNING | d |
| - | on | right |
| side | of the | appliance, |
| |||||||||||||||||||||||||||||
|
|
|
|
|
|
|
|
|
|
|
|
|
|
|
| - | on | the | underside | of | the | appliance. | |||||||||||||||||||||||
|
| Improper | connection | of | the | ||
|
| equipment | grounding | conductor | |||
|
| may | result | in electric shock. | |||
8. Tighten all 3 screws (3 Nm) so | that | Have | the | appliance | checked by | ||
the power conductors are held | in | a qualified | electrician | or | service | ||
place securely. |
| technician | if you are in | doubt as | |||
|
| to whether the dryer has been | |||||
|
| properly | grounded. |
|
| ||
2
1
3
1 Y Exhaust air outlet on the rear of the appliance (standard)
7