| Error |
|
| Status |
|
| Possible Cause |
|
| Remedy |
|
| Code |
|
| Message |
|
|
|
|
| ||
|
|
|
|
|
|
|
|
|
| ||
|
|
|
|
|
|
| scanner was ready. |
|
|
| |
Troubleshooting Operations
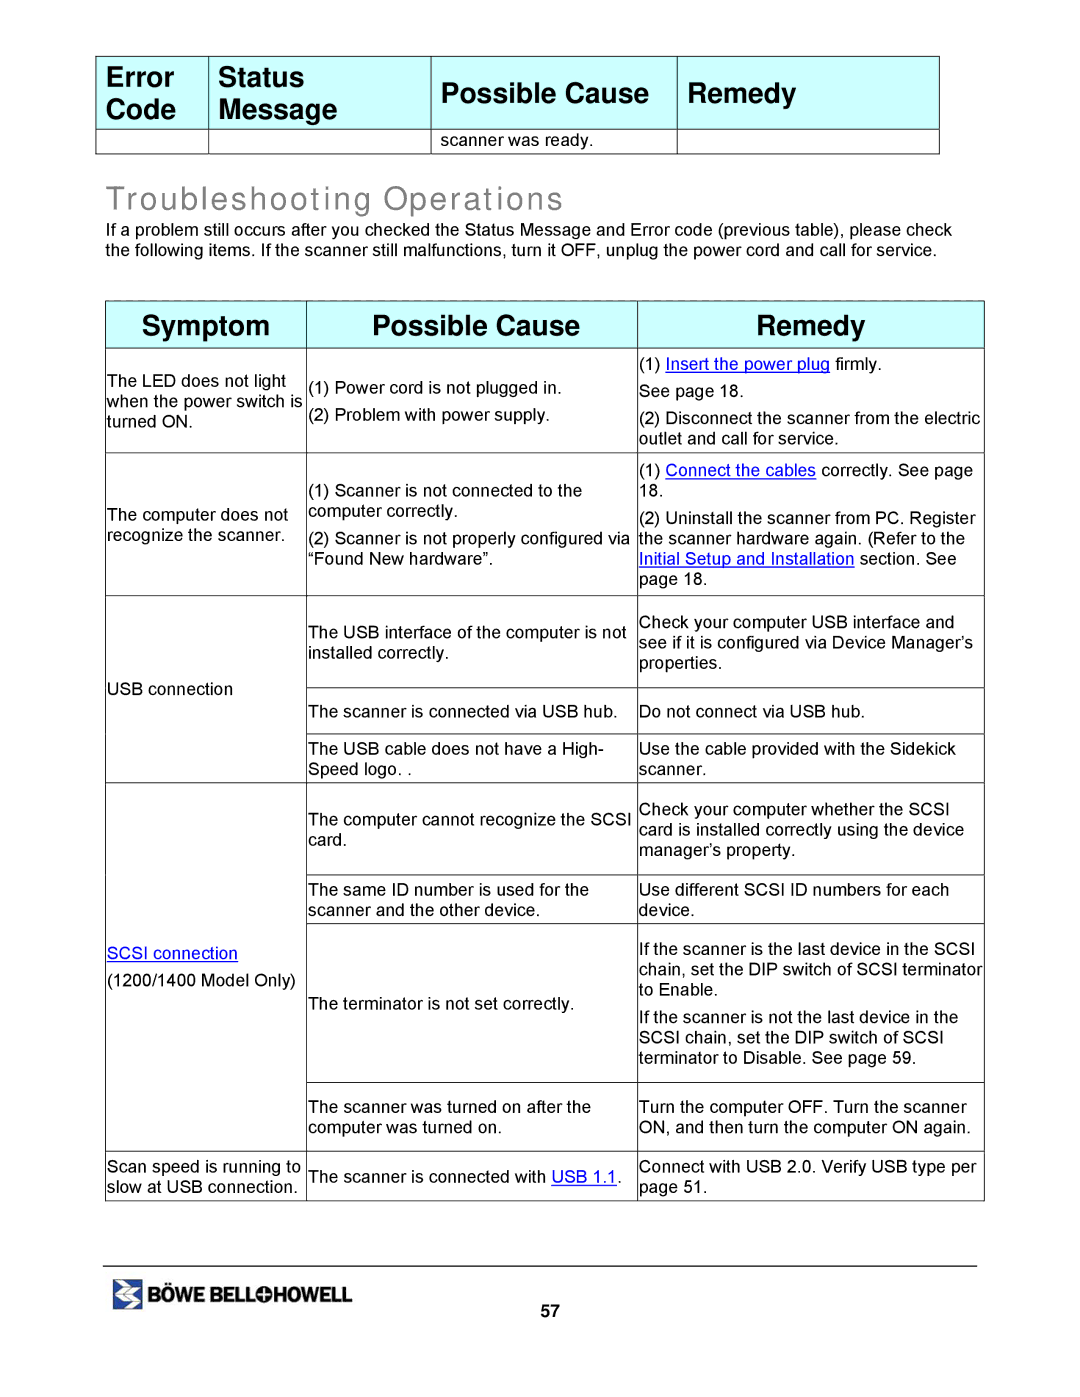
If a problem still occurs after you checked the Status Message and Error code (previous table), please check the following items. If the scanner still malfunctions, turn it OFF, unplug the power cord and call for service.
Symptom | Possible Cause | Remedy | |
The LED does not light |
| (1) Insert the power plug firmly. | |
(1) Power cord is not plugged in. | See page 18. | ||
when the power switch is | |||
(2) Problem with power supply. | (2) Disconnect the scanner from the electric | ||
turned ON. | |||
|
| outlet and call for service. | |
|
| (1) Connect the cables correctly. See page | |
| (1) Scanner is not connected to the | 18. | |
The computer does not | computer correctly. | (2) Uninstall the scanner from PC. Register | |
recognize the scanner. | (2) Scanner is not properly configured via | the scanner hardware again. (Refer to the | |
| “Found New hardware”. | Initial Setup and Installation section. See | |
|
| page 18. | |
|
|
| |
| The USB interface of the computer is not | Check your computer USB interface and | |
| see if it is configured via Device Manager’s | ||
| installed correctly. | properties. | |
|
| ||
USB connection |
|
| |
The scanner is connected via USB hub. | Do not connect via USB hub. | ||
| |||
|
|
| |
| The USB cable does not have a High- | Use the cable provided with the Sidekick | |
| Speed logo. . | scanner. | |
| The computer cannot recognize the SCSI | Check your computer whether the SCSI | |
| card. | card is installed correctly using the device | |
| manager’s property. | ||
|
| ||
|
|
| |
| The same ID number is used for the | Use different SCSI ID numbers for each | |
| scanner and the other device. | device. | |
SCSI connection |
| If the scanner is the last device in the SCSI | |
(1200/1400 Model Only) |
| chain, set the DIP switch of SCSI terminator | |
The terminator is not set correctly. | to Enable. | ||
| |||
| If the scanner is not the last device in the | ||
|
| ||
|
| SCSI chain, set the DIP switch of SCSI | |
|
| terminator to Disable. See page 59. | |
|
|
| |
| The scanner was turned on after the | Turn the computer OFF. Turn the scanner | |
| computer was turned on. | ON, and then turn the computer ON again. | |
|
|
| |
Scan speed is running to | The scanner is connected with USB 1.1. | Connect with USB 2.0. Verify USB type per | |
slow at USB connection. | page 51. |
57
