040248
Revision Serial Number Engine Model Number Date Purchased
Where to Find Us
Table of Contents
Safety Rules
Hazard Symbols and Meanings
Fire Hot Surface
Generator produces hazardous voltage
When adjusting or making repairs to your generator
When testing for engine spark
Equipment Description
Connections to a Building’s Electrical System
Ground Fault Protection
Customer’s Responsibilities
Gaseous Fuel System
Shipment Contents
Assembly/Installation
Lifting the Generator
Generator Location
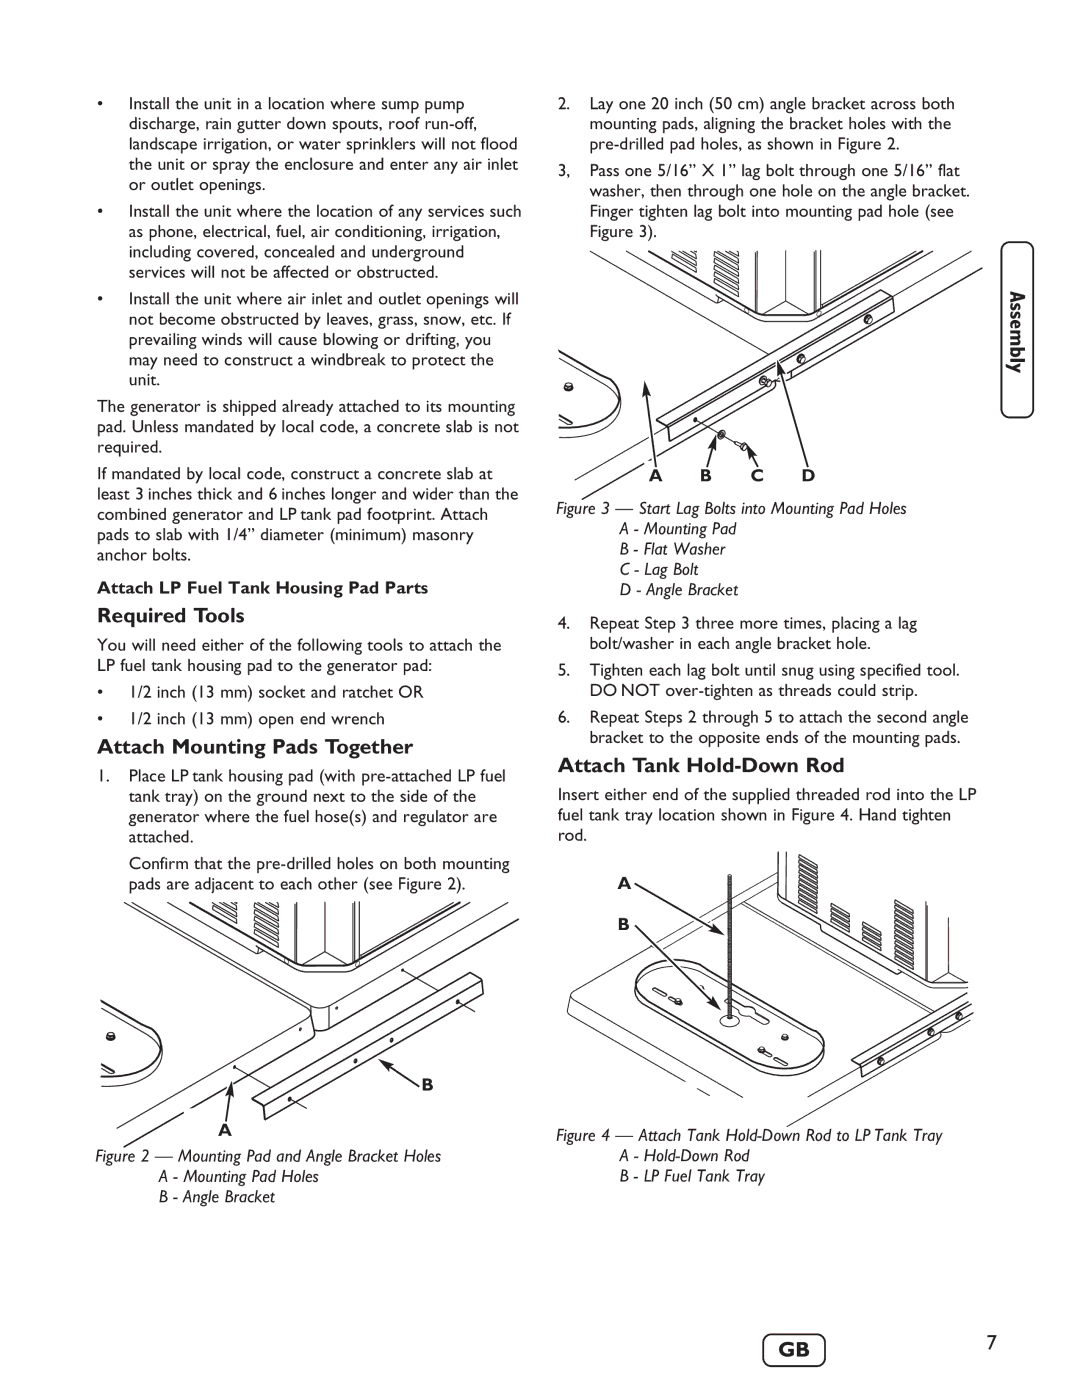
Required Tools
Attach LP Fuel Tank Housing Pad Parts
Attach Mounting Pads Together
Attach Tank Hold-Down Rod
To Install LP Fuel Tanks
CD G
Leak Testing Fuel System
Battery Connection
Removable Roof and Access Door
To Remove LP Fuel Tanks
Verify Engine Oil Level
AB C
Generator Controls and Features
Generator from current overload at receptacle
Control Panel Controls and Features
Equipment Ground
Receptacles
120/240 Volt AC, 30 Amp, Locking Receptacle
Volt AC, 20 Amp, Duplex Receptacles
Operating Your Generator
Connecting Electrical Loads
Starting the Engine
Stopping the Engine
During Generator Use
Test Gfci Circuit Breaker
Don’t Overload Generator
Power Management
Capacity
Example
Maintenance
Maintenance Schedule
Clean Debris
General Recommendations
Oil Recommendations
Oil
Checking and Adding Oil
Changing Engine Oil and Filter
To service the air cleaner elements, follow these steps
Service Air Cleaner Elements
Changing Oil Filter
Fill engine with oil
Charge Battery
Service Spark Plug
Check Valve Clearance
Engine Air Cooling System
Storage
Service Battery
Problem Cause Correction
Troubleshooting
Replacement Parts
Product Specifications
Maintenance Items
Engine
Owner’s Warranty Responsibilities
Warranted Parts
Length of Coverage
Maintenance Consequential Coverage
No Charge
Claims and Coverage Exclusions
Warranty Period
This page reserved
Dónde encontrarnos
Montaje/instalación
Utilización del generador
Plan de mantenimiento
Normas de seguridad
Símbolos de peligro y sus significados
Descarga eléctrica
El generador produce voltaje peligroso
Descripción del equipo
Cuando ajuste o repare su generador
Cuando pruebe la bujía del motor
Conexión al sistema eléctrico de un edificio
Protección contra los fallos de conexión a tierra
Responsabilidades del cliente
El sistema de combustible gaseoso
Contenido del paquete
Montaje/instalación
Elevación del generador
Ubicación del generador
Herramientas necesarias
Montaje de la varilla de fijación del depósito
Unión de los soportes de montaje
Para instalar los depósitos de combustible LP
Instalación del depósito de combustible LP
Cree una mezcla de agua y jabón lavavajillas al 50%
Comprobación de fugas en el circuito de combustible
Comprobar el nivel de aceite del motor
Para retirar los depósitos de combustible
Techo y puerta de acceso extraíbles
Conexión de la batería
Este manual para futuras consultas
Controles y características del generador
Terminal de tierra del equipo- Para la conexión a
Tierra del generador
Controles y características del panel de control
Equipo de tierra
Tomas eléctricas
Dispositivo de seguridad de 120/240 V, 30 a
Tomas eléctricas dobles de 120 V CA y 20 a
Encendido del motor
Utilización del generador
Conexión de cargas eléctricas
Parada del Motor
Durante el uso del generador
Compruebe su disyuntor Gfci
Capacidad
No sobrecargar el generador
Ejemplo
Control de la energía
Recomendaciones generales
Plan de mantenimiento
Control de emisiones
Mantenimiento
Recomendaciones sobre el aceite
Aceite
Comprobar y añadir aceite
Cambio del aceite del motor y del filtro
Cambio del filtro de aceite
Elementos del filtro de aire
Rellene el motor con aceite
Para revisar el filtro de aire, siga estos pasos
Comprobación de holgura de la válvula
Revise la bujía
Sistema de refrigeración de aire
Carga de la batería
Servicio de la batería
Almacenamiento
Abra el panel de control
Notas
Resolución de problemas
Piezas de repuesto
Especificaciones del producto
Artículos para el mantenimiento
Motor
Responsabilidades de la garantía del propietario
Piezas garantizadas
Duración de la cobertura
Solicitudes y exclusiones de cobertura
Servicio gratuito
Mantenimiento
Cobertura de daños derivados
Período DE Garantía
Esta página está reservada
Comment nous joindre
Fonctions et commandes de la génératrice
Assemblage/Installation
Règles de sécurité
Mise en marche de votre génératrice
Symboles de risque et leur signification
Mot signal Danger , Mise EN Garde
Règles de sécurité
Lors de tests d’allumage du moteur
Lors du réglage ou des réparations de votre génératrice
Description de l’Èquipement
Mise EN Garde
Branchements au système électrique d’un édifice
Protection contre les fuites de terre
Responsabilités du client
Le système de combustible gazeux
Emplacement de la génératrice
Assemblage/Installation
Contenu de l’expédition
Soulèvement de la génératrice
Outils nécessaires
Fixation des ensemble les berceaux de montage
Fixation de la tige de retenue pour réservoir
Pour installer les réservoirs de combustible PL
Installation du réservoir de combustible PL
Le gaz propane est extrêmement inflammable et explosif
Vérification de fuite du système de combustible
Vérifiez le niveau d’huile du moteur
Toit amovible et porte d’accès
Branchement de la batterie
Conservez ce manuel pour à des fins de référence
Fonctions et commandes de la génératrice
Borne de mise à la terre d’équipement- Connectez ici
La génératrice à la mise à la terre
Fonctions et commandes du tableau de commande
Mise à la terre de l’équipement
Prises
Prise verrouillable de 120/240 volts C.A., 30 a
Prises doubles de 120 volts C.A., 20 a
Démarrage du moteur
Mise en marche de votre génératrice
Raccordement de charges électriques
Arrêt du moteur
Mise à l’essai du disjoncteur Gfci
La position Off gauche et ensuite à la position On droite
Pendant le fonctionnement de la génératrice
Capacité
Ne surchargez pas votre génératrice
Exemple
Gestion de l’énergie
Calendrier d’entretien
Recommandations générales
Contrôle des émissions
Entretien
Huile
Entretien des éléments filtrants
Changement du filtre à huile
Remplissez l’huile dans le moteur
Entretien de la bougie d’allumage
Remplacement des boyaux d’alimentation et du régulateur
Vérification du jeu des soupapes
Système de refroidissement à air du moteur
Entreposage
Entretien de la batterie
Entretenez et remplacez la batterie au besoin
Assurez-vous que la soupape d’arrêt du réservoir est fermée
Remarques
Dépannage
Pièces de rechange
Caractéristiques du produit
Articles d’entretien
Pression d’alimentation en
Durée de la couverture
Pièces garanties
Connecteurs et dispositifs
Réclamations et exclusions de couverture
Aucun frais
Entretien
Couverture indirecte
Période DE Garantie

