|
|
|
|
| Maintenance | |
|
|
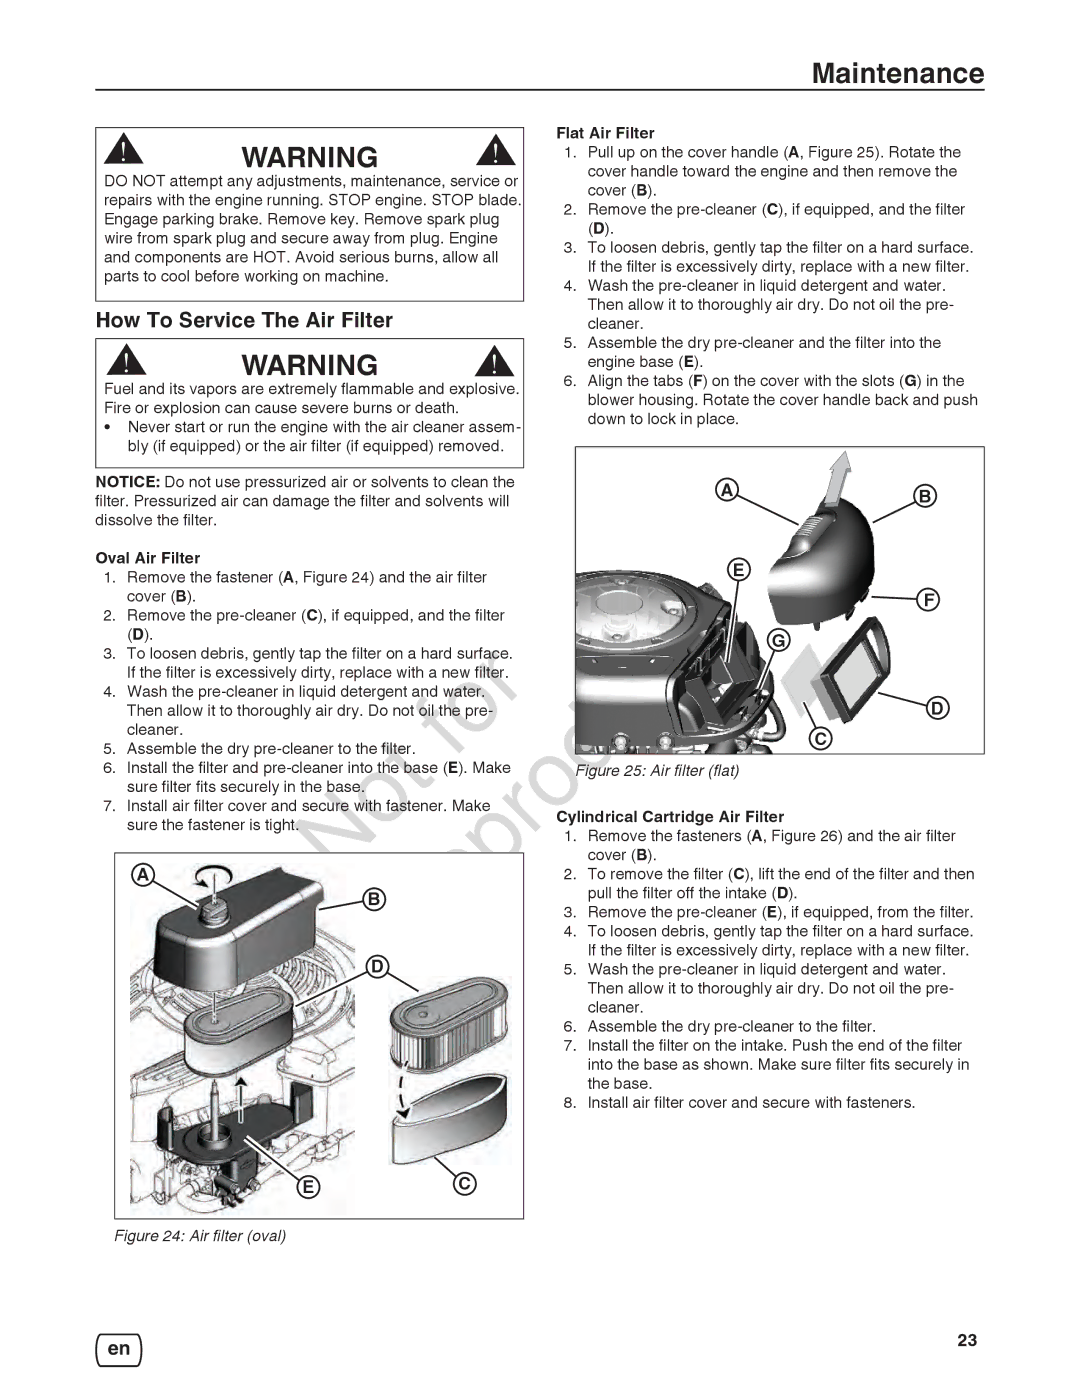
| Flat Air Filter | |||
! | WARNING | ! | ||||
1. | cover handle toward the engine and then remove the | |||||
|
|
| Pull up on the cover handle (A, Figure 25). Rotate the | |||
DO NOT attempt any adjustments, maintenance, service or |
|
| cover (B). | |||
repairs with the engine running. STOP engine. STOP blade. |
|
| ||||
2. | Remove the | |||||
Engage parking brake. Remove key. Remove spark plug | ||||||
|
| (D). | ||||
wire from spark plug and secure away from plug. Engine |
|
| ||||
3. | To loosen debris, gently tap the filter on a hard surface. | |||||
and components are HOT. Avoid serious burns, allow all | ||||||
|
| If the filter is excessively dirty, replace with a new filter. | ||||
parts to cool before working on machine. |
| 4. | ||||
| Wash the | |||||
|
|
|
|
| Then allow it to thoroughly air dry. Do not oil the pre- | |
How To Service The Air Filter |
|
|
| |||
|
|
| cleaner. | |||
|
|
| 5. | Assemble the dry | ||
! | WARNING | ! | ||||
6. | Align the tabs (F) on the cover with the slots (G) in the | |||||
Fuel and its vapors are extremely flammable and explosive. |
|
| engine base (E). | |||
|
| blower housing. Rotate the cover handle back and push | ||||
Fire or explosion can cause severe burns or death. |
|
|
| |||
|
|
| down to lock in place. | |||
• Never start or run the engine with the air cleaner assem- |
|
| ||||
bly (if equipped) or the air filter (if equipped) removed. |
|
|
| |||
|
|
| ||||
NOTICE: Do not use pressurized air or solvents to clean the | A | B |
filter. Pressurized air can damage the filter and solvents will | ||
dissolve the filter. |
|
|
Oval Air Filter |
| Reproduction |
|
|
| ||||||
1. | Remove the fastener (A, Figure 24) and the air filter |
|
| E |
|
| F | ||||
2. | cover (B). |
|
|
|
|
|
|
|
| ||
Remove the |
|
|
| G |
|
| |||||
3. | (D). |
|
|
|
|
|
|
|
| ||
To loosen debris, gently tap the filter a hard surface. |
|
|
|
|
|
| |||||
|
|
|
|
| for |
|
|
|
|
|
|
4. | If the filter is excessively dirty, replace with a new filter. |
|
|
|
|
|
| ||||
Wash the |
|
|
|
|
| D | |||||
|
| Then allow it to thoroughly air dry. Do not oil the pre- |
|
|
|
|
| ||||
|
| cleaner. |
|
|
|
|
|
|
| C |
|
5. | Assemble the dry |
|
|
|
|
|
|
| |||
6. | Install the filter and |
| Figure 25: Air filter (flat) |
|
|
| |||||
7. | sure filter fits securely in the base. |
|
|
|
|
|
|
|
| ||
Install air filter cover and secure with fastener. Make | Cylindrical Cartridge Air Filter |
|
| ||||||||
|
| sure the fastener is tight. |
|
|
|
|
| ||||
|
|
|
|
| 1. | Remove the fasteners (A, Figure 26) and the air filter | |||||
|
|
|
|
|
|
|
| cover (B). |
|
|
|
|
| A | NotB |
| 2. |
|
|
| |||
|
|
| To remove the filter (C), lift the end of the filter and then | ||||||||
|
|
|
| 3. | pull the filter off the intake (D). |
|
| ||||
|
|
|
|
|
| Remove the | |||||
|
|
|
|
|
| 4. | To loosen debris, gently tap the filter on a hard surface. | ||||
|
|
|
| D |
| 5. | If the filter is excessively dirty, replace with a new filter. | ||||
|
|
|
|
| Wash the | ||||||
|
|
|
|
|
|
|
| Then allow it to thoroughly air dry. Do not oil the pre- | |||
|
|
|
|
|
| 6. | cleaner. |
|
|
| |
|
|
|
|
|
| Assemble the dry |
| ||||
|
|
|
|
|
| 7. | Install the filter on the intake. Push the end of the filter | ||||
|
|
|
|
|
|
|
| into the base as shown. Make sure filter fits securely in | |||
|
|
|
|
|
| 8. | the base. |
|
|
| |
|
|
|
|
|
| Install air filter cover and secure with fasteners. |
| ||||
E | C |
Figure 24: Air filter (oval)
en | 23 |