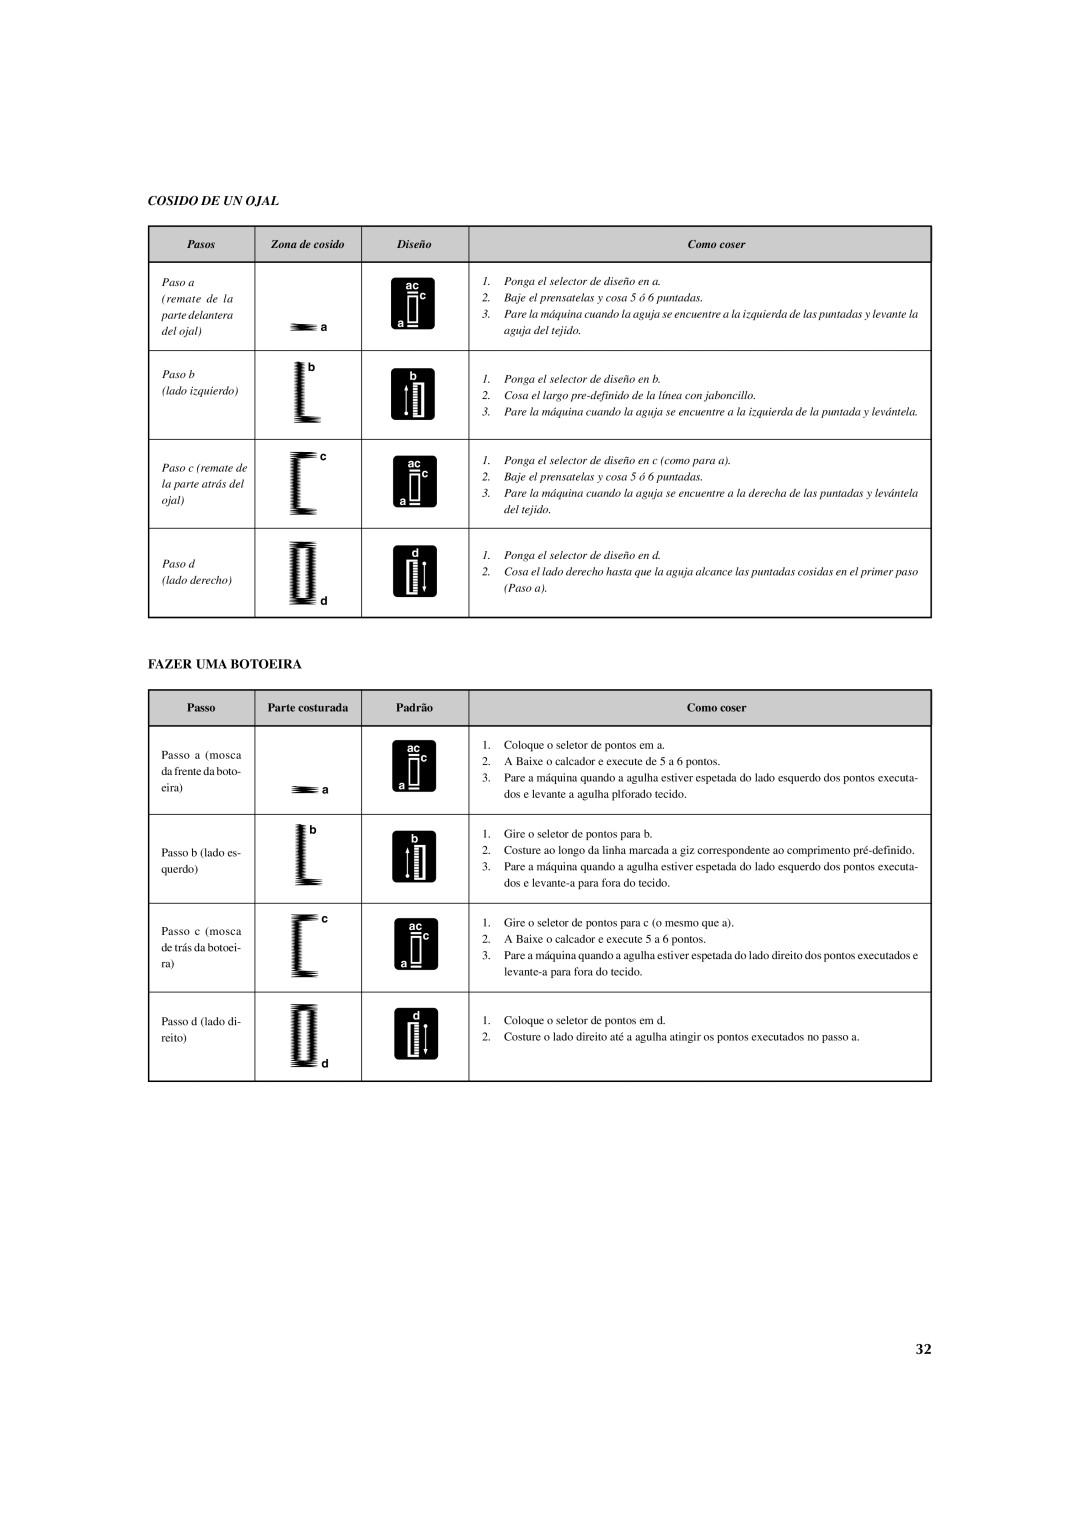
COSIDO DE UN OJAL

Pasos

Zona de cosido

Diseño


Como coser


Paso a


ac

1.

Ponga el selector de diseño en a.

(remate de la


c

2.

Baje el prensatelas y cosa 5 ó 6 puntadas.


parte delantera

a

a


3.

Pare la máquina cuando la aguja se encuentre a la izquierda de las puntadas y levante la

del ojal)


aguja del tejido.


Paso b

b


b

1.

Ponga el selector de diseño en b.


(lado izquierdo)


2.

Cosa el largo pre-definido de la línea con jaboncillo.


3.

Pare la máquina cuando la aguja se encuentre a la izquierda de la puntada y levántela.


Paso c (remate de

c


ac

1.

Ponga el selector de diseño en c (como para a).


c

2. Baje el prensatelas y cosa 5 ó 6 puntadas.

la parte atrás del


3.

Pare la máquina cuando la aguja se encuentre a la derecha de las puntadas y levántela

ojal)


a


del tejido.


Paso d


d

1.

Ponga el selector de diseño en d.


2.

Cosa el lado derecho hasta que la aguja alcance las puntadas cosidas en el primer paso


(lado derecho)


d


(Paso a).


FAZER UMA BOTOEIRA

Passo

Parte costurada

Padrão


Como coser


Passo a (mosca


ac

1.

Coloque o seletor de pontos em a.


c

2. A Baixe o calcador e execute de 5 a 6 pontos.


da frente da boto-


3. Pare a máquina quando a agulha estiver espetada do lado esquerdo dos pontos executa-

eira)

a

a


dos e levante a agulha plforado tecido.


b


b

1. Gire o seletor de pontos para b.


2.

Costure ao longo da linha marcada a giz correspondente ao comprimento pré-definido.

Passo b (lado es-


querdo)


3.

Pare a máquina quando a agulha estiver espetada do lado esquerdo dos pontos executa-


dos e levante-a para fora do tecido.


Passo c (mosca

c


ac

1.

Gire o seletor de pontos para c (o mesmo que a).


c

2.

A Baixe o calcador e execute 5 a 6 pontos.

de trás da botoei-


3.

Pare a máquina quando a agulha estiver espetada do lado direito dos pontos executados e

ra)


a


levante-a para fora do tecido.


Passo d (lado di-


d

1.

Coloque o seletor de pontos em d.


reito)

d


2.

Costure o lado direito até a agulha atingir os pontos executados no passo a.


32

Page 40
Image 40
Brother LS 2125 instruction manual Cosido DE UN Ojal, Fazer UMA Botoeira

LS 2125 specifications

The Brother LS 2125 is a versatile and efficient sewing machine that caters to both beginners and experienced sewists. Designed with user-friendliness in mind, it combines functionality and affordability, making it an ideal choice for a wide range of sewing projects.

One of the standout features of the Brother LS 2125 is its 21 built-in stitch functions. These stitches include essential utility stitches, decorative stitches, and a one-step buttonhole, allowing users to explore creativity while completing practical tasks. The variety of stitch options provides ample opportunities for customization, ensuring that every sewing project can be tailored to individual preferences.

The machine is equipped with a quick-set drop-in bobbin system, which simplifies the process of inserting the bobbin and reduces the risk of thread jams. The clear view cover allows sewists to monitor thread supply, making the sewing experience more seamless. Additionally, the Brother LS 2125 includes a built-in automatic needle threader, a feature that minimizes eye strain and saves time, particularly useful for those who sew frequently.

In terms of performance, the LS 2125 boasts a powerful motor that is capable of handling various fabrics, from lightweight materials to thicker textiles. Its adjustable stitch length and width provide further control, allowing users to refine their techniques and achieve professional results. The machine’s lightweight and compact design also make it portable, an advantage for those who enjoy attending classes or sewing events.

Furthermore, the Brother LS 2125 emphasizes ease of use with its intuitive layout and straightforward control panel. The machine features a free arm configuration, which is ideal for sewing cylindrical items such as sleeves and hems. The included accessories, such as multiple sewing feet and a dust cover, enhance its versatility and functionality, ensuring users have everything they need to get started right away.

With its combination of practical features and user-centered design, the Brother LS 2125 stands out as a reliable option for anyone looking to embark on or continue their sewing journey. Whether you aim to create garments, home décor, or craft projects, this sewing machine is equipped to meet your diverse sewing needs. Its blend of technology, functionality, and user-friendly characteristics make it a commendable tool for creativity and craftsmanship.