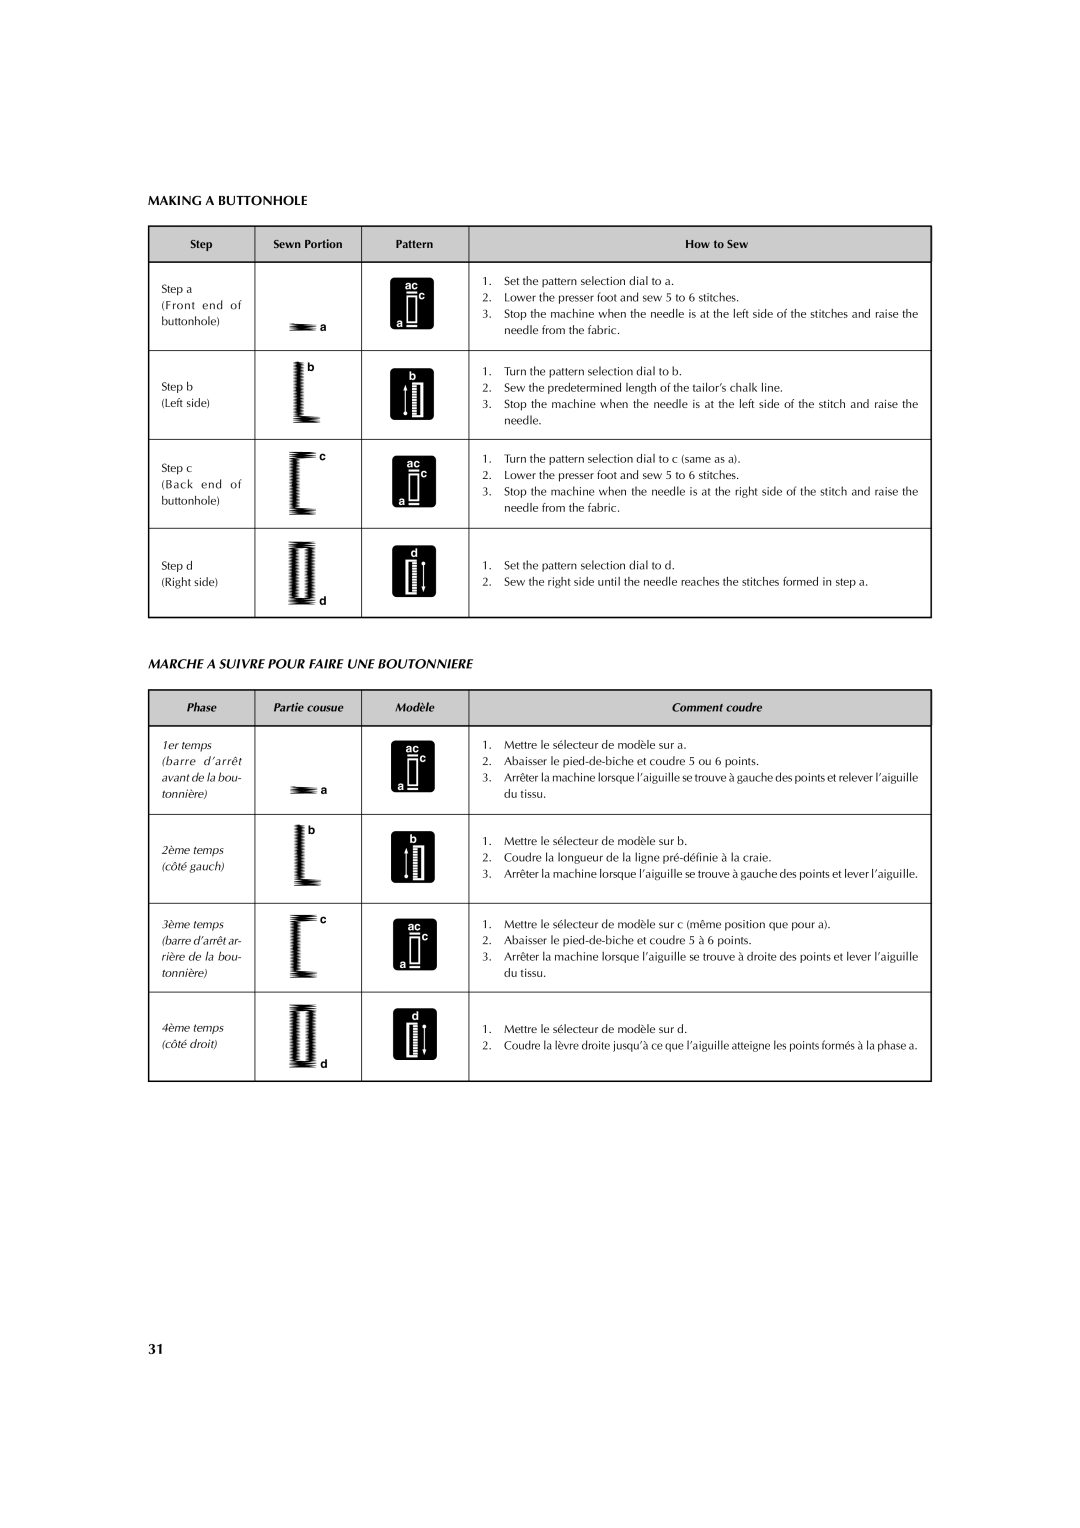
Brother LS 2125 Marche a Suivre Pour Faire UNE Boutonniere, Step Sewn Portion Pattern How to Sew

Models: LS 2125

1 67
Download 67 pages 51.3 Kb
Page 39
Image 39

MAKING A BUTTONHOLE

Step


Sewn Portion

Pattern


How to Sew


Step a


ac

1.

Set the pattern selection dial to a.


c

2.

Lower the presser foot and sew 5 to 6 stitches.

(Front end

of


3.

Stop the machine when the needle is at the left side of the stitches and raise the

buttonhole)


a

a


needle from the fabric.


b


b

1.

Turn the pattern selection dial to b.


Step b


2.

Sew the predetermined length of the tailor’s chalk line.


(Left side)


3.

Stop the machine when the needle is at the left side of the stitch and raise the


needle.


Step c


c


ac

1.

Turn the pattern selection dial to c (same as a).


c

2.

Lower the presser foot and sew 5 to 6 stitches.

(Back end

of


3.

Stop the machine when the needle is at the right side of the stitch and raise the

buttonhole)


a


needle from the fabric.


Step d


d

1.

Set the pattern selection dial to d.


(Right side)


d


2.

Sew the right side until the needle reaches the stitches formed in step a.


MARCHE A SUIVRE POUR FAIRE UNE BOUTONNIERE

Phase

Partie cousue

Modèle


Comment coudre


1er temps


ac

1.

Mettre le sélecteur de modèle sur a.

(barre d’arrêt


c

2.

Abaisser le pied-de-biche et coudre 5 ou 6 points.


avant de la bou-

a

a


3.

Arrêter la machine lorsque l’aiguille se trouve à gauche des points et relever l’aiguille

tonnière)


du tissu.


b


b

1.

Mettre le sélecteur de modèle sur b.

2ème temps


2. Coudre la longueur de la ligne pré-définie à la craie.


(côté gauch)


3.

Arrêter la machine lorsque l’aiguille se trouve à gauche des points et lever l’aiguille.


3ème temps

c


ac

1.

Mettre le sélecteur de modèle sur c (même position que pour a).


(barre d’arrêt ar-


c

2.

Abaisser le pied-de-biche et coudre 5 à 6 points.


rière de la bou-


a


3.

Arrêter la machine lorsque l’aiguille se trouve à droite des points et lever l’aiguille

tonnière)


du tissu.


4ème temps


d

1.

Mettre le sélecteur de modèle sur d.


(côté droit)

d


2.

Coudre la lèvre droite jusqu’à ce que l’aiguille atteigne les points formés à la phase a.


31

Page 39
Image 39
Brother LS 2125 instruction manual Marche a Suivre Pour Faire UNE Boutonniere, Step Sewn Portion Pattern How to Sew

LS 2125 specifications

The Brother LS 2125 is a versatile and efficient sewing machine that caters to both beginners and experienced sewists. Designed with user-friendliness in mind, it combines functionality and affordability, making it an ideal choice for a wide range of sewing projects.

One of the standout features of the Brother LS 2125 is its 21 built-in stitch functions. These stitches include essential utility stitches, decorative stitches, and a one-step buttonhole, allowing users to explore creativity while completing practical tasks. The variety of stitch options provides ample opportunities for customization, ensuring that every sewing project can be tailored to individual preferences.

The machine is equipped with a quick-set drop-in bobbin system, which simplifies the process of inserting the bobbin and reduces the risk of thread jams. The clear view cover allows sewists to monitor thread supply, making the sewing experience more seamless. Additionally, the Brother LS 2125 includes a built-in automatic needle threader, a feature that minimizes eye strain and saves time, particularly useful for those who sew frequently.

In terms of performance, the LS 2125 boasts a powerful motor that is capable of handling various fabrics, from lightweight materials to thicker textiles. Its adjustable stitch length and width provide further control, allowing users to refine their techniques and achieve professional results. The machine’s lightweight and compact design also make it portable, an advantage for those who enjoy attending classes or sewing events.

Furthermore, the Brother LS 2125 emphasizes ease of use with its intuitive layout and straightforward control panel. The machine features a free arm configuration, which is ideal for sewing cylindrical items such as sleeves and hems. The included accessories, such as multiple sewing feet and a dust cover, enhance its versatility and functionality, ensuring users have everything they need to get started right away.

With its combination of practical features and user-centered design, the Brother LS 2125 stands out as a reliable option for anyone looking to embark on or continue their sewing journey. Whether you aim to create garments, home décor, or craft projects, this sewing machine is equipped to meet your diverse sewing needs. Its blend of technology, functionality, and user-friendly characteristics make it a commendable tool for creativity and craftsmanship.