Button Sewing

Pattern

Foot

Other


2, 3 or 4

Button Sewing Foot

Darning Plate

1.Measure the distance between the buttonholes and set the pat- tern selection dial to the Zigzag Stitch (2, 3 or 4) with the de- sired width.

Distance between holes

Pattern

1.6mm (1/16")

2


3.2 mm (1/8")

3


4.8 mm (3/16")

4


2.Attach the button sewing foot.

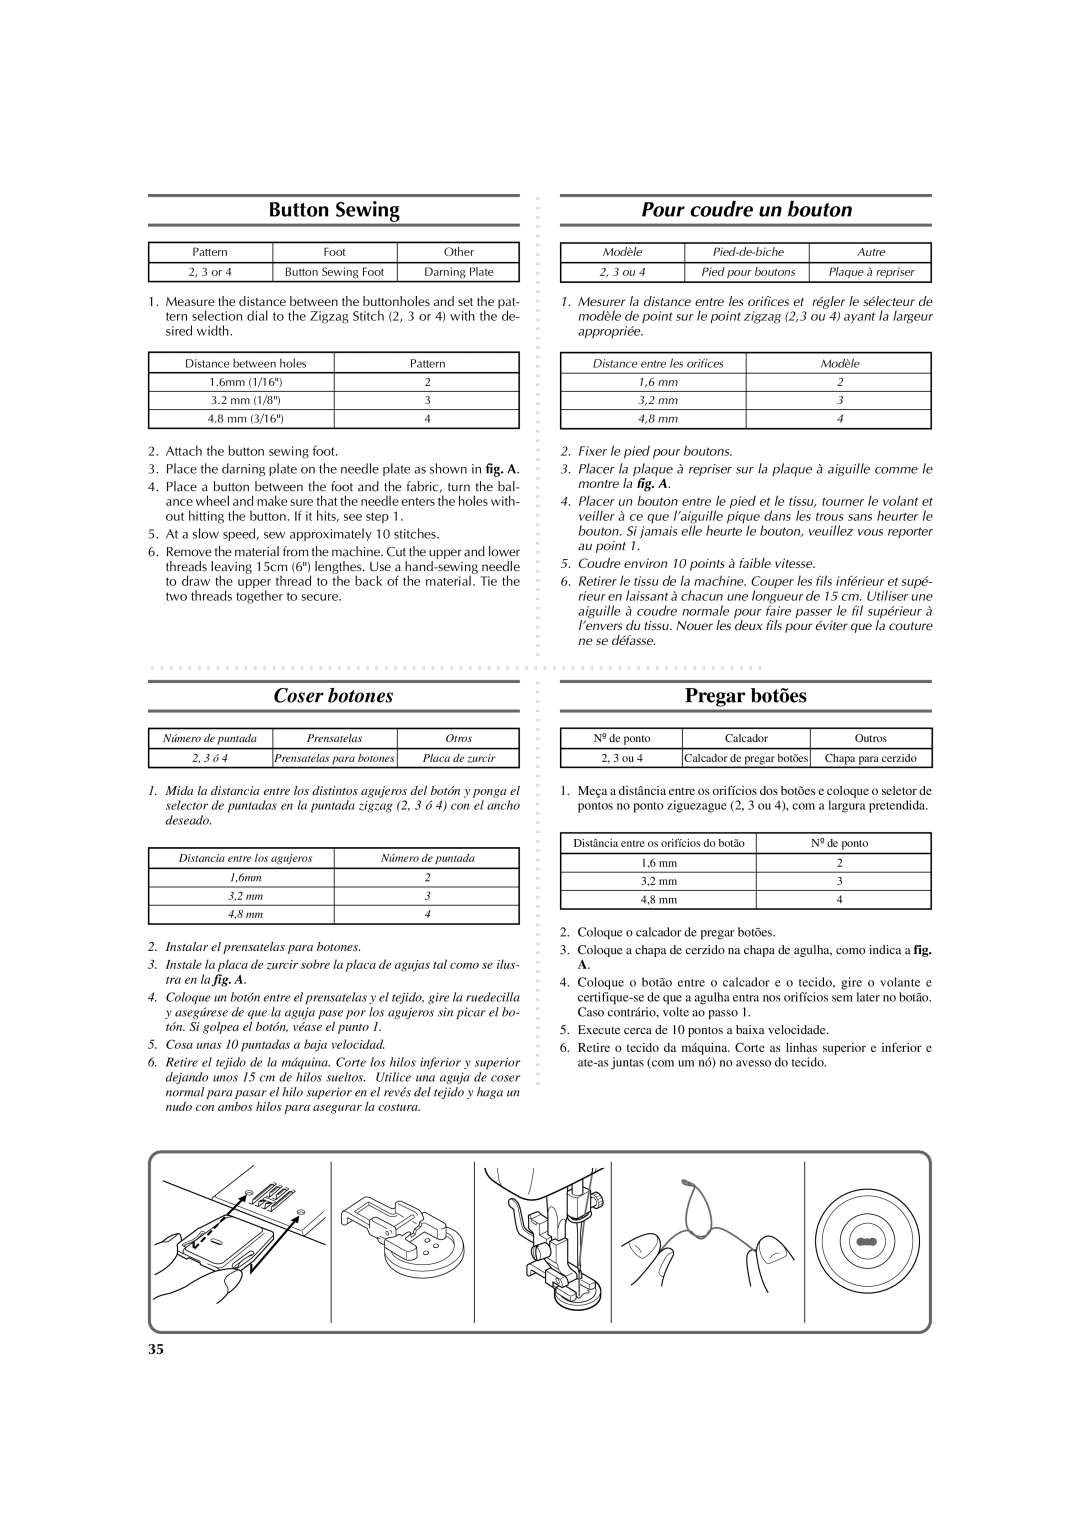
3.Place the darning plate on the needle plate as shown in fig. A.

4.Place a button between the foot and the fabric, turn the bal- ance wheel and make sure that the needle enters the holes with- out hitting the button. If it hits, see step 1.

5.At a slow speed, sew approximately 10 stitches.

6.Remove the material from the machine. Cut the upper and lower threads leaving 15cm (6") lengthes. Use a hand-sewing needle to draw the upper thread to the back of the material. Tie the two threads together to secure.

Pour coudre un bouton

Modèle

Pied-de-biche

Autre


2, 3 ou 4

Pied pour boutons

Plaque à repriser


1.Mesurer la distance entre les orifices et régler le sélecteur de modèle de point sur le point zigzag (2,3 ou 4) ayant la largeur appropriée.

Distance entre les orifices

Modèle


1,6 mm

2


3,2 mm

3


4,8 mm

4


2.Fixer le pied pour boutons.

3.Placer la plaque à repriser sur la plaque à aiguille comme le montre la fig. A.

4.Placer un bouton entre le pied et le tissu, tourner le volant et veiller à ce que l’aiguille pique dans les trous sans heurter le bouton. Si jamais elle heurte le bouton, veuillez vous reporter au point 1.

5.Coudre environ 10 points à faible vitesse.

6.Retirer le tissu de la machine. Couper les fils inférieur et supé- rieur en laissant à chacun une longueur de 15 cm. Utiliser une aiguille à coudre normale pour faire passer le fil supérieur à l’envers du tissu. Nouer les deux fils pour éviter que la couture ne se défasse.

Coser botones

Número de puntada

Prensatelas

Otros


2, 3 ó 4

Prensatelas para botones

Placa de zurcir


1.Mida la distancia entre los distintos agujeros del botón y ponga el selector de puntadas en la puntada zigzag (2, 3 ó 4) con el ancho deseado.

Distancia entre los agujeros

Número de puntada


1,6mm

2


3,2 mm

3


4,8 mm

4


2.Instalar el prensatelas para botones.

3.Instale la placa de zurcir sobre la placa de agujas tal como se ilus- tra en la fig. A.

4.Coloque un botón entre el prensatelas y el tejido, gire la ruedecilla y asegúrese de que la aguja pase por los agujeros sin picar el bo- tón. Si golpea el botón, véase el punto 1.

5.Cosa unas 10 puntadas a baja velocidad.

6.Retire el tejido de la máquina. Corte los hilos inferior y superior dejando unos 15 cm de hilos sueltos. Utilice una aguja de coser normal para pasar el hilo superior en el revés del tejido y haga un nudo con ambos hilos para asegurar la costura.

Pregar botões

Nº de ponto

Calcador

Outros


2, 3 ou 4

Calcador de pregar botões

Chapa para cerzido


1.Meça a distância entre os orifícios dos botões e coloque o seletor de pontos no ponto ziguezague (2, 3 ou 4), com a largura pretendida.

Distância entre os orifícios do botão

Nº de ponto


1,6 mm

2


3,2 mm

3


4,8 mm

4


2.Coloque o calcador de pregar botões.

3.Coloque a chapa de cerzido na chapa de agulha, como indica a fig. A.

4.Coloque o botão entre o calcador e o tecido, gire o volante e certifique-se de que a agulha entra nos orifícios sem later no botão. Caso contrário, volte ao passo 1.

5.Execute cerca de 10 pontos a baixa velocidade.

6.Retire o tecido da máquina. Corte as linhas superior e inferior e ate-as juntas (com um nó) no avesso do tecido.

35

Page 43
Image 43
Brother LS 2125 instruction manual Button Sewing, Pour coudre un bouton, Coser botones, Pregar botões

LS 2125 specifications

The Brother LS 2125 is a versatile and efficient sewing machine that caters to both beginners and experienced sewists. Designed with user-friendliness in mind, it combines functionality and affordability, making it an ideal choice for a wide range of sewing projects.

One of the standout features of the Brother LS 2125 is its 21 built-in stitch functions. These stitches include essential utility stitches, decorative stitches, and a one-step buttonhole, allowing users to explore creativity while completing practical tasks. The variety of stitch options provides ample opportunities for customization, ensuring that every sewing project can be tailored to individual preferences.

The machine is equipped with a quick-set drop-in bobbin system, which simplifies the process of inserting the bobbin and reduces the risk of thread jams. The clear view cover allows sewists to monitor thread supply, making the sewing experience more seamless. Additionally, the Brother LS 2125 includes a built-in automatic needle threader, a feature that minimizes eye strain and saves time, particularly useful for those who sew frequently.

In terms of performance, the LS 2125 boasts a powerful motor that is capable of handling various fabrics, from lightweight materials to thicker textiles. Its adjustable stitch length and width provide further control, allowing users to refine their techniques and achieve professional results. The machine’s lightweight and compact design also make it portable, an advantage for those who enjoy attending classes or sewing events.

Furthermore, the Brother LS 2125 emphasizes ease of use with its intuitive layout and straightforward control panel. The machine features a free arm configuration, which is ideal for sewing cylindrical items such as sleeves and hems. The included accessories, such as multiple sewing feet and a dust cover, enhance its versatility and functionality, ensuring users have everything they need to get started right away.

With its combination of practical features and user-centered design, the Brother LS 2125 stands out as a reliable option for anyone looking to embark on or continue their sewing journey. Whether you aim to create garments, home décor, or craft projects, this sewing machine is equipped to meet your diverse sewing needs. Its blend of technology, functionality, and user-friendly characteristics make it a commendable tool for creativity and craftsmanship.