Page
For USA Only
IMPORTANT INFORMATION REGULATIONS
Federal Communications Commissions FCC Declaration of Conformity
Canadian Department of Communications Compliance Statement
For repairs or adjustments
Please read before using this product
For a longer service life
For additional product information and updates, visit our web site at
Troubleshooting
Table of Contents
Table of Contents
Automatically Converting an Image to an
What you can do with this software
Package Contents
Before Use
Introduction
Before Use
Optional Supply
Principal Parts
b Memo
System Requirements
Installation
Please Read Before Installation
Before Use
If the installer does not automatically start up
Installing the Software
For Windows XP or 2000 users
Before Use
2. Click Run setup.exe
Windows Vista users only
5 Click All Programs - Accessories - Run
Before Use
To install the application into a different folder 1 Click Browse
Before Use
b Memo
b Memo
Click Next to install the application into the selected folder
Before Use
a Note
Online Registration
Uninstallation
Technical Support
Before Use
1 Title bar 2 Menu bar
Understanding the Window and Using Tools
Tutorial
3 Toolbar
1 Start up PE-DESIGN Lite
Tutorial
Step 1 Entering text
2 Enter the text
b Memo
Specify the size. For this example, use the default size of 10.0 mm
Tutorial
b Memo
b Memo
3 Adjust the text size and position
Tutorial
b Memo
Tutorial
Step 2 Adjusting the text layout
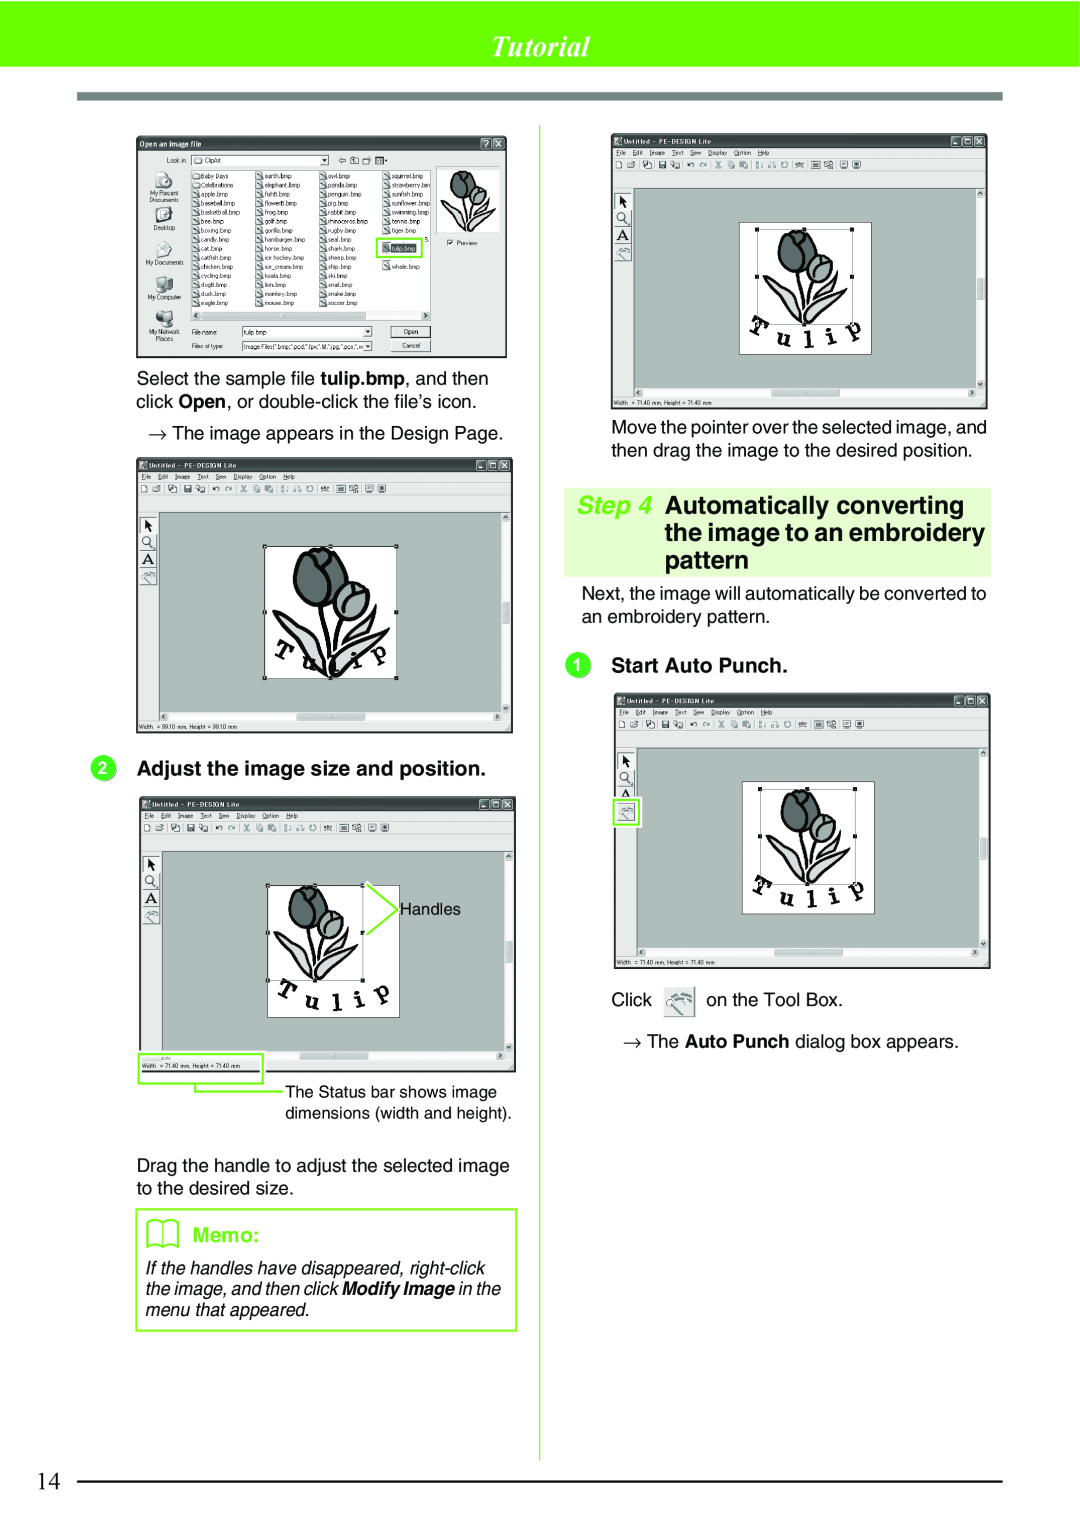
Step 3 Importing image data
b Memo
Tutorial
Step 4 Automatically converting the image to an embroidery pattern
2 Adjust the image size and position
b Memo
2 Convert the image to an embroidery pattern
Step 5 Specifying the sewing color and direction
Tutorial
b Memo
Tutorial
Click Sew, then Sewing Attribute Setting, or
→ The Sewing Attribute Setting dialog box appears
b Memo
Tutorial
Step 6 Changing the sewing order
Step 7 Displaying a preview of the embroidery
b Memo
Click Display, then Realistic Preview, or
Step 8 Saving the embroidery design
Tutorial
Click File, then Save, or click on the toolbar
b Memo
Step 9 Transferring the design to an original card
Tutorial
1 Insert an original card into the USB card writer module
Importing image data from a scanner
Importing Image Data
Importing image data
Automatically Converting an Image to an Embroidery Pattern
b Memo
Importing image data from the Clipboard
Automatically Converting an Image to an Embroidery Pattern
b Memo
Changing the size and position of the image
Changing the Image Settings
Changing the display of the background image
Automatically Converting an Image to an Embroidery Pattern
b Memo
Automatically Converting an Image to an Embroidery Pattern Auto Punch
Automatically Converting an Image to an Embroidery Pattern
b Memo
7. After selecting the desired settings, click Finish
Automatically Converting an Image to an Embroidery Pattern
b Memo
Creating a new embroidery design
Arranging Embroidery Designs
Opening/Importing Embroidery Designs
Opening a PE-DESIGN Lite file
b Memo
Arranging Embroidery Designs
b Memo
b Memo
Toolbar button
Importing embroidery design files
Arranging Embroidery Designs
b Memo
→ The embroidery design is displayed in the Design Page
Arranging Embroidery Designs
b Memo
a Note
b Memo
Specifying the Design Page Size and Color
Arranging Embroidery Designs
b Memo
Outputting to the Clipboard
Saving the Image Data
Saving as a file
Arranging Embroidery Designs
Moving patterns
Editing Embroidery Designs
Selecting patterns
Selecting patterns in the created order
Rotating patterns
Scaling patterns
Flipping patterns horizontally or vertically
Moving embroidery patterns to the center
b Memo
Selecting patterns individually
Arranging Embroidery Designs
b Memo
Arranging Embroidery Designs
Adding Text
Entering Text
b Memo
Arranging Embroidery Designs
Selecting text attributes
Font
b Memo
Arranging Embroidery Designs
Editing entered text
Text Size
b Memo
b Memo
Specifying text arrangement
Arranging Embroidery Designs
Toolbar button
Sets the shape of curving
Arranging Embroidery Designs
Curving
Spacing
Color
Setting the thread color and sew type
Applying Sewing Attributes to Text and Regions
Arranging Embroidery Designs
Arranging Embroidery Designs
Special colors
Sew type
b Memo
Arranging Embroidery Designs
Specifying sewing attributes
→ The Sewing Attribute Setting dialog box appears
b Memo
Satin stitch
Region sewing attributes
Arranging Embroidery Designs
Fill stitch
Zooming out
Zooming
Zooming in
Displaying at actual size
Toolbar button
Checking and editing the sewing order/ color
Arranging Embroidery Designs
b Memo
b Memo
Arranging Embroidery Designs
Editing the sewing order
Combining patterns of the same color
b Memo
Displaying a preview of the embroidery
Arranging Embroidery Designs
b Memo
Arranging Embroidery Designs
Changing realistic preview settings
1. Click Display, then Realistic Preview Attribute Setting
b Memo
b Memo
Checking embroidery design information
Arranging Embroidery Designs
1. Click Option, then Design Property
Overwriting
Saving and Printing
Saving
Saving with a new name
b Memo
Writing multiple embroidery files to an original card
Arranging Embroidery Designs
b Memo
b Memo
Arranging Embroidery Designs
b Memo
b Memo
Adding comments to saved .pes files
Specifying print settings
Printing
1. Click File, then Print Setup
b Memo
Checking the print image
Arranging Embroidery Designs
b Memo
Printing
Arranging Embroidery Designs
b Memo
Changing the measurement units
Changing Software Settings
Changing the grid settings
1. Click Display, then Grid Setup
Sewing Order
Tips and Techniques
Sewing Direction
Sewing Wide Areas
List of Menus
Menus/Tools
List of Tool Box Buttons
File menu
Menus/Tools
Edit menu
Flips the selected patterns up/down
Menus/Tools
Horizon
Mirror
a Note
Image menu
Menus/Tools
The file name extension must be one of the
Display menu
Text menu
Sew menu
Menus/Tools
browser is correctly installed and an Internet
Option menu
Help menu
Menus/Tools
Troubleshooting
Index
Index
Page
Read the following before opening the CD-ROM package
Product Agreement
English XE2656-001 Printed in China