Threading (2)
![]() Note Please turn power is off before using automatic needle threader. Accidentally stepping on the foot controller during this operation could cause bodily injury or damage to the machine.
Note Please turn power is off before using automatic needle threader. Accidentally stepping on the foot controller during this operation could cause bodily injury or damage to the machine.
Upper Threading |
| 1 |
|
|
| |
|
|
|
|
| ||
7 |
|
| 1 |
|
| |
|
|
|
|
| ||
|
|
| 6 | 7 |
| |
|
|
|
|
| ||
| 6 |
| 4 | 2 | 9 | |
8 | 2 | 3 | ||||
4 |
| 0 | ||||
|
| 3 |
|
| ||
5 |
|
|
| 8 |
| |
|
|
| 5 | A | ||
9 |
|
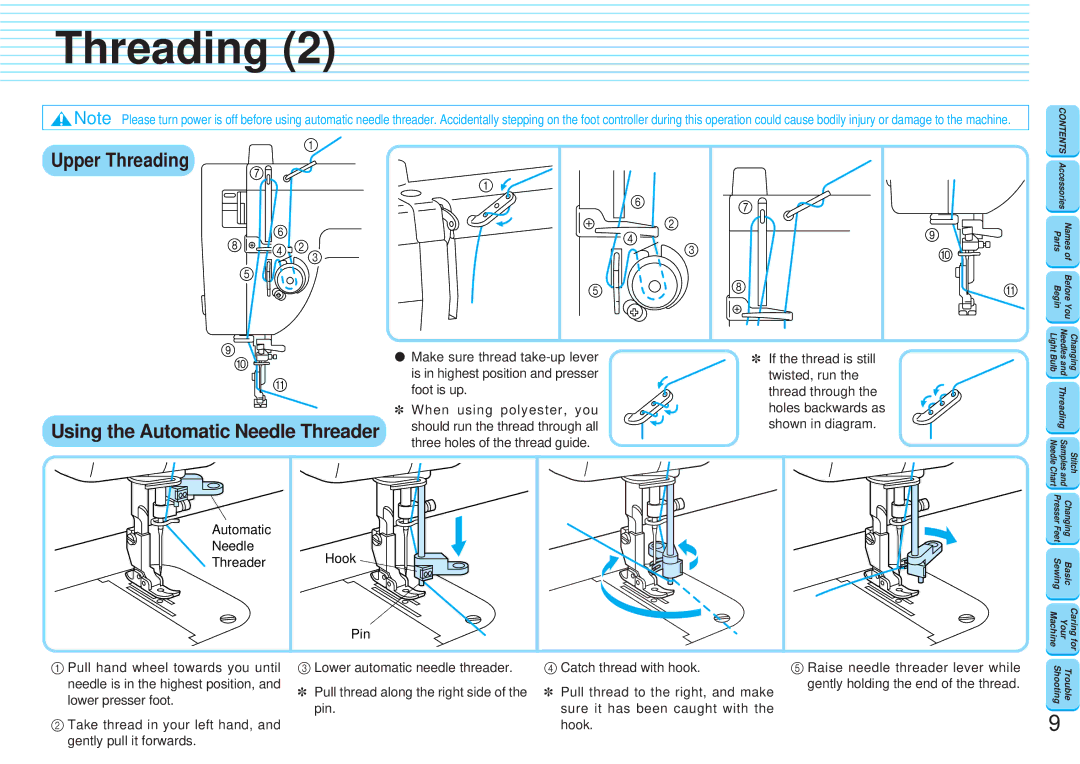
| ● Make sure thread | ✽ If the thread is still |
| |
0 |
|
|
| |||
|
| is in highest position and presser | twisted, run the |
| ||
| A |
|
| |||
|
| foot is up. | thread through the |
| ||
|
|
|
| |||
|
|
| ✽ When using polyester, you | holes backwards as |
| |
Using the Automatic Needle Threader | should run the thread through all | shown in diagram. |
| |||
three holes of the thread guide. |
|
| ||||
|
|
|
|
| ||
Automatic |
| |
Needle | Hook | |
Threader | ||
|
Pin
CONTENTS | |
Accessories | |
Parts | Names |
| of |
Begin | Before You |
Light Bulb | Needles and | Changing | |
| Threading |
| |
Needle Chart | Samples and | Stitch | |
Presser Feet | Changing | ||
Sewing | Basic | ||
Machine | Your | Caring for | |
1Pull hand wheel towards you until needle is in the highest position, and lower presser foot.
2Take thread in your left hand, and gently pull it forwards.
3Lower automatic needle threader.
✽Pull thread along the right side of the pin.
4Catch thread with hook.
✽Pull thread to the right, and make sure it has been caught with the hook.
5Raise needle threader lever while gently holding the end of the thread.
Shooting | Trouble |
9