SERVICE (cont.)

SOLENOIDS

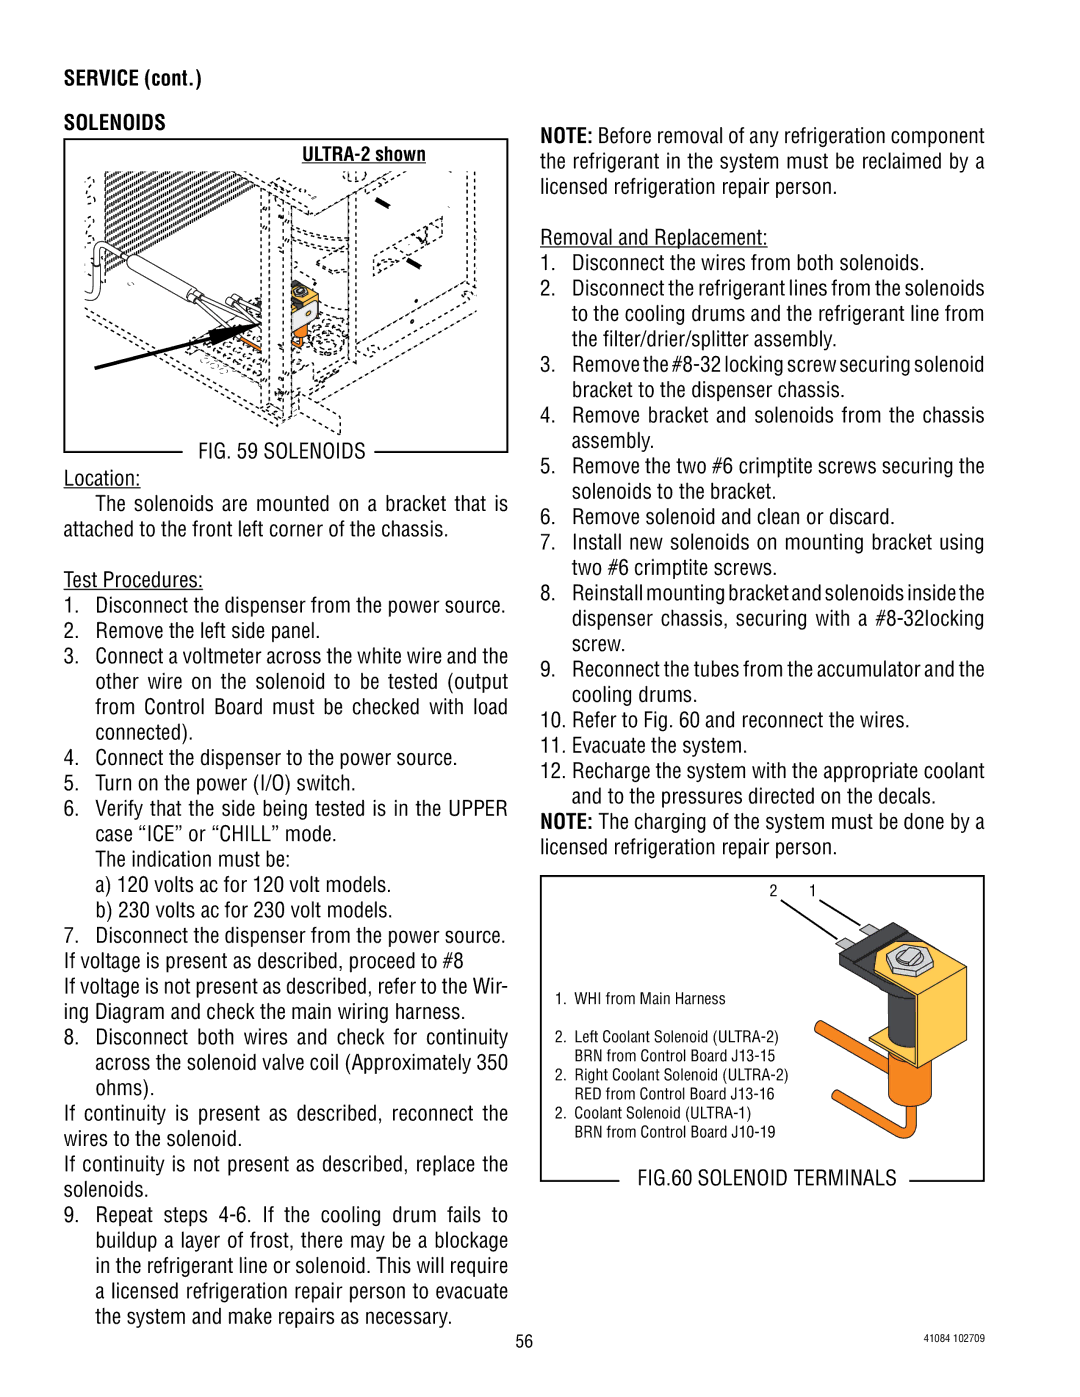
ULTRA-2 shown

FIG. 59 SOLENOIDS

Location:

The solenoids are mounted on a bracket that is attached to the front left corner of the chassis.

Test Procedures:

1.Disconnect the dispenser from the power source.

2.Remove the left side panel.

3.Connect a voltmeter across the white wire and the other wire on the solenoid to be tested (output from Control Board must be checked with load connected).

4.Connect the dispenser to the power source.

5.Turn on the power (I/O) switch.

6.Verify that the side being tested is in the UPPER case “ICE” or “CHILL” mode.

The indication must be:

a)120 volts ac for 120 volt models.

b)230 volts ac for 230 volt models.

7.Disconnect the dispenser from the power source. If voltage is present as described, proceed to #8

If voltage is not present as described, refer to the Wir- ing Diagram and check the main wiring harness.

8.Disconnect both wires and check for continuity across the solenoid valve coil (Approximately 350

ohms).

If continuity is present as described, reconnect the wires to the solenoid.

If continuity is not present as described, replace the solenoids.

9.Repeat steps 4-6. If the cooling drum fails to buildup a layer of frost, there may be a blockage in the refrigerant line or solenoid. This will require a licensed refrigeration repair person to evacuate the system and make repairs as necessary.

NOTE: Before removal of any refrigeration component the refrigerant in the system must be reclaimed by a licensed refrigeration repair person.

Removal and Replacement:

1.Disconnect the wires from both solenoids.

2.Disconnect the refrigerant lines from the solenoids to the cooling drums and the refrigerant line from the filter/drier/splitter assembly.

3.Remove the #8-32 locking screw securing solenoid bracket to the dispenser chassis.

4.Remove bracket and solenoids from the chassis assembly.

5.Remove the two #6 crimptite screws securing the solenoids to the bracket.

6.Remove solenoid and clean or discard.

7.Install new solenoids on mounting bracket using two #6 crimptite screws.

8.Reinstall mounting bracket and solenoids inside the dispenser chassis, securing with a #8-32locking screw.

9.Reconnect the tubes from the accumulator and the cooling drums.

10.Refer to Fig. 60 and reconnect the wires.

11.Evacuate the system.

12.Recharge the system with the appropriate coolant and to the pressures directed on the decals.

NOTE: The charging of the system must be done by a licensed refrigeration repair person.

2 1

1. WHI from Main Harness

2.Left Coolant Solenoid (ULTRA-2) BRN from Control Board J13-15

2. Right Coolant Solenoid (ULTRA-2) RED from Control Board J13-16

2.Coolant Solenoid (ULTRA-1) BRN from Control Board J10-19

FIG.60 SOLENOID TERMINALS

56

41084 102709


Page 56
Image 56
Bunn ULTRA-2 manual Solenoids, WHI from Main Harness

ULTRA-2 specifications

The Bunn ULTRA-2 is an exceptional frozen beverage dispenser that caters to both commercial and home use, making it a popular choice in various establishments such as cafes, restaurants, and convenience stores. Renowned for its reliability and efficiency, the ULTRA-2 serves a wide range of frozen beverages, including slushes, smoothies, and frozen cocktails, providing an irresistible treat for customers.

One of the standout features of the Bunn ULTRA-2 is its high-capacity design. With a dual hopper system, this machine allows operators to serve two different flavors simultaneously. Each hopper can hold up to 3.2 gallons of product, allowing for continuous service without the need for frequent refills. This is particularly advantageous during peak hours when demand is high.

The ULTRA-2 is equipped with Bunn's advanced refrigeration technology, which ensures rapid freezing and consistent product quality. The machine uses a patented freezing mechanism that maintains optimal product texture and temperature, resulting in a smooth, uniform consistency that keeps customers coming back for more. Additionally, the ULTRA-2's adjustable temperature control allows operators to customize the consistency of the beverages to their liking.

User-friendliness is another hallmark of the Bunn ULTRA-2. The machine features intuitive controls that simplify operation, making it easy for staff to learn and use efficiently. A built-in safety feature prevents the machine from operating when the hoppers are too low, minimizing waste and ensuring product quality.

Durability and ease of maintenance are also prominent characteristics of the ULTRA-2. Constructed from high-quality stainless steel, the machine offers enhanced longevity and is resistant to rust and corrosion. The removable hoppers and door assemblies facilitate quick cleaning and maintenance, allowing businesses to keep the machine in top working condition with minimal effort.

In summary, the Bunn ULTRA-2 stands out in the crowded market of frozen beverage dispensers through its dual hopper functionality, advanced refrigeration technology, user-friendly design, and robust construction. Whether for a busy café or a family gathering, the ULTRA-2 provides a reliable solution for delivering delicious frozen beverages that satisfy a variety of tastes and preferences.