Operating Instructions and Parts Manual
Modelo CHN50399
Operating The Nailer
(Continued)
CHANGING SHOE PLATES
1. | Disconnect the air supply from |
| the nailer. |
2. | Using provided 4 mm wrench, |
| remove the three shoe screws. |
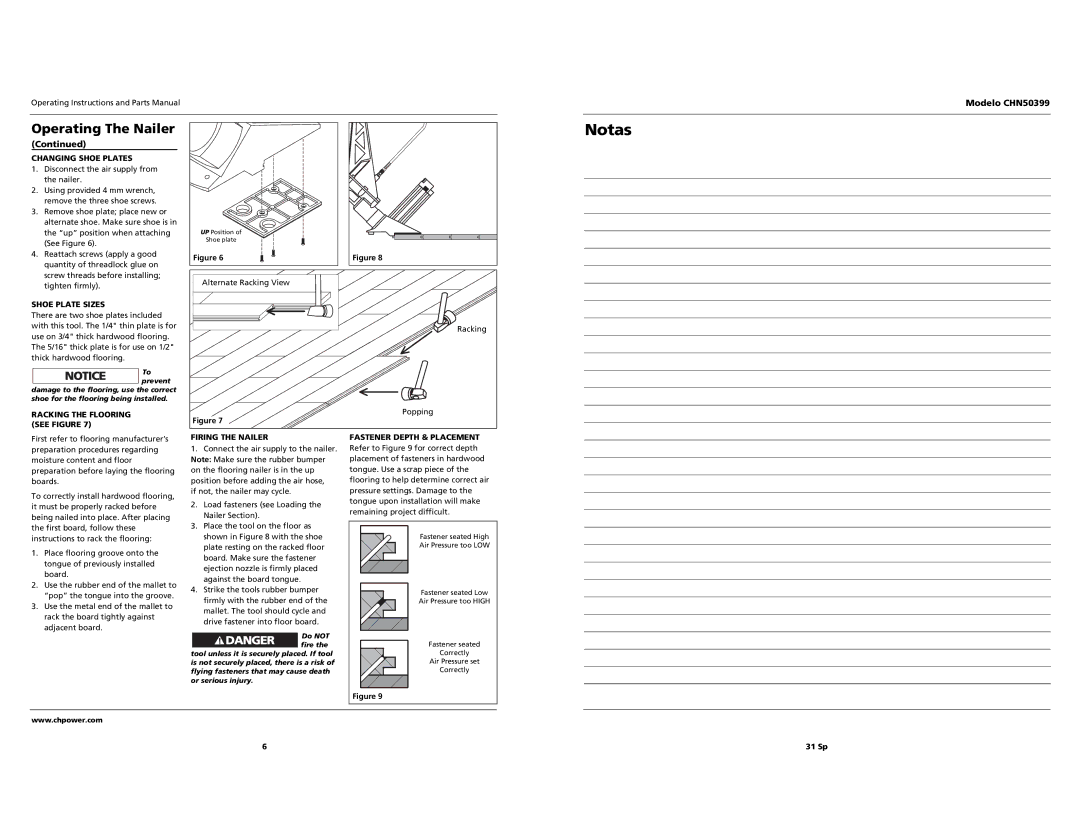
3. | Remove shoe plate; place new or |
| alternate shoe. Make sure shoe is in |
| the “up” position when attaching |
| (See Figure 6). |
4. | Reattach screws (apply a good |
| quantity of threadlock glue on |
UP Position of |
Shoe plate |
Figure 6 |
Figure 8 |
Notas
screw threads before installing; |
tighten firmly). |
SHOE PLATE SIZES
There are two shoe plates included with this tool. The 1/4" thin plate is for use on 3/4" thick hardwood flooring. The 5/16" thick plate is for use on 1/2" thick hardwood flooring.
To prevent
damage to the flooring, use the correct shoe for the flooring being installed.
RACKING THE FLOORING (SEE FIGURE 7)
Alternate Racking View |
Racking |
Popping |
Figure 7 |
First refer to flooring manufacturer’s preparation procedures regarding moisture content and floor preparation before laying the flooring boards.
To correctly install hardwood flooring, it must be properly racked before being nailed into place. After placing the first board, follow these instructions to rack the flooring:
1.Place flooring groove onto the tongue of previously installed board.
2.Use the rubber end of the mallet to “pop” the tongue into the groove.
3.Use the metal end of the mallet to rack the board tightly against adjacent board.
FIRING THE NAILER
1.Connect the air supply to the nailer. Note: Make sure the rubber bumper on the flooring nailer is in the up position before adding the air hose,
if not, the nailer may cycle.
2.Load fasteners (see Loading the Nailer Section).
3.Place the tool on the floor as shown in Figure 8 with the shoe plate resting on the racked floor board. Make sure the fastener ejection nozzle is firmly placed against the board tongue.
4.Strike the tools rubber bumper firmly with the rubber end of the mallet. The tool should cycle and drive fastener into floor board.
Do NOT fire the tool unless it is securely placed. If tool
is not securely placed, there is a risk of flying fasteners that may cause death or serious injury.
FASTENER DEPTH & PLACEMENT
Refer to Figure 9 for correct depth placement of fasteners in hardwood tongue. Use a scrap piece of the flooring to help determine correct air pressure settings. Damage to the tongue upon installation will make remaining project difficult.
Fastener seated High
Air Pressure too LOW
Fastener seated Low
Air Pressure too HIGH
Fastener seated
Correctly
Air Pressure set
Correctly
Figure 9
www.chpower.com
6 | 31 Sp |