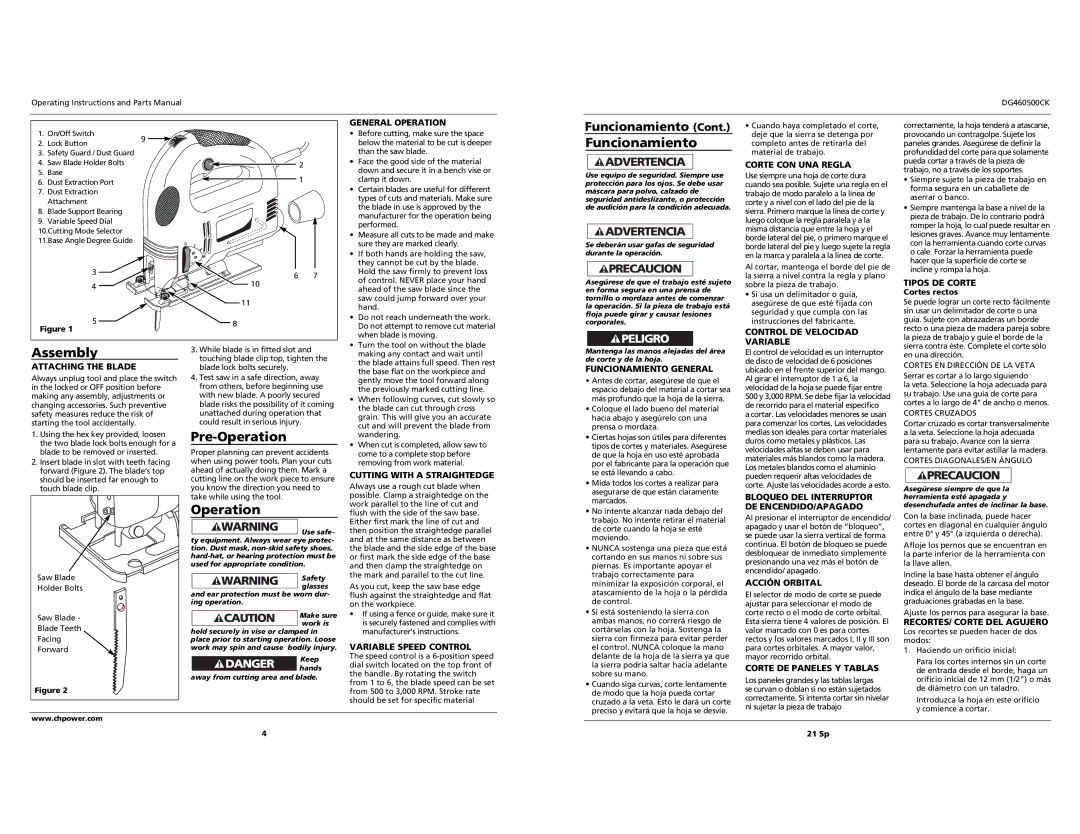
Operating Instructions and Parts Manual

DG460500CK


GENERAL OPERATION

1. On/Off Switch

9


Before cutting, make sure the space

2. Lock Button


below the material to be cut is deeper


3. Safety Guard / Dust Guard


than the saw blade.

4. Saw Blade Holder Bolts


2

Face the good side of the material

5. Base


down and secure it in a bench vise or


1


6. Dust Extraction Port


clamp it down.


Certain blades are useful for different

7. Dust Extraction


types of cuts and materials. Make sure

Attachment


the blade in use is approved by the

8. Blade Support Bearing


manufacturer for the operation being

9. Variable Speed Dial


performed.

10.Cutting Mode Selector


• Measure all cuts to be made and make

11.Base Angle Degree Guide


sure they are marked clearly.


• If both hands are holding the saw,


they cannot be cut by the blade.

3


6

7


Hold the saw firmly to prevent loss


of control. NEVER place your hand

4


10


ahead of the saw blade since the


11


saw could jump forward over your


hand.


5


8


• Do not reach underneath the work.


Do not attempt to remove cut material

Figure 1


when blade is moving.


Assembly


3. While blade is in fitted slot and

• Turn the tool on without the blade


making any contact and wait until


touching blade clip top, tighten the


ATTACHING THE BLADE


the blade attains full speed. Then rest


blade lock bolts securely.


the base flat on the workpiece and

Always unplug tool and place the switch

4. Test saw in a safe direction, away


gently move the tool forward along

in the locked or OFF position before

from others, before beginning use


the previously marked cutting line.

making any assembly, adjustments or

with new blade. A poorly secured

• When following curves, cut slowly so

changing accessories. Such preventive

blade risks the possibility of it coming


the blade can cut through cross

safety measures reduce the risk of

unattached during operation that


grain. This will give you an accurate

starting the tool accidentally.


could result in serious injury.


cut and will prevent the blade from

1. Using the hex key provided, loosen

Pre-Operation


wandering.

the two blade lock bolts enough for a


• When cut is completed, allow saw to


blade to be removed or inserted.

Proper planning can prevent accidents


come to a complete stop before

2. Insert blade in slot with teeth facing

when using power tools. Plan your cuts


removing from work material.

forward (Figure 2). The blade’s top

ahead of actually doing them. Mark a

CUTTING WITH A STRAIGHTEDGE

should be inserted far enough to

cutting line on the work piece to ensure

Always use a rough cut blade when

touch blade clip.


you know the direction you need to


take while using the tool.


possible. Clamp a straightedge on the


Operation


work parallel to the line of cut and


flush with the side of the saw base.


Either first mark the line of cut and


Use safe-

then position the straightedge parallel


ty equipment. Always wear eye protec-

and at the same distance as between


tion. Dust mask, non-skid safety shoes,

the blade and the side edge of the base


hard-hat, or hearing protection must be

or first mark the side edge of the base


used for appropriate condition.

and then clamp the straightedge on

Saw Blade


Safety

the mark and parallel to the cut line.


As you cut, keep the saw base edge

Holder Bolts


glasses


and ear protection must be worn dur-

flush against the straightedge and flat


ing operation.


on the workpiece.

Saw Blade -


Make sure

• If using a fence or guide, make sure it


work is


is securely fastened and complies with

Blade Teeth


held securely in vise or clamped in


manufacturer’s instructions.

Facing


place prior to starting operation. Loose

VARIABLE SPEED CONTROL

Forward


work may spin and cause bodily injury.


Keep

The speed control is a 6-position speed


dial switch located on the top front of


hands


the handle. By rotating the switch


away from cutting area and blade.


from 1 to 6, the blade speed can be set

Figure 2


from 500 to 3,000 RPM. Stroke rate


should be set for specific material

www.chpower.com


Funcionamiento (Cont.)

Funcionamiento

Use equipo de seguridad. Siempre use protección para los ojos. Se debe usar máscara para polvo, calzado de seguridad antideslizante, o protección de audición para la condición adecuada.

Se deberán usar gafas de seguridad durante la operación.

Asegúrese de que el trabajo esté sujeto en forma segura en una prensa de tornillo o mordaza antes de comenzar la operación. Si la pieza de trabajo está floja puede girar y causar lesiones corporales.

Mantenga las manos alejadas del área de corte y de la hoja.

FUNCIONAMIENTO GENERAL

Antes de cortar, asegúrese de que el espacio debajo del material a cortar sea más profundo que la hoja de la sierra.

Coloque el lado bueno del material hacia abajo y asegúrelo con una prensa o mordaza.

Ciertas hojas son útiles para diferentes tipos de cortes y materiales. Asegúrese de que la hoja en uso esté aprobada por el fabricante para la operación que se está llevando a cabo.

Mida todos los cortes a realizar para asegurarse de que están claramente marcados.

No intente alcanzar nada debajo del trabajo. No intente retirar el material de corte cuando la hoja se esté moviendo.

NUNCA sostenga una pieza que está cortando en sus manos ni sobre sus piernas. Es importante apoyar el trabajo correctamente para minimizar la exposición corporal, el atascamiento de la hoja o la pérdida de control.

Si está sosteniendo la sierra con ambas manos, no correrá riesgo de cortárselas con la hoja. Sostenga la sierra con firmeza para evitar perder el control. NUNCA coloque la mano delante de la hoja de la sierra ya que la sierra podría saltar hacia adelante sobre su mano.

Cuando siga curvas, corte lentamente de modo que la hoja pueda cortar cruzado a la veta. Esto le dará un corte preciso y evitará que la hoja se desvíe.

Cuando haya completado el corte, deje que la sierra se detenga por completo antes de retirarla del material de trabajo.

CORTE CON UNA REGLA

Use siempre una hoja de corte dura cuando sea posible. Sujete una regla en el trabajo de modo paralelo a la línea de corte y a nivel con el lado del pie de la sierra. Primero marque la línea de corte y luego coloque la regla paralela y a la misma distancia que entre la hoja y el borde lateral del pie, o primero marque el borde lateral del pie y luego sujete la regla en la marca y paralela a la línea de corte.

Al cortar, mantenga el borde del pie de la sierra a nivel contra la regla y plano sobre la pieza de trabajo.

Si usa un delimitador o guía, asegúrese de que esté fijada con seguridad y que cumpla con las instrucciones del fabricante.

CONTROL DE VELOCIDAD VARIABLE

El control de velocidad es un interruptor de disco de velocidad de 6 posiciones ubicado en el frente superior del mango. Al girar el interruptor de 1 a 6, la velocidad de la hoja se puede fijar entre 500 y 3,000 RPM. Se debe fijar la velocidad de recorrido para el material específico

a cortar. Las velocidades menores se usan para comenzar los cortes. Las velocidades medias son ideales para cortar materiales duros como metales y plásticos. Las velocidades altas se deben usar para materiales más blandos como la madera. Los metales blandos como el aluminio pueden requerir altas velocidades de corte. Ajuste las velocidades acorde a esto.

BLOQUEO DEL INTERRUPTOR DE ENCENDIDO/APAGADO

Al presionar el interruptor de encendido/ apagado y usar el botón de “bloqueo”, se puede usar la sierra vertical de forma continua. El botón de bloqueo se puede desbloquear de inmediato simplemente presionando una vez más el botón de encendido/ apagado.

ACCIÓN ORBITAL

El selector de modo de corte se puede ajustar para seleccionar el modo de corte recto o el modo de corte orbital. Esta sierra tiene 4 valores de posición. El valor marcado con 0 es para cortes rectos y los valores marcados I, II y III son para cortes orbitales. A mayor valor, mayor recorrido orbital.

CORTE DE PANELES Y TABLAS

Los paneles grandes y las tablas largas se curvan o doblan si no están sujetados correctamente. Si intenta cortar sin nivelar ni sujetar la pieza de trabajo

correctamente, la hoja tenderá a atascarse, provocando un contragolpe. Sujete los paneles grandes. Asegúrese de definir la profundidad del corte para que solamente pueda cortar a través de la pieza de trabajo, no a través de los soportes.

Siempre sujete la pieza de trabajo en forma segura en un caballete de aserrar o banco.

Siempre mantenga la base a nivel de la pieza de trabajo. De lo contrario podrá romper la hoja, lo cual puede resultar en lesiones graves. Avance muy lentamente con la herramienta cuando corte curvas o cale. Forzar la herramienta puede hacer que la superficie de corte se incline y rompa la hoja.

TIPOS DE CORTE

Cortes rectos

Se puede lograr un corte recto fácilmente sin usar un delimitador de corte o una guía. Sujete con abrazaderas un borde recto o una pieza de madera pareja sobre la pieza de trabajo y guíe el borde de la sierra contra éste. Complete el corte sólo en una dirección.

CORTES EN DIRECCIÓN DE LA VETA

Serrar es cortar a lo largo siguiendo

la veta. Seleccione la hoja adecuada para su trabajo. Use una guía de corte para cortes a lo largo de 4" de ancho o menos.

CORTES CRUZADOS

Cortar cruzado es cortar transversalmente a la veta. Seleccione la hoja adecuada para su trabajo. Avance con la sierra lentamente para evitar astillar la madera.

CORTES DIAGONALES/EN ÁNGULO

Asegúrese siempre de que la herramienta esté apagada y desenchufada antes de inclinar la base.

Con la base inclinada, puede hacer cortes en diagonal en cualquier ángulo entre 0° y 45° (a izquierda o derecha).

Afloje los pernos que se encuentran en la parte inferior de la herramienta con la llave allen.

Incline la base hasta obtener el ángulo deseado. El borde de la carcasa del motor indica el ángulo de la base mediante graduaciones grabadas en la base.

Ajuste los pernos para asegurar la base.

RECORTES/ CORTE DEL AGUJERO

Los recortes se pueden hacer de dos modos:

1.Haciendo un orificio inicial:

Para los cortes internos sin un corte de entrada desde el borde, haga un orificio inicial de 12 mm (1/2") o más de diámetro con un taladro.

Introduzca la hoja en este orificio y comience a cortar.

4

21 Sp

Page 4
Image 4
Campbell Hausfeld DG460500CK specifications Assembly, Pre-Operation, Funcionamiento

DG460500CK specifications

The Campbell Hausfeld DG460500CK is a reliable and versatile air compressor designed to meet a variety of needs, from household tasks to professional applications. Known for its sturdiness and efficiency, this model stands out in the current market owing to its solid construction and user-friendly features.

One of the key features of the DG460500CK is its powerful 4.5 CFM at 90 PSI output, which provides ample airflow for a variety of pneumatic tools, making it ideal for tasks such as inflating tires, powering nail guns, and running airbrushes. The compressor is powered by a robust 1.3 HP motor, which ensures durability and consistent performance even during extended use. Coupled with a 6-gallon steel tank, it offers a perfect balance of capacity and portability, allowing for both home and job site applications.

The DG460500CK incorporates advanced technologies that enhance its functionality. It features an oil-lubricated pump, which not only extends the life of the compressor but also helps maintain quieter operation compared to oil-free models. This makes it an excellent choice for environments where noise reduction is essential, such as residential settings or workshops. Additionally, the pump is designed for easy maintenance, enabling users to keep the compressor in optimal working condition with minimal effort.

Safety and convenience are prioritized in the design of the DG460500CK. The compressor is equipped with an integrated pressure regulator and gauge, allowing users to easily adjust and monitor the pressure levels to suit different applications. Furthermore, the unit features a quick-connect coupler, providing fast and easy tool changes, thus enhancing overall efficiency.

Moreover, the compact design of the Campbell Hausfeld DG460500CK, along with its carrying handle, makes it easily portable. Whether you’re moving it from your garage to your backyard or transporting it to a job site, the lightweight construction ensures that it can be maneuvered effortlessly.

In summary, the Campbell Hausfeld DG460500CK air compressor is a well-rounded product that combines power, convenience, and safety features for both DIY enthusiasts and professionals. With its robust build, advanced capabilities, and ease of use, it is a trusted companion for a wide range of air-powered tasks. Whether you're inflating, nailing, or sanding, this compressor is designed to get the job done efficiently and effectively.