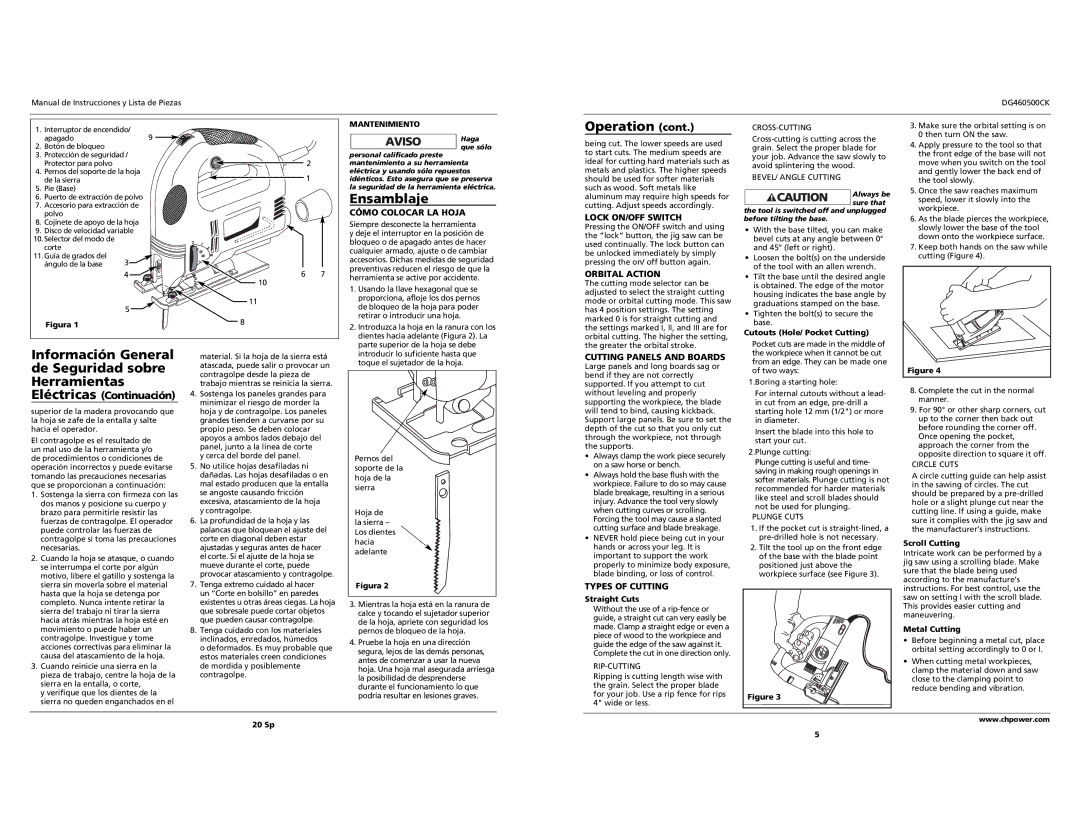
1. Interruptor de encendido/
apagado9
2.Botón de bloqueo
3.Protección de seguridad / Protector para polvo
4.Pernos del soporte de la hoja de la sierra
5.Pie (Base)
6.Puerto de extracción de polvo
7.Accesorio para extracción de polvo
8.Cojinete de apoyo de la hoja
9.Disco de velocidad variable
10. Selector del modo de corte
11. Guía de grados del | 3 |
ángulo de la base |
| 4 |
5
Figura 1
 2
2  1
1
6 7
10
11
8
MANTENIMIENTO
Haga que sólo
personal calificado preste mantenimiento a su herramienta eléctrica y usando sólo repuestos idénticos. Esto asegura que se preserva la seguridad de la herramienta eléctrica.
Ensamblaje
CÓMO COLOCAR LA HOJA
Siempre desconecte la herramienta y deje el interruptor en la posición de bloqueo o de apagado antes de hacer cualquier armado, ajuste o de cambiar accesorios. Dichas medidas de seguridad preventivas reducen el riesgo de que la herramienta se active por accidente.
1. Usando la llave hexagonal que se |
proporciona, afloje los dos pernos |
de bloqueo de la hoja para poder |
retirar o introducir una hoja. |
2. Introduzca la hoja en la ranura con los |
dientes hacia adelante (Figura 2). La |
parte superior de la hoja se debe |
Operation (cont.)
being cut. The lower speeds are used to start cuts. The medium speeds are ideal for cutting hard materials such as metals and plastics. The higher speeds should be used for softer materials such as wood. Soft metals like aluminum may require high speeds for cutting. Adjust speeds accordingly.
LOCK ON/OFF SWITCH
Pressing the ON/OFF switch and using the “lock” button, the jig saw can be used continually. The lock button can be unlocked immediately by simply pressing the on/ off button again.
ORBITAL ACTION
The cutting mode selector can be adjusted to select the straight cutting mode or orbital cutting mode. This saw has 4 position settings. The setting marked 0 is for straight cutting and the settings marked I, II, and III are for orbital cutting. The higher the setting, the greater the orbital stroke.
CROSS-CUTTING
Cross-cutting is cutting across the grain. Select the proper blade for your job. Advance the saw slowly to avoid splintering the wood.
BEVEL/ ANGLE CUTTING
Always be sure that
the tool is switched off and unplugged before tilting the base.
•With the base tilted, you can make bevel cuts at any angle between 0° and 45° (left or right).
•Loosen the bolt(s) on the underside of the tool with an allen wrench.
•Tilt the base until the desired angle is obtained. The edge of the motor housing indicates the base angle by graduations stamped on the base.
•Tighten the bolt(s) to secure the base.
Cutouts (Hole/ Pocket Cutting)
Pocket cuts are made in the middle of
3.Make sure the orbital setting is on 0 then turn ON the saw.
4.Apply pressure to the tool so that the front edge of the base will not move when you switch on the tool and gently lower the back end of the tool slowly.
5.Once the saw reaches maximum speed, lower it slowly into the workpiece.
6.As the blade pierces the workpiece, slowly lower the base of the tool down onto the workpiece surface.
7.Keep both hands on the saw while cutting (Figure 4).
Información General de Seguridad sobre Herramientas Eléctricas (Continuación)
superior de la madera provocando que la hoja se zafe de la entalla y salte hacia el operador.
El contragolpe es el resultado de un mal uso de la herramienta y/o de procedimientos o condiciones de operación incorrectos y puede evitarse tomando las precauciones necesarias que se proporcionan a continuación:
1.Sostenga la sierra con firmeza con las dos manos y posicione su cuerpo y brazo para permitirle resistir las fuerzas de contragolpe. El operador puede controlar las fuerzas de contragolpe si toma las precauciones necesarias.
2.Cuando la hoja se atasque, o cuando se interrumpa el corte por algún motivo, libere el gatillo y sostenga la sierra sin moverla sobre el material hasta que la hoja se detenga por completo. Nunca intente retirar la sierra del trabajo ni tirar la sierra hacia atrás mientras la hoja esté en movimiento o puede haber un contragolpe. Investigue y tome acciones correctivas para eliminar la causa del atascamiento de la hoja.
3.Cuando reinicie una sierra en la pieza de trabajo, centre la hoja de la sierra en la entalla, o corte,
y verifique que los dientes de la sierra no queden enganchados en el
material. Si la hoja de la sierra está atascada, puede salir o provocar un contragolpe desde la pieza de trabajo mientras se reinicia la sierra.
4.Sostenga los paneles grandes para minimizar el riesgo de morder la hoja y de contragolpe. Los paneles grandes tienden a curvarse por su propio peso. Se deben colocar apoyos a ambos lados debajo del panel, junto a la línea de corte
y cerca del borde del panel.
5.No utilice hojas desafiladas ni dañadas. Las hojas desafiladas o en mal estado producen que la entalla se angoste causando fricción excesiva, atascamiento de la hoja y contragolpe.
6.La profundidad de la hoja y las palancas que bloquean el ajuste del corte en diagonal deben estar ajustadas y seguras antes de hacer el corte. Si el ajuste de la hoja se mueve durante el corte, puede provocar atascamiento y contragolpe.
7.Tenga extremo cuidado al hacer un “Corte en bolsillo” en paredes existentes u otras áreas ciegas. La hoja que sobresale puede cortar objetos que pueden causar contragolpe.
8.Tenga cuidado con los materiales inclinados, enredados, húmedos
o deformados. Es muy probable que estos materiales creen condiciones de mordida y posiblemente contragolpe.
introducir lo suficiente hasta que |
toque el sujetador de la hoja. |
Pernos del |
soporte de la |
hoja de la |
sierra |
Hoja de |
la sierra – |
Los dientes |
hacia |
adelante |
Figura 2 |
3.Mientras la hoja está en la ranura de calce y tocando el sujetador superior de la hoja, apriete con seguridad los pernos de bloqueo de la hoja.
4.Pruebe la hoja en una dirección segura, lejos de las demás personas, antes de comenzar a usar la nueva hoja. Una hoja mal asegurada arriesga la posibilidad de desprenderse durante el funcionamiento lo que podría resultar en lesiones graves.
CUTTING PANELS AND BOARDS
Large panels and long boards sag or bend if they are not correctly supported. If you attempt to cut without leveling and properly supporting the workpiece, the blade will tend to bind, causing kickback. Support large panels. Be sure to set the depth of the cut so that you only cut through the workpiece, not through the supports.
•Always clamp the work piece securely on a saw horse or bench.
•Always hold the base flush with the workpiece. Failure to do so may cause blade breakage, resulting in a serious injury. Advance the tool very slowly when cutting curves or scrolling. Forcing the tool may cause a slanted cutting surface and blade breakage.
•NEVER hold piece being cut in your hands or across your leg. It is important to support the work properly to minimize body exposure, blade binding, or loss of control.
TYPES OF CUTTING
Straight Cuts
Without the use of a rip-fence or guide, a straight cut can very easily be made. Clamp a straight edge or even a piece of wood to the workpiece and guide the edge of the saw against it. Complete the cut in one direction only.
RIP-CUTTING
Ripping is cutting length wise with the grain. Select the proper blade for your job. Use a rip fence for rips 4" wide or less.
the workpiece when it cannot be cut from an edge. They can be made one of two ways:
1.Boring a starting hole:
For internal cutouts without a lead- in cut from an edge, pre-drill a starting hole 12 mm (1/2") or more in diameter.
Insert the blade into this hole to start your cut.
2.Plunge cutting:
Plunge cutting is useful and time- saving in making rough openings in softer materials. Plunge cutting is not recommended for harder materials like steel and scroll blades should not be used for plunging.
PLUNGE CUTS
1.If the pocket cut is straight-lined, a pre-drilled hole is not necessary.
2.Tilt the tool up on the front edge of the base with the blade point positioned just above the workpiece surface (see Figure 3).
I
0
Figure 3
8.Complete the cut in the normal manner.
9.For 90° or other sharp corners, cut up to the corner then back out before rounding the corner off. Once opening the pocket, approach the corner from the opposite direction to square it off.
CIRCLE CUTS
A circle cutting guide can help assist in the sawing of circles. The cut should be prepared by a pre-drilled hole or a slight plunge cut near the cutting line. If using a guide, make sure it complies with the jig saw and the manufacturer’s instructions.
Scroll Cutting
Intricate work can be performed by a jig saw using a scrolling blade. Make sure that the blade being used according to the manufacture’s instructions. For best control, use the saw on setting I with the scroll blade. This provides easier cutting and maneuvering.
Metal Cutting
•Before beginning a metal cut, place orbital setting accordingly to 0 or I.
•When cutting metal workpieces, clamp the material down and saw close to the clamping point to reduce bending and vibration.