Camera User Guide
Function
Symbols Used
Flowchart and Reference Guides
Using the Flash
Procedures
Table of Contents
About Printing 101 Dpof Print Settings 103
Saving Custom Settings Setting the Auto Rotate Function
Registering My Camera Settings 121
Battery Performance 144
Read This First
Warranty Limitations
Please Read
Test Shots
Language Setting
Camera Body Temperature
Charging the Date/Time Battery
About the LCD Monitor
Safety Precautions
Read This First
Read This First
Read This First
Read This First
Preventing Malfunctions
Avoid Condensation Related Problems
Avoid Strong Magnetic Fields
If Condensation Forms Inside the Camera
AF-assist Beam p
Components Guide
Terminal p
Direct Print Compatible Printers Sold Separately
AF Frame Selector Battery Cover p Button p
Indicators p
Strap Mount LCD Monitor
Viewfinder
Upper Indicator
Shooting Mode Dial Indicators
Lower Indicator
Power Lamp
Close the battery cover
Installing the Batteries
Proper Battery Handling
Preparing the Camera
Preparing the Camera
Never use batteries that look like this
Battery Status Indications
Change
Batteries Should replace the batteries Immediately
Close the CF card slot cover securely
Formatting a CF Card
About CF Cards
Press the Menu button
Press the SET button Press the Menu button
Setting the Date/Time
Setting the Language
Shortcut Operation
LCD monitor can also be positioned as below
Opening the LCD Monitor
Fold the LCD monitor back against the camera body
Shooting Mode
Using the LCD Monitor
DISP. Button Detailed
AF Frame set to AiAF p
Icons Displayed in Shooting Mode
Playback Mode
DISP. Button Detailed Display
DISP. Button
ISO Speed Flash Macro Mode
Icons Displayed in Playback Mode Detailed Display
White Balance
Following information may also appear with some image files
About the Histogram
Sample Histograms
Dark image Balanced image Bright image
Press the ON/OFF button until the power lamp lights green p
Turning the Power On/Off
Press the ON/OFF button again to turn the power off
Basic Functions
Switching between Shooting and Playback
ZOpen the LCD monitor and slide the mode switch to
Shooting The Basics
Auto Mode
Press the shutter button halfway
Shutter button has a two-stage action
Pressing Halfway
Press the shutter Button all the way
Pressing halfway automatically sets the exposure and focus
Pressing Fully
About the Autofocus Function
Shooting with the Viewfinder
Image Seen in Viewfinder vs. Recorded Image
AF-assist Beam
Displayed
Reviewing an Image Right after Shooting
Rec. menu appears
Changing the Image Display Duration
Using the Mode Dial Image Zone
Landscape Mode
Portrait Mode
Night Scene Mode
Shooting Modes Always use a tripod to prevent camera shake
Resolution
Changing the Resolution and Compression
Purpose
Large
Select
Resolution you Wish to set using Left or right Button
Press the FUNC. button
Excluding
Using the Flash
Press the button to switch between Flash modes
Shoot the image
Adjustments
Setting the Red-eye Reduction Function
Rec. menu, set Red- eye to On
Appears on the LCD monitor
Macro Mode
Macro mode is not available
Press the DISP. button to turn the LCD monitor on Button
Current setting is displayed
Self-timer
Digital Zoom
Continuous Shooting
Framing a Subject
Shooting Panoramic Images Stitch Assist
Shoot the first image
Use the same procedures to Shoot the remaining frames
Press the SET button after the last shot
Shooting
Clearly with the optimal exposure
Special Scene Mode
Turn the mode dial to Special Scene mode
Night Snapshot Kids & Pets Indoor
Foliage Snow Beach
Postcard Print Mode
Select Postcard using the left or right button
Press the FUNC. button Shoot the image
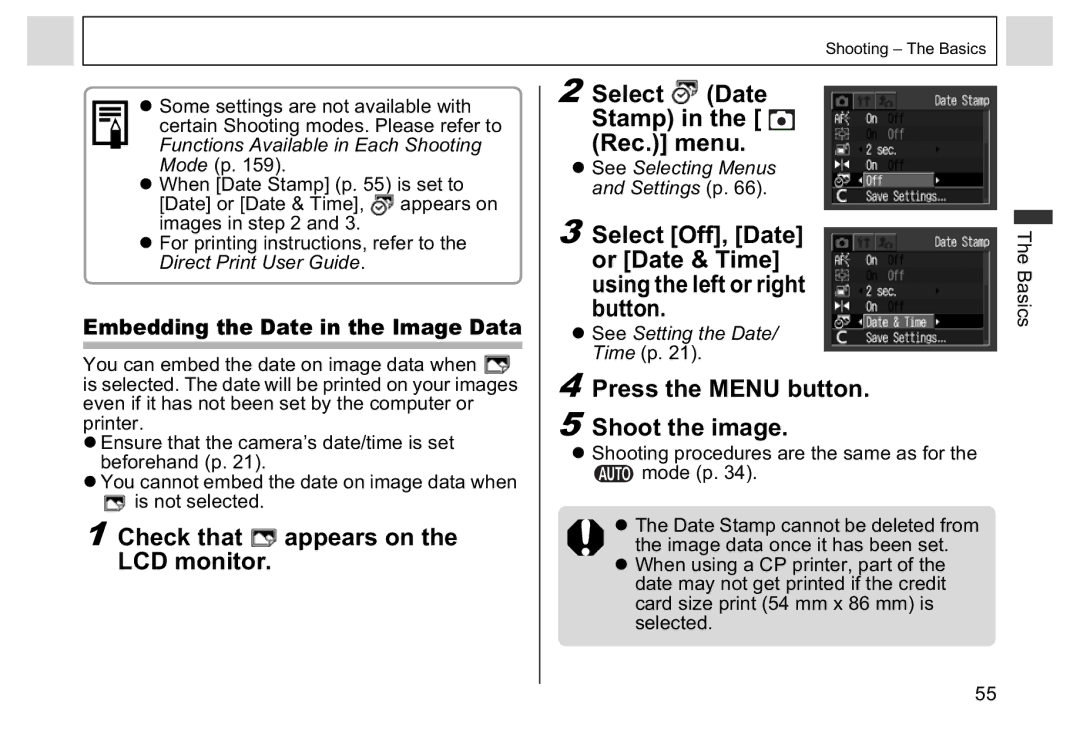
Press the Menu button Shoot the image
Select Off, Date or Date & Time using the left or right
Embedding the Date in the Image Data
Time p
Press the shutter button all Way
Movie Mode
Basics
Playback The Basics
Viewing Images in Sets of Nine Index Playback
Canceling the Magnified Display
Images appear at once index playback
Movie Selected Images
Press the zoom lever toward While in index playback p
Jumping Between Images
Change the image Selection
Viewing/Editing Movies
Select the movie you wish to edit Press the SET button
Pausing and Resuming Play
Fast Forwarding/Rewinding
Editing Movies
Select an editing
Method using Up or down Button
Or more can be edited in 1-frame units
New File
Erasing
Confirmation screen appears
Erase function p
Erasing
Selecting Menus and Settings
Selecting Settings with the FUNC. Button Shooting Mode Only
Shooting Advanced Functions
Rec. Menu Play Menu Set up Menu
Settings you wish to set
Use the left or right button to select
Use the up or down button to select a menu item
Shooting Advanced Functions
Rec. Menu
Menu Settings and Default Settings
Play Menu
Volume Start-up Vol
Set up Menu
Mute
Operation Vol
Released Volume Shutter Volume
Selftimer Vol
Auto Rotate
Ft./in
Language
Customizing the Camera My Camera Settings
Turn the power on
Resetting the Settings to Default
Can be performed from Shooting or Playback mode
Press the Menu button for longer Than 5 seconds
How to Use the Mode Dial
Using the Mode Dial Creative Zone
Setting the Shutter Speed
Program AE
Differences between the and Modes
Value Seconds
Aperture
Wide Angle
Telephoto
Aperture Value Display
Setting the Aperture
Manually Setting the Shutter Speed and Aperture
Rec. menu, select AF frame
Select the AF Frame
Setting an AF Frame Manually
Press the button
Switching between Light Metering Modes
Using the left or
Metering mode
Select * Evaluative FUNC. menu
Select a light
Adjusting the Exposure
Adjust the compensation using the left or Right button
Select * +/- Exp. FUNC. menu
Select * Auto FUNC. menu
Adjusting the Tone White Balance
Custom
Daylight
Setting a Custom White Balance
White balance cannot be adjusted
Select * Auto in the Func Menu
Shooting mode other than is selected
Zoom is positioned to the telephoto end setting
Set the digital zoom to Off
Mode, white balance data cannot be read
Select the ISO speed using Left or right button
Changing the ISO Speed
Select * ISO Speed FUNC. menu
Select the photo effect using Left or right button
Changing the Photo Effect
Select * Effect Off in the Func Menu
Adjusting the Flash Output
Adjust the flash output using Left or right button
Select Flash Output in the FUNC. menu
Shooting with AF Lock
Shooting with Focus Lock
Indicator Appears
Shooting in Manual Focus Mode
Press the MF
Button until Appears
Focus using the left or right Button and shoot the image
Saving Custom Settings
Set the setting contents you wish To save
Setting the Auto Rotate Function
Select Save Settings Rec. menu and press the SET button
Set up menu, select Auto Rotate
Select OK and press the SET button Press the Menu button
Shooting Advanced Functions
Rotating Images in the Display
Playback Advanced Functions
Play menu, select Rotate and press the SET Button
Original 270
Select Sound Memo in the Play menu and press SET button
Attaching Sound Memos to Image
Playing the Sound Memos
Erasing the Sound Memos
Auto Play
Pausing and Resuming Auto Play
Play menu, select Auto Play and press the SET Button
Stopping Auto Play
Protecting Images
Play menu, select Protect and press the SET Button
Protected Icon
About Printing
Various Functions
Direct Print Compatible Printing
Print settings
Play menu, select Print Order and press the SET Button
Dpof Print Settings
Selecting Images for Printing
Single Images
All the Images on a CF Card z Press the zoom lever
Setting the Print Style
Format specified in the Date/Time menu
Resetting the Print Settings
Play menu, select Transfer Order and press SET button
Image Transmission Settings Dpof Transfer Order
Select images for transferring
Selecting Images for Transferring
All the Images on a CF Card
Downloading Images to a Computer
Windows
Connecting the Camera to a Computer
Macintosh
Disk first time only
Slide the cameras mode switch to
USB port Interface cable DIGITALTerminal
Various Functions 111
Windows Proceed to steps 5 and 6 on the right Macintosh
Press the ON/OFF button until the power lamp lights green
Downloading Images by Direct Transfer
All Images/New Images/DPOF Trans. Images
Use the up or down button to Select , or Press Button
Select & Transfer/Wallpaper
Select
Various Functions 115
See steps 2 to 4 on
Double-click the icon of the drive With the CF card
Downloading Directly from a CF card
Xxx is a three-digit number from 100 to 998 p 116
Viewing Images on a TV Set
Set up menu, select File No. Reset
Resetting the File Number
Various Functions 119
Customizing the Camera My Camera Settings
Changing My Camera Settings
Start-up image displays 120
Registering the CF Card Images and Sounds
Registering My Camera Settings
Press the DISP. button
Select or using the left or right button
An image appears Start-up Image Go to a, 7a
122
ZStart-up Image
File Format of My Camera Settings
Recording Format Wave monaural Quantization Bits
Recording Time
List of Messages
Cannot magnify
Unidentified Image
Cannot rotate
Incompatible Wave
Problem Cause Solution
Troubleshooting
Shutter button when the upper indicator lights
ZBe sure the cover is closed securely
Lens will not
ZClose the CF card slot cover or battery cover
Until ready to use them
129
Subjects for the Autofocus p
Recorded image is Be too bright
Subject Subject too close causing flash to
Formatting a CF Card p
Using the Power Kits Sold Separately
Charge Indicator
Appendix
Remains lit
Using the AC Adapter Kit ACK600
Using the Lenses Sold Separately
Wide Converter WC-DC52
Tele-converter TC-DC52A
Close-Up Lens 250D 52 mm
Shooting Ranges in Macro Mode
Conversion Lens Adapter LA-DC52D
End
Lens
Release button Hold it down, Turn the ring Direction Arrow
Be sure that the camera is turned off Press the ring
Attaching a Lens
Ring
Appendix
Camera Care and Maintenance
PowerShot A95
Specifications
Fluorescent H or custom
Pets and Night Snapshot, Stitch assist and Movie
High-Speed continuous shooting Approx .0 shots/sec
Compatible
AA-size alkaline batteries included in the camera kit
Battery Performance
CF Cards and Estimated Capacities Recordable Images
M1 Medium
M2 Medium
Image File Size Estimated
NiMH Battery NB-2AH
Battery Charger CB-4AH/CB-4AHE
Compact Power Adapter CA-PS500
CompactFlashTM Card
Separately
Close-up Lens 250D 52 mm Sold
Conversion Lens Adapter LA-DC52D Sold Separately
Tele-converter TC-DC52A Sold Separately
ZAdvanced Technique for the Macro Mode p
ZTip for Using the Self-timer p
ZHow to Adjust the Exposure p
Photo Tips and Information
Underexposure
Adjust the exposure compensation towards the + end
Optimal Exposure Overexposure
ZISO Speed p
35, 71
Batteries
CompactFlash card 141
Erasing
Focus
Exposure
Light Metering
Manual
My Camera
Movie
Operation Sound
Playback
Transfer Order
Start-up
Wave Files
Appendix 155
156
Appendix 157
158
Functions Available in Each Shooting Mode
Drive
AF Lock Manual Focus Macro Mode Digital Zoom
Mode
Frame