Cámara DVD
Manuel d’instruction
Manual de Instrucciones
DVD Camcorder Caméscope DVD
Important Usage Instructions
Introduction
Important Safety Instructions E
Example of Antenna Grounding AS
Advantages of DVDs
An Introduction to DVDs
Best for Reusability
Available disc specifications Video mode only
Best for Compatibility
Best for Recording Time
With a DVD player
Feature
Again for recording Giving a title to the disc
Table of contents
Playing Back the Disc on an External Device
Editing Functions
Additional Information
External Connections
About this Manual
About this Manual
Conventions Used in the Manual
Trademark Acknowledgements
Operation
About the Power Switch
About the Multi Selector
About the Operating Modes
Getting to Know the Camcorder
Supplied Accessories
AV terminal Terminal cover
Components Guide
Left side view Right Side View Front view
Back view Top view Bottom view
Wireless Controller WL-D86
Recording Movies Recording Still Images
Screen Displays
Remaining recording time
Card/Disc Access Display
Remaining battery charge
Recording reminder
Viewing Still Images
Playing Movies Index Screen
Playing Movies During Playback
Getting Started
Preparing the Power Supply
Turn on the camcorder
Adjust the viewfinder
Disconnect the compact power adapter from the camcorder
Preparing the Camcorder
Rotating the LCD Panel Open the LCD panel 90 degrees
Wireless Controller
Adjusting the LCD Screen
Fasten the grip belt
Turn off the camcorder Open the memory card slot cover
LCD Backlight
Inserting and Removing a Memory Card
Only miniSD cards can be used with this camcorder
Points to Check
When Using DVD-R/DVD-R DL Discs
Inserting and Removing a Disc
Grab the edge of the disc and gently pull it out
Removing the Disc Move the power switch to on
Selecting a Menu Option
Using the Menus
Press FUNC. to save the settings and close the menu
Selecting a FUNC. Menu Option
Changing the Time Zone
First Time Settings
Changing the Language
DATE/TIME JAN , 2006 1200 AM
Setting the Date and Time
DATE/TIME Setup
Select the month and move to the day setting
Before You Begin Recording
Recording
Recording Movies
Recording
Basic Functions Selecting the Aspect Ratio of your
Recording Still Images
Reviewing the Last Scene Recorded
Press record review
Selector
Press Photo halfway
Press Photo fully
Selecting the Media for the Still Images
Move , the selection frame
Playback
Zooming
Playing Back Movies
Slow Forward Playback Slow Reverse Playback
Special Playback Modes
Fast Forward Playback Fast Reverse Playback
Playback Pause
Use the multi selector to move between images
Adjusting the Volume
System Setup
Magnifying the Still Image
Data Code Date & TIME
Display Setup
Press Menu Select Display Setup and press
DATE, TIME, DATE&TIME only
VARIABLE, Speed 3, Speed 2, Speed
Camera Setup
Menu Options Lists
Menu Options
Advanced Functions
VIDEO, VR, Cancel
Disc Operations
ALL Copy
NO, YES
Still IMG Oper
Date & Time
Display Setup
NORMAL, Bright
Camera Data
RESET, Continuous
System Setup
High Volume
LOW VOLUME, OFF
FUNC. Menu Options
Standard PLAY, Long Play
Image Effect OFF, VIVID, Neutral
Effect OFF, Fader
Effect OFF, BLK&WHT
CANCEL, Start
Using the Recording Programs
Program AE as described
Programmed Auto Exposure
FUNC. Recording Program
Shutter speed guidelines
Change the shutter speed and press to save the setting
Shutter-Priority AE
Aperture-Priority AE
Available aperture values
Manual Exposure Adjustment
Adjust the brightness of the image as required
Exposure, Focus and Color
Automatic Focus Modes
Light Metering Mode
Manual Focus Adjustment
Select the autofocus mode
Appears Pressing Focus again will return to autofocus
Camcorder. Use this setting for outdoor
White Balance
Infinity Focus
White Balance
Press FUNC. to save the setting and close the menu
Image Effects
Selecting the Size and Quality of Still Images
Press and select the custom setting options
Adjust each setting as desired and then press
Still Image Recording Options
While you are recording a movie, press Photo
Capturing a Still Image while Recording Movies
Still I. REC OFF
Press Photo fully and hold it pressed down
Continuous Shooting and Exposure Bracketing
Press Photo halfway to activate the autofocus
Press FUNC. after the last image
Drive Mode
Creating Panoramic Images
Press Photo to record the first image
Autofocus and then fully to record Still image
Self Timer
Menu Camera Setup Self Timer
Press Photo , first halfway to activate
Press flash button
LED Light
Flash
Press Light
Effect Effects
Digital Effects
Selecting a Fader / Effect
Fader Faders
Applying
Using the Multi-Image Screen
Setting
Digital Effect
Camera Chroma Key CAM. Chroma
Combining Images Card Mix
Card Luminance Key Card Lumi
Card Animation C. Animation
Effects button Press D.EFFECTS
Card MIX
Level preferred
Moving Scenes in the Playlist
Editing the Scenes
Creating a Playlist
Adding Scenes to the Playlist
Deleting All Scenes
Disc type DVD-RW discs Video or VR mode
Deleting a Single Scene
FUNC. Delete YES
Initializing the Disc
Disc Options
Dividing a Scene
Protecting the Disc
Changing the Disc Title
Erasing Still Images
Still Image Options
Copying All Images
Copying Still Images
Converting Still Images into Photomovie Scenes
Copying a Single Image
Protecting Still Images from the Index Screen
Protecting Still Images on the Memory Card
Converting All Images
Protecting a Single Image
Menu Still IMG Oper Card Initialize YES
Initializing the Memory Card
Still IMG Oper
Protect
Restrictions after Disc Finalization
Finalizing the Disc
Finalizing the Disc
Finalize
Disc type DVD-RW initialized in Video mode
Without unfinalizing
Unfinalize
Unfinalized
Additional scenes even
AV Terminal
Connecting to a TV or VCR
Connection Diagrams
Connecting to a TV or VCR
Video Input Recording
Selecting the Type of TV
Playback on a TV Screen
Recording to a VCR
This camcorder Change the recording settings as necessary
Menu LINE-IN Mode
Transferring Recordings MyDVD for Canon
Connecting to a Computer
PC Connection Diagrams
System Requirements
Setup Wizard will launch automatically
Click Next to start the registration
Connecting the Camcorder
Serial number will already be filled
Completing the User Registration
If the operation is interrupted
One-Touch Dubbing Windows XP only
Software does not support writing on
Insert the source disc into the camcorder
Insert a finalized disc into Camcorder Run MyDVD for Canon
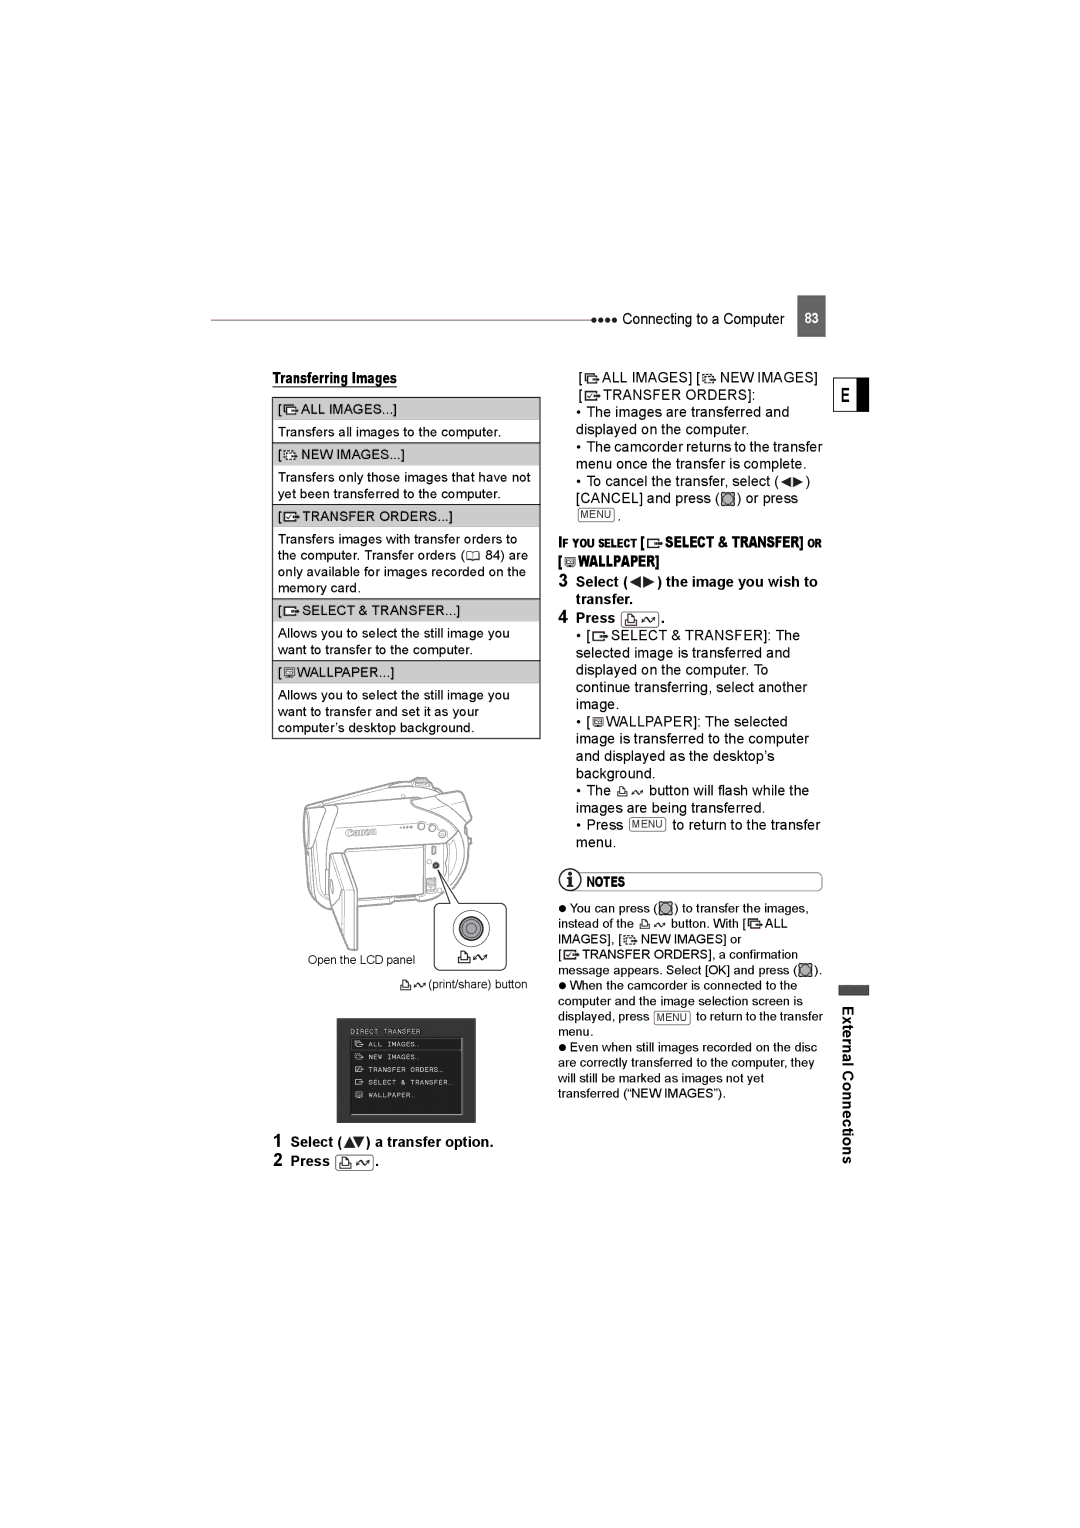
Print/share button
Transferring Still Images Direct Transfer
If YOU Select Select & Transfer or Wallpaper
Transferring Images
Select a transfer option Press
ALL Images NEW Images Transfer Orders
Erasing All Transfer Orders
Transfer Order Settings
Setting Transfer Orders from the Index Screen
Selecting Still Images to Transfer Transfer Order
Select the still image you Wish to print Press Print/share
Connecting to a Printer
Printing Still Images Direct Print
Printing with the Print/Share Button
Number of copies Print effect Date printing
Print Settings
Select the print settings Select , Print and press
Trimming settings Paper settings
Connections
Trimming Settings
Print setting menu, select Trimming and press
Change the size of the trimming frame
Selecting Still Images for Printing Print Order
Print Order Settings
Setting Print Orders from the Index Screen
Move , the trimming frame
Press Menu , select Print and press
Erasing All Print Orders
Printing
Print
Trouble?
Troubleshooting
Power Source
Problem Solution
Additional Information
Problem
Playback/Editing
Playing Back the Disc in an External DVD Device
Message Explanation
List of Messages
Memory Card Operation
Supported not DVD-R/RW
Video mode that was finalized with another digital device
Disc could not be read. Try cleaning it or replace the disc
Onto it. Try cleaning the disc or replace it
Disc is being read. Wait before you start recording
Could not recover a corrupted file
No disc is loaded. Insert a disc
Or Secam
Direct Print Related Messages
Close the printer cover securely
Printer is in use. Check the printer status
Position
Camcorder
Handling Precautions
Battery Pack
Treat the battery pack with care
Do not store the camcorder with a disc left inside
About the battery terminal cover
Mini DVD Disc
Memory Card
Built-in Rechargeable Lithium Battery
Lithium Button Battery
Condensation
Maintenance/Others
Cleaning
Storage
Playback on a TV Screen
Using the Camcorder Abroad
Power Sources
General Information
System Diagram Availability differs from area to area
Use of genuine Canon accessories is recommended
Optional Accessories
Battery Packs
CG-300 Battery Charger
WS-20 Wrist Strap
Provided Accessories
Optional Accessories
Product Codes
Memory Card
Specifications
DC22
System
Input/Output Terminals
CA-570 Compact Power Adapter
BP-208 Battery Pack
Power/Others
Index
XP mode
111
Canada
Canon Consumer Digital Video Equipment Limited Warranty
Canon INC Canon U.S.A., INC. NEW Jersey Office