Camera User Guide
Installing the Software
Connecting the Camera to a Computer
Using the Printer and Printing
Shooting with the Camera
Camera Body Temperature
Language Setting
About the LCD Monitor
Video Format
Symbols Used
Set up Menu p My Camera Menu p
Question? Look Here First
How do I go about printing? About Printing p
Shows the Rec., Replay, Set up and My camera menus at a
How to use a TV set for shooting and reviewing images
Printing, Transferring
Page
Table of Contents
Shooting Selecting Particular Effects
100
Displaying Images Individually 113
114
Image Transfer Settings Dpof Transfer Order
Warranty Limitations
Test Shots
Page
Page
Avoid Condensation Related Problems
Avoid Strong Magnetic Fields
If Condensation Forms Inside the Camera
Install the Battery p
Charge the Battery p
Turn the power on p
Turn the mode dial to p Focus p
Shoot p
View the recorded image p
To Immediately Delete the Displayed Image
Front View
Upper Indicator
Lower Indicator
Back / Bottom View
Controls
Top
Back
Mode Dial
Auto p
Image Zone
Creative Zone
Shooting Mode
Replay Mode
Main Dial
Turning the Main Dial
Display Panel
Charging the Battery Pack
Turn off the power p
Battery cover
Make sure that the power/mode indicator is off
Battery Pack Handling Precautions
Charging the Battery Pack
Installing the Battery Pack
Slide the battery cover in the direction
Turn off the camera p
Arrows
Battery Status Symbols
Installing the Battery Pack
Using Compact Power Adapter
Installing a CF Card
Insert the CF card with the label facing up
CF Card Handling Precautions
Setting the Date / Time
Turn on the camera p Press the button
Button
Set the date and time
Replacing the Date Battery p
Setting the Language
Window
Using the Soft Case Optional
Attaching the Strap
Attaching the Lens Cap
Turning the Power On / Off
Powering the Camera in Shooting Mode
Mode Lever
Orange Shooting mode Green
Powering the Camera in Replay Mode
Turning the Power Off
Power/mode indicator lights green
Power goes off
Turning the Power On / Off
Power-saving Function
Turning on the camera without the startup sound and image
Shooting Mode
Replaying Mode
Camera switches to shooting mode
Using the LCD Monitor
Switching between Display Modes
Tilt it 180 degrees toward the lens
Camera body
Using the LCD Monitor
Information Displayed on the LCD Monitor
Following displays in information view
Simple display mode, the following information appears
Following information may also appear with some image files
About the Histogram
Overexposure Warning
Using the Optical Viewfinder to Shoot
Image Seen in Viewfinder vs. Recorded Image
Shooting with an Off-Center AF Frame Selected
Pressing the Shutter Button
Pressing Halfway
Pressing Fully
Pressing the Shutter Button
AF-assist Beam
AF-assist beam can be turned off p
Using the Zoom Focal Length
Telephoto / Wide Angle
Digital Zoom
Selecting Menus and Settings
Turn the mode lever to Shooting
Press Button to turn on the LCD monitor
Press Button, Button or click the main dial
Selecting Settings by Pressing the Button
Menu switches as follows Rec. or Replay Set up My Camera
Replay menu appears
Menu Settings and Factory Defaults
Selecting Menus and Settings
Menu Items Selectable with the Button
Menu Items Selectable with Button
Basic
Changing My Camera Settings
Pressing the button also switches between the menu tabs
Pressing
Effect
Registering the My Camera Settings
Turn the mode lever to Replay
Registering CF Card Images and Sounds
Select or using the B or a arrow on the omni selector
Appears
File Format of My Camera Settings
Registering the My Camera Settings
Start-up Image
Auto Mode
Shooting Letting the Camera Select Settings
Auto Mode
Press the shutter button all the way p
Reviewing the Image
Changing the Recording Format Right after Shooting
2Keeping the Shutter Button Pressed
2Pressing the button while the image is displayed
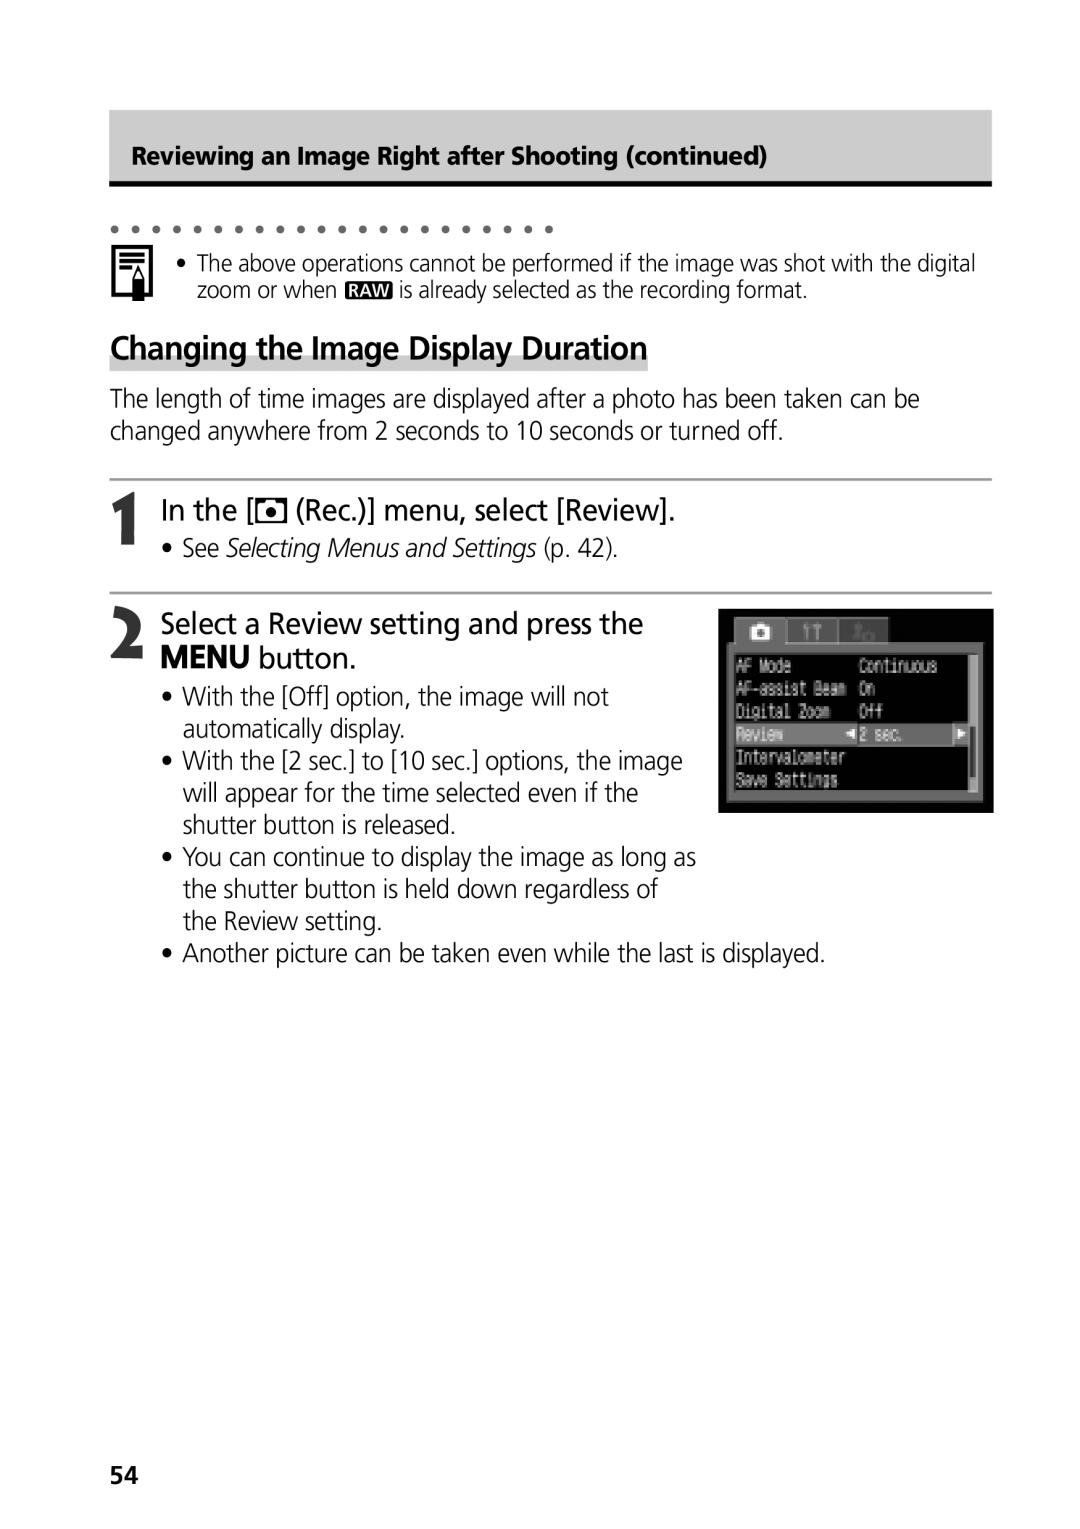
Select a Review setting and press the button
Changing the Image Display Duration
Reviewing an Image Right after Shooting
Using the C or D arrow on the omni selector
Press Button to turn the LCD monitor on
Select
Select the resolution you wish to set
Press the · button Select the compression you wish to set
Shoot the image
This screen will appear again, once the image is shot
Initial Shooting Next Shooting Mode
Changing the File Format
Button Select
Press
Press the button, the button or click the main dial
Appears on the LCD monitor and on the display panel
Using the Flash
Press the button to switch between flash modes
Mode p
Use the flash according to the guidelines below
Setting the Red-eye Reduction Function
Setting the Slow Synchro
Rec menu, set Red-eye to On
Rec. menu, set Slow Synchro to On
Using the Flash
Portrait Mode
Landscape Mode
Same as for Mode
Use this mode to shoot expansive landscape scenes
Night Scene Mode
Stitch Assist Mode
Framing a Subject
Open the LCD monitor and turn the mode dial
Stitch Assist Mode
Shooting
Shoot the first image
Use the same procedures to shoot the remaining frames
Press the button after the last shot
Movie Mode
Press the shutter button all the way
Recording time in seconds
Shooting and sound recording starts simultaneously
Macro Mode
Press Button again to cancel the macro Mode
Icon appears on the display panel and on
LCD monitor
Self-Timer
Beginning. The shutter activates in two seconds
Setting the Number of Seconds until Shooting
Menu.Select Self-timer from the Rec
Shooting procedures are the same as for the mode p
Digital Zoom
Images become coarser the more they are digitally zoomed
Continuous Shooting
Rec. menu, select Cont. Shooting
Also appear in the LCD monitor if it is on
When
Continuous Shooting
Program AE
Shooting Selecting Particular Effects
Program AE
Differences and Similarities between the and Modes
Setting the Shutter Speed
Turn the main dial and select a shutter
Speed
Also appear on the LCD monitor if it is on
Setting the Shutter Speed
Wide Angle
Telephoto
Shutter Speed Display
Setting the Aperture
Value
Setting the Aperture
Aperture Setting Display
Clicking the main dial switches between
Indicates the difference between standard
Difference is more than ±2 stops, the LCD
Monitor shows a red -2 or +2
Selecting an AF Frame
AF frame appears in green on the LCD
Monitor
Pressing the shutter button instead of pressing
Press Button to select Metering mode
Press
Switching between Light Metering Modes
Rec. menu, select Spot AE Point
Select the Center or AF Point option Then press the button
Adjusting the Exposure
Press C on the omni selector
Press Button or click the main dial
Dial or the B or a arrow on the omni selector
Setting the White Balance
Please see the next page regarding the custom setting
Press On the omni selector
Press the button or click the main dial Shoot the image
Setting a Custom White Balance
Balance settings appear on the LCD monitor if it is on
Setting the White Balance
However, the Custom Effect settings cannot be changed
Changing the Photo Effect
You can shoot with different photo effects
Contrast
Sharpness
Saturation
Changing the Photo Effect
Page
Changing the ISO Speed
Panel using the C or D arrow on the omni selector
Compensation range cannot be adjusted
Select or in to cancel the AEB mode
Auto Exposure Bracketing AEB Mode
Focus Bracketing Focus-BKT Mode
However, the range cannot be adjusted
Focus Bracketing Focus-BKT Mode
While pressing the shutter button halfway, press the button
Recompose the image and shoot
AF frame focuses on the subject
Locking the Exposure Setting AE Lock
AE lock function cannot be used when the LCD monitor is off
Setting instructions
Icon
Appears on the Display Panel and on the LCD monitor
Switching between Flash Adjustment Settings
Compensating the Flash Adjustment Flash
Select Flash Adjust from
Select Auto or Manual and press the button
Compensating the Flash Output
B or a arrow on the omni selector
101
Switching the Timing at which the Flash Fires
102
Select Intervalometer from the Rec. menu
103
Press the shutter button
Appears on the display panel
Shooting Images at Set Intervals Intervalometer
104
Shooting with Focus Lock
Focus Lock Method
105
Shooting in Manual Focus Mode
Icon and the MF indicator will appear on LCD monitor
AF frame area is magnified when MF-Point
Turn the main dial to focus
Using the Manual Focus in Combination with the Auto Focus
Current focusing point
Focus the camera with the manual focus
107
Switching between Focus Settings
You can switch between focus settings to shoot
Continuous
Single
Saving Custom Settings
Settings that can be saved to the C1/C2 mode
Shooting menu settings Zoom location Manual Focus location
Select C1 or C2 and press the button
Using the ND Filter
Select On and press Button
Appears on the Display Panel
110
Setting the Auto Rotate Function
Select Auto Rotate in the Set up menu
Information display is on
111
Resetting the File Numbers
Set up menu, select File No. Reset
Select On or Off and press the button
You can select the way file numbers are assigned
Turn the mode lever to
Displaying Images Individually
Open the LCD monitor
Cancelling the Magnified Display
Turn the zoom lever toward Symbol
Magnifying Images
Images can be magnified up to approximately 10 times
Viewing Nine Images at a Time Index Replay
Up to nine images can be viewed at once in index replay
Nine images appear at once index replay
Press the button to show the data for the displayed image p
Jumping Between Images
Press Button while in single replay p or index Replay p
Displayed images change
Single Replay
You can replay the images shot in mode
Pausing and Resuming Play
Viewing Movies
Fast Forwarding / Rewinding
Viewing Movies
118
Editing Movies
Select the movie you wish to edit and press Button
See Viewing Movies p
Movie editing panel and the movie editing bar appear
Editing Movies
120
Rotating Images in the Display
Selectmenu.Rotate from the Replay
Menu
121
Attaching Sound Annotations to Images
Playing back the Sound Annotations
Erasing the Sound Annotations
You cannot attach sound annotation to movies
123
When the slide show is over, press Button
Automated Playback Slide Show
Starting a Slide Show
Replay menu, select Slide Show and press the button
Selecting Images for Slide Shows
125
Adjusting the Play Time and Repeat Settings
Automated Playback Slide Show
126
Set up menu closes
Play Time
Select a play time
Repeat
Protecting Images
Replay menu, select Protect and press the button
You can protect important images from accidental erasure
Protect window closes
Erasing Images Individually
Protected images cannot be erased with the erase function p
129
Erasing All Images
Replay menu, select Erase All and press the button
130
Set up menu, select Format Press the button
Formatting a CF Card
131
About Printing
132
Print Settings for Direct Print Function
133
Selecting from the Print Menu
134
Reset p
Turns the menu on/off
Number of copies
135
Connecting the Camera to a Printer
Connecting to a Direct Print Function Compatible Printer
136
Connecting to a Bubble Jet Printer
Press the printer’s ON/OFF button to turn on the power
Direct interface cable
Mark of the cable faces the front
Connect the camera and printer using the cable
Connecting the Camera to a Printer
138
Printing
139
Cancel Printing
Printing Errors
Printing
140
Setting the Print Style
Selecting the Number of Copies
Direct Print Function Compatible Printer
Direct Print Function Compatible BJ Printer
Setting the Print Settings Direct Print Function
142
Setting the Printing Area Trimming
Button again
You can specify which portion for an image gets printed
Prior to Trimming
Press the button to close the setting menu
Setting the Portion of the Trimming Frame
Trim the Image
Changing the Size of the Trimming Frame
Print Settings Dpof Print Settings
Selecting Images for Printing
Replay menu, select Print Order and press the button
145
Select images for printing
Single Images
All the Images on a CF Card
Pressing the button again
Maximum of 998 images can be marked per CF card
147
Print Type
Select Standard, Index or Both
Date
File No
Resetting the Print Settings
149
Printing with Dpof Print Settings
150
Cancel Printing p Restarting Printing
Printing Errors p
Size
Postcard Size
Selecting Images for Transferring
Replay menu, select Transfer Order and press the button
152
Press the button to switch to index replay three images
Select images for transferring
153
Terminal on the camera
154
Downloading Directly from a CF Card
155
Connecting the Camera to a Computer Via the USB Cable
156
Setting the Communication Mode
Set Up menu, select Communication
Check that the camera is not connected to the computer
157
Rec. Menu
Some items may not appear in certain shooting modes p
158
159
Rec. Menu
160
Replay Menu
161
Set up Menu
162
163
Set up Menu
164
165
My Camera Menu
166
Settings of each
For details, see the table below
My Camera menu
167
Resetting the Settings to Default
Turn on the camera
Press the button for longer than 5 seconds
168
List of Error / Message Codes
Error Codes
Message Codes
169
List of Messages
Incompatible RAW format
Cannot magnify You attempted to magnify an image that was
Different format, or edited on a computer
Cannot rotate You attempted to rotate an image that was
Or the paper feed isn’t operating correctly
No Ink
Ink
List of Messages
173
Using the Wireless Controller
Installing the Battery
174
Removing the Battery
Shooting / Replaying
Shooting
175
Using the Wireless Controller
Replaying
Icon appears in the display panel
176
Attach the flash to the camera’s hot
Shoe
177
Flash is charged when its pilot lamp lights up
Other Canon Flashes
Press the shutter button halfway to focus
Press the shutter button all the way to shoot the image
Auto Zoom Not available with the 220EX
179
Attach the controller to the camera’s hot shoe
180
Macro mode p
Attach Flash Heads to their respective flash head mounts
Press the button and set ND filter to on
ND filter p
Daylight Synchro Slow Synchro Flash Exposure Compensation
182
Using Conversion Lenses Optional Close-up Lenses Optional
Wide Converter WC-DC58N
183
Using Conversion Lenses Optional / Close-up Lenses Optional
Close-up Lens 250D 58 mm
184
Mounting the Lenses
185
Using a Charge Adapter / Car Battery Cable Kit Optional
Using a Car Cigarette Lighter Socket as a Power Source
Confirm that the camera’s power is turned off
Be sure to have the engine running when you unplug it too
187
Replacing the Date Battery
189
Camera Care and Maintenance
Troubleshooting
191
Troubleshooting
192
193
ISO speed p
194
195
Battery Performance
196
See page 17 for battery handling precautions
CF Cards and Estimated Capacities Recordable Images
Approximate Image File Sizes Estimated
197
Power supply Lithium button battery CR2025
198
Car Battery Cable CB-560
199
Index
200
201
202
Digital Camera, Model PC1032
203
Functions Available in Each Shooting Mode
204
205
Auto Rotate Off ND Filter
XX02CHXX