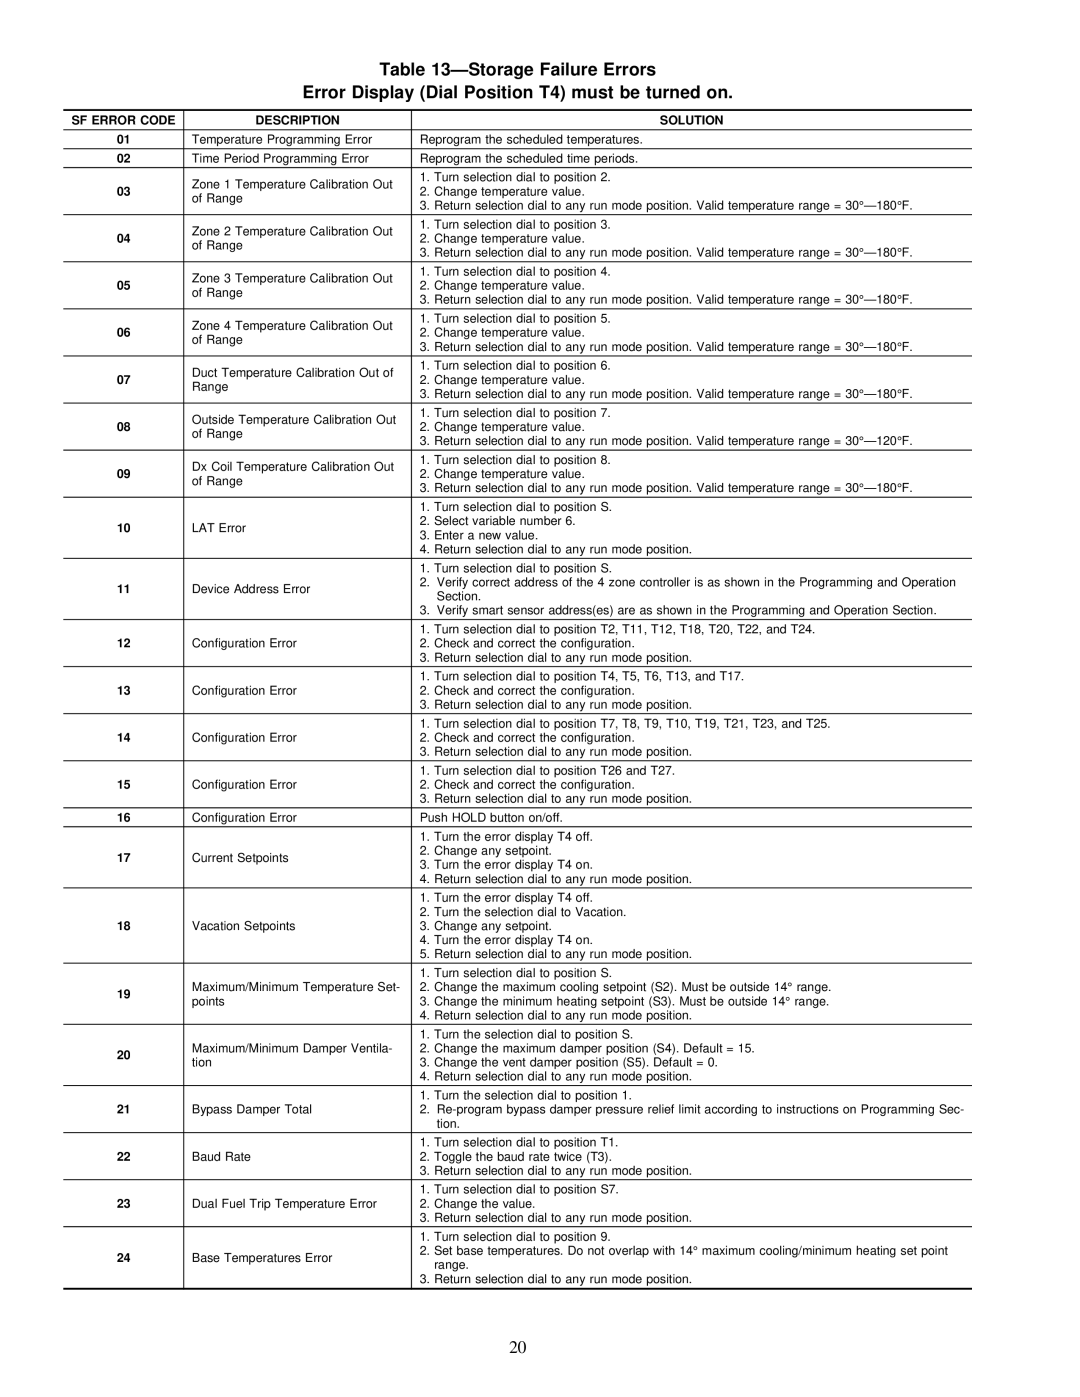
Table 13ÐStorage Failure Errors

Error Display (Dial Position T4) must be turned on.

SF ERROR CODE

DESCRIPTION


SOLUTION


01

Temperature Programming Error

Reprogram the scheduled temperatures.


02

Time Period Programming Error

Reprogram the scheduled time periods.

03

Zone 1 Temperature Calibration Out

1.

Turn selection dial to position 2.

2.

Change temperature value.

of Range


3.

Return selection dial to any run mode position. Valid temperature range = 30°Ð180°F.


04

Zone 2 Temperature Calibration Out

1.

Turn selection dial to position 3.

2.

Change temperature value.

of Range


3.

Return selection dial to any run mode position. Valid temperature range = 30°Ð180°F.


05

Zone 3 Temperature Calibration Out

1.

Turn selection dial to position 4.

2.

Change temperature value.

of Range


3.

Return selection dial to any run mode position. Valid temperature range = 30°Ð180°F.


06

Zone 4 Temperature Calibration Out

1.

Turn selection dial to position 5.

2.

Change temperature value.

of Range


3.

Return selection dial to any run mode position. Valid temperature range = 30°Ð180°F.


07

Duct Temperature Calibration Out of

1.

Turn selection dial to position 6.

2.

Change temperature value.

Range


3.

Return selection dial to any run mode position. Valid temperature range = 30°Ð180°F.


08

Outside Temperature Calibration Out

1.

Turn selection dial to position 7.

2.

Change temperature value.

of Range


3.

Return selection dial to any run mode position. Valid temperature range = 30°Ð120°F.


09

Dx Coil Temperature Calibration Out

1.

Turn selection dial to position 8.

2.

Change temperature value.

of Range


3.

Return selection dial to any run mode position. Valid temperature range = 30°Ð180°F.


1.

Turn selection dial to position S.

10

LAT Error

2.

Select variable number 6.

3.

Enter a new value.


4.

Return selection dial to any run mode position.


1.

Turn selection dial to position S.

11

Device Address Error

2.

Verify correct address of the 4 zone controller is as shown in the Programming and Operation


Section.


3.

Verify smart sensor address(es) are as shown in the Programming and Operation Section.


12


1.

Turn selection dial to position T2, T11, T12, T18, T20, T22, and T24.

Configuration Error

2. Check and correct the configuration.


3.

Return selection dial to any run mode position.


13


1.

Turn selection dial to position T4, T5, T6, T13, and T17.

Configuration Error

2. Check and correct the configuration.


3.

Return selection dial to any run mode position.

14


1.

Turn selection dial to position T7, T8, T9, T10, T19, T21, T23, and T25.

Configuration Error

2. Check and correct the configuration.


3.

Return selection dial to any run mode position.


15


1.

Turn selection dial to position T26 and T27.

Configuration Error

2. Check and correct the configuration.


3.

Return selection dial to any run mode position.

16

Configuration Error

Push HOLD button on/off.


1.

Turn the error display T4 off.

17

Current Setpoints

2.

Change any setpoint.

3.

Turn the error display T4 on.


4.

Return selection dial to any run mode position.


1.

Turn the error display T4 off.

18


2.

Turn the selection dial to Vacation.

Vacation Setpoints

3. Change any setpoint.


4.

Turn the error display T4 on.


5.

Return selection dial to any run mode position.


1.

Turn selection dial to position S.

19

Maximum/Minimum Temperature Set-

2. Change the maximum cooling setpoint (S2). Must be outside 14° range.

points

3. Change the minimum heating setpoint (S3). Must be outside 14° range.


4.

Return selection dial to any run mode position.


1.

Turn the selection dial to position S.

20

Maximum/Minimum Damper Ventila-

2. Change the maximum damper position (S4). Default = 15.

tion

3. Change the vent damper position (S5). Default = 0.


4.

Return selection dial to any run mode position.

21


1.

Turn the selection dial to position 1.

Bypass Damper Total

2.

Re-program bypass damper pressure relief limit according to instructions on Programming Sec-


tion.


22


1.

Turn selection dial to position T1.

Baud Rate

2. Toggle the baud rate twice (T3).


3.

Return selection dial to any run mode position.

23


1.

Turn selection dial to position S7.

Dual Fuel Trip Temperature Error

2. Change the value.


3.

Return selection dial to any run mode position.


1.

Turn selection dial to position 9.

24

Base Temperatures Error

2.

Set base temperatures. Do not overlap with 14° maximum cooling/minimum heating set point


range.


3.

Return selection dial to any run mode position.


20

Page 20
Image 20
Carrier ZONEKIT4ZCAR instruction manual SF Error Code Description Solution

ZONEKIT4ZCAR specifications

The Carrier ZONEKIT4ZCAR is an innovative zoning system designed to enhance the comfort and efficiency of heating and cooling in residential and commercial spaces. Its functionality allows users to customize temperature settings in different areas of a building, which is especially valuable in larger homes or multi-room facilities.

One of the standout features of the ZONEKIT4ZCAR is its integration with Carrier’s advanced HVAC technology. This zoning system utilizes dampers that control airflow, directing heated or cooled air to specific areas as needed. This ensures that every room is maintained at the desired temperature without wasting energy on unused spaces. The system can effectively manage up to four different zones simultaneously.

The ZONEKIT4ZCAR is equipped with smart technology compatibility, allowing seamless integration with smart home systems. Users can control their zoning settings through mobile applications, voice commands, or smart thermostats. This feature enhances user convenience, providing access to temperature adjustments from anywhere in the home. Additionally, the system can be programmed to follow user schedules, optimizing energy usage and potentially lowering energy bills.

Another key characteristic of the Carrier ZONEKIT4ZCAR is its reliability and durability. Carrier is a well-respected brand in the HVAC industry, associated with high-quality products that are built to last. The ZONEKIT4ZCAR reflects this commitment, featuring robust construction and materials that ensure longevity and consistent performance.

The installation process of the ZONEKIT4ZCAR is designed to be straightforward, making it an appealing choice for both professionals and DIY enthusiasts. It is compatible with various Carrier heating and cooling systems, allowing for easy upgrades or replacements in existing setups.

In terms of energy efficiency, the ZONEKIT4ZCAR caters to environmentally conscious users. By allowing precise control over the climate in specific areas, the system reduces overall energy consumption, thereby lowering carbon footprints.

Finally, the ZONEKIT4ZCAR provides exceptional comfort and control, making it a smart investment for anyone looking to improve their indoor climate experience. With its combination of cutting-edge technology, user-friendly features, and energy efficiency, the Carrier ZONEKIT4ZCAR stands out in the HVAC market as a reliable choice for modern zoning solutions.