To go to “Getting the Most Out of Dynamic Photo” click here
Unpacking
Read this first
Contents
❚❙ Quick Start Basics
❚❙ Recording Images
❚❙ Using BEST SHOT
❚❙ Advanced Recording Settings
❚❙ Viewing Snapshots and Movies
❚❙ Other Playback Functions
(PLAY)
❚❙ Dynamic Photo
❚❙ Printing
❚❙ Using the Camera with a Computer
❚❙ Other Settings
(Set Up)
❚❙ Configuring Monitor Screen Settings
❚❙ Appendix
General Guide
Monitor Screen Contents
.Snapshot Viewing
.Movie Playback
Quick Start Basics
What is a digital camera
What you can do with your CASIO camera
Using the Touch Panel
Squeeze
IMPORTANT
NOTE
First, charge the battery prior to use
To load the battery
Charge the Battery
3. Connect the USB
cable to the camera
Back Lamp Operation
Lamp Status
Description
.To charge using a USB connection to a computer
1.Press [ON/OFF] (Power) to turn off the camera
2. With your computer
turned on, connect the
camera to it
Page
Other Charging Precautions
Checking Remaining Battery Power
Remaining Power
Battery Indicator
Indicator Color
Configuring Basic Settings the First Time You Turn On the Camera
4.Touch the value you want to change (year, month, day, hour, minute)
5. Touch “8” or “2” to change the currently selected value
6.When the date and time settings are the way you want, touch “OK”
8.Touch “Apply”
Preparing a Memory Card
Supported Memory Cards
To load a memory card
To format (initialize) a new memory card
Turning Power On and Off
Entering the REC Mode and PLAY Mode
To enter the
PLAY mode
To enter the REC
mode
Holding the Camera Correctly
To Shoot a Snapshot
Selecting an Auto Recording Mode
To shoot a snapshot
Full-press
Recording a Movie
.If the image does not focus
.Shooting with Auto
.Shooting with Premium Auto
Viewing Snapshots
Deleting Snapshots and Movies
To delete a single file
To delete all files
Snapshot Shooting Precautions
Auto Focus Restrictions
Recording Images
Selecting a Recording Mode
Digitally Correcting for Overexposure and Underexposure (HDR)
Shooting Snapshots Digitally Processed for Artistic Effect (HDR Art)
Shooting a Panorama Image (Slide Panorama)
Point the camera at the start of the panorama and
the right)
Page
Using Flash (Flash)
Red-eyeReduction
Shooting with Zoom
Interpreting the Zoom Bar
Zooming with Super Resolution (Single SR Zoom)
To record a movie
6.Touch “c” (Movie Stop) to stop recording
Minimizing the Effects of Camera Movement during Movie Recording
Using BEST SHOT
Advanced Recording Settings
Using the REC Menu
Using Touch Shutter (Touch Shutter)
Shooting Snapshots of better Texture and Sharpness (Single SR Quality)
Using the Self-timer (Self-timer)
Changing the Image Size (Image Size)
Movie Image Quality Settings (Movie Quality)
Correcting Image Brightness (EV Shift)
Adjusting White Balance (White Balance)
Specifying ISO Sensitivity (ISO)
Optimizing Image Brightness (Lighting)
Selecting a Focus Mode (Focus)
To focus with manual focus
2.Touch “W”
Watching the image on the monitor screen, touch “+” (closer) or
Using Focus Lock
1. Align the monitor screen’s focus frame with
Shooting with Continuous Auto Focus (Continuous AF)
Using the Auto Focus Assist Light (AF Assist Light)
Reducing the Effects of Camera and Subject Movement (Anti Shake)
Turning on Image Review (Review)
Viewing Snapshots and Movies
Viewing a Movie
Movie Playback Controls
Pause/Play
Fast forward
Fast reverse
Stop playback
Editing a Movie on the Camera (Movie Editing)
Viewing a Panorama Image
Playing a Slideshow on the Camera (Slideshow)
Viewing the Image Menu
Zooming an On-screenImage
Viewing Snapshots and Movies on a TV Screen
4.Touch the camera monitor screen to perform operations
Recording Camera Images to a DVD Recorder or Video Deck
Other Playback Functions (PLAY)
Using the PLAY Menu
Protecting a File Against Deletion (Protect)
Copying Files (Copy)
Using Red Eye Correction (Red Eye)
Cropping a Snapshot (Trimming)
Resizing a Snapshot (Resize)
Rotating an Image (Rotation)
Selecting Images for Printing (DPOF Printing)
Dynamic Photo
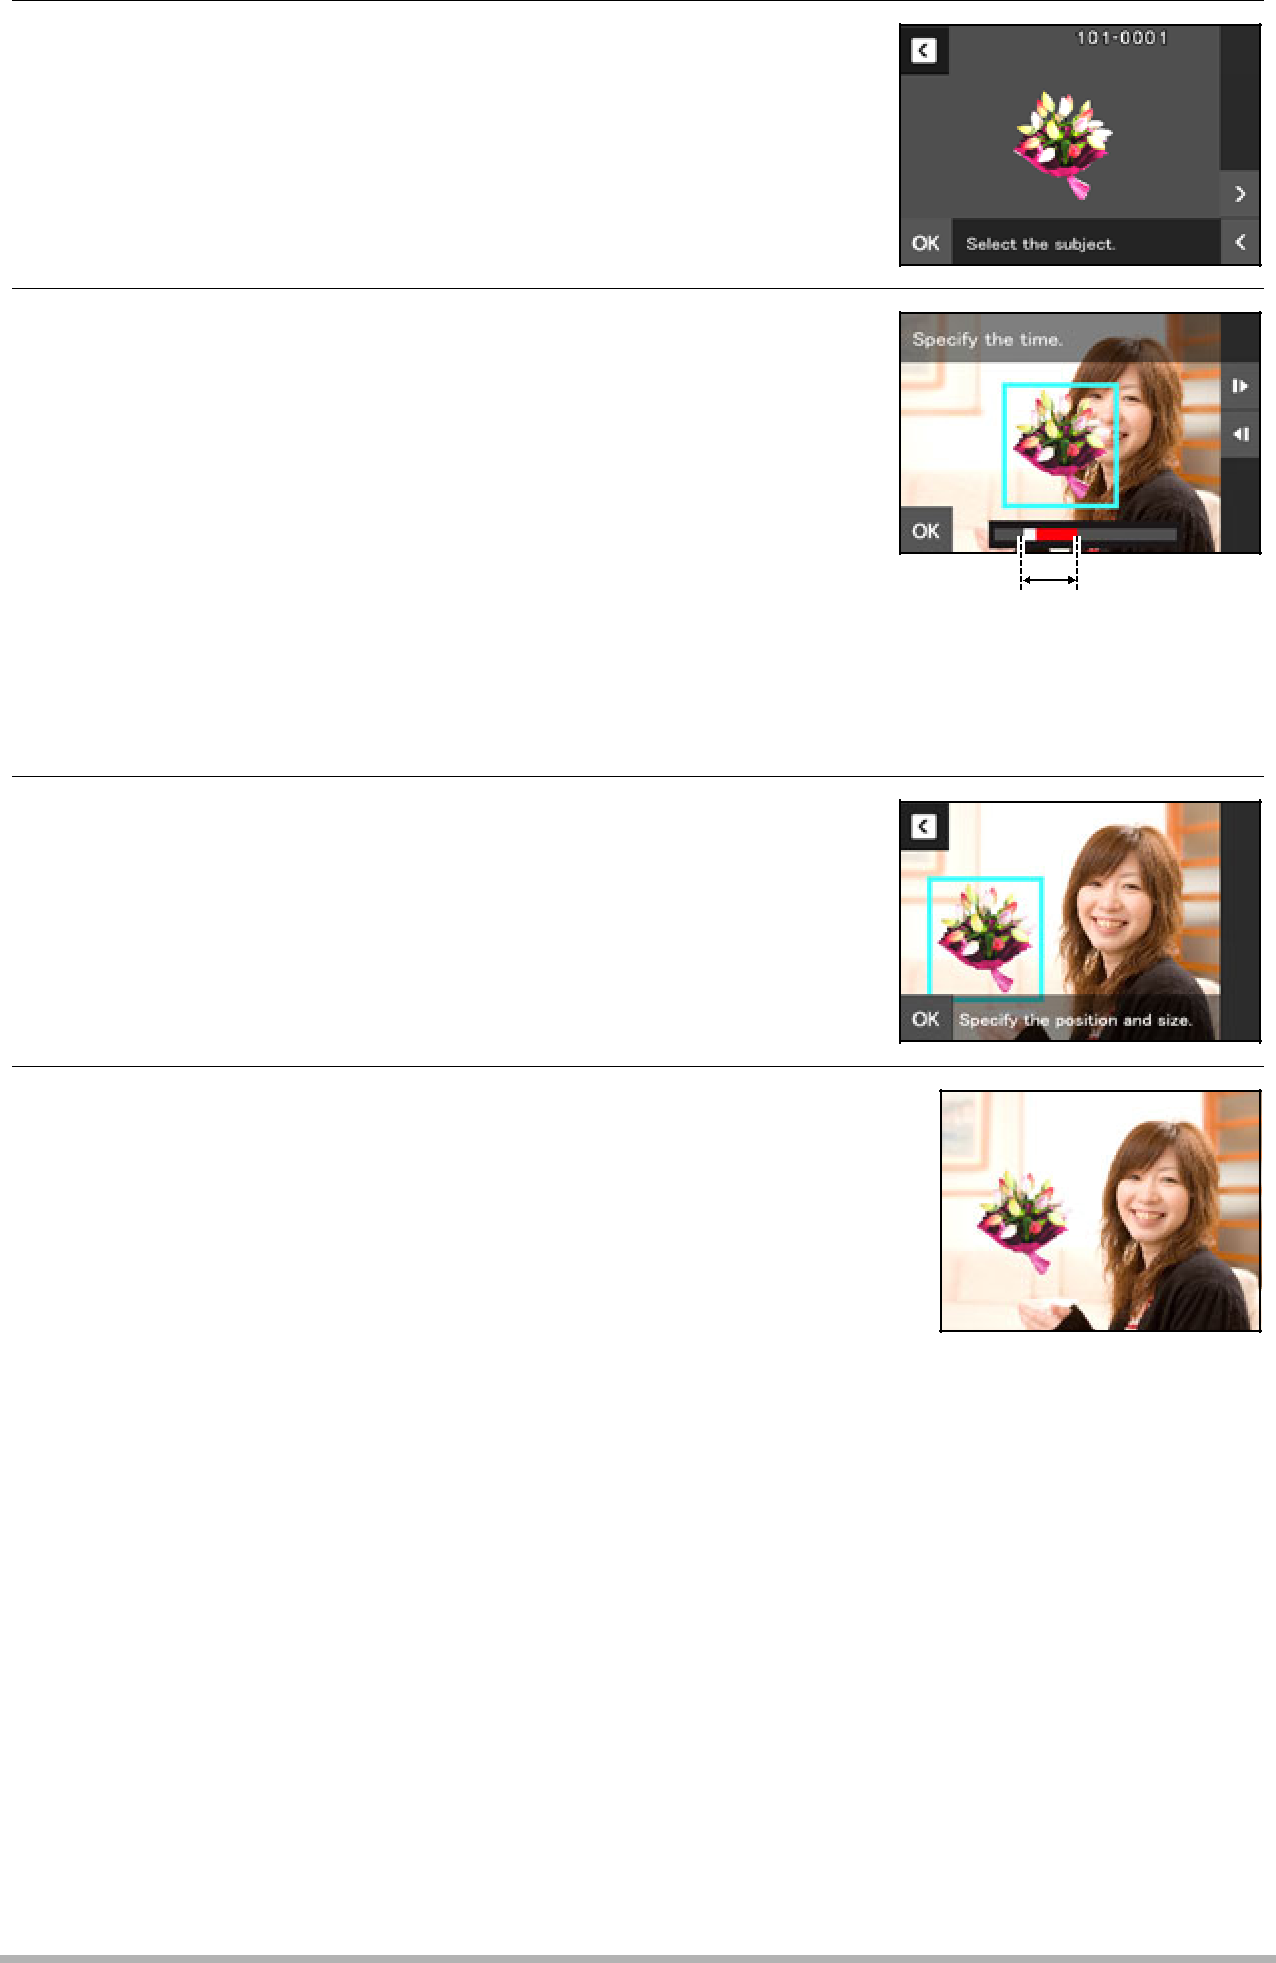
Inserting a Built-inSubject into a Snapshot or Movie (Dynamic Photo)
7.Touch “OK”
To view a Dynamic Photo (Dynamic Photo File)
Converting a Dynamic Photo Still Image to a Movie (Movie Converter)
Printing
Printing Snapshots
Using DPOF to Specify Images to be Printed and the Number of Copies
.Configuring the Same DPOF Settings for All the Images
MENU * Setup * DPOF Printing * All images
1.Touch “Date stamping”
2.Touch “On” to turn date stamping on or “Off” to turn it off
3.Touch “ú” or “õ” to specify the number of prints
.Date Stamping
Configuring camera settings
Configuring computer settings
Professional print service
.Standards Supported by the Camera
Using the Camera with a Computer
Things you can do using a computer
Using the Camera with a Windows Computer
Viewing and Storing Images on a Computer
3.Windows 7, Windows Vista users: Click “Start” and then “Computer”
Windows XP users: Click “Start” and then “My Computer”
4.Double-click“Removable Disk”
5.Right-clickthe “DCIM” folder
6.On the shortcut menu that appears, click “Copy”
.To view images you copied to your computer
1.Double-clickthe copied “DCIM” folder to open it
2.Double-clickthe folder that contains the images you want to view
3.Double-clickthe image file you want to view
Playing Movies
Uploading Movie Files to YouTube
Transferring Images from Your Computer to Camera Memory
.To transfer computer screen captures to the camera
3.Display the screen whose screen capture you want to transfer
4.Click the [Capture] button
5.Draw a boundary around the area you want to capture
6.Follow the instructions that appear on the display
Play back Dynamic Photo images on your EXILIM, a computer, or on a mobile phone
Transforming Snapshots into Artistic Image
.To transform snapshots into artistic images
On your computer, click the following in sequence: Start
On the toolbar, click [Paint] or the canvas icon to transform the image
Viewing User Documentation (PDF Files)
User Registration
Using the Camera with a Macintosh
Connecting the Camera to Your Computer and Saving Files
Macintosh
3.Double-clickthe camera’s drive icon
4.Drag the “DCIM” folder to the folder to which you want to copy it
5.After the copy operation is complete, drag the drive icon to Trash
6.Disconnect the camera from the computer
Transferring Images Automatically and Managing Them on Your Macintosh
Playing a Movie
Using an Eye-FiWireless SD Memory Card to Transfer Images (Eye-Fi)
Page
Files and Folders
Memory Card Data
.Memory Folder Structure
.Supported Image Files
.Built-inMemory and Memory Card Data Handling Precautions
Other Settings (Set Up)
Adjusting Monitor Screen Brightness (Screen)
Turning off Eye-FiCard Communication (Eye-Fi)
Configuring Camera Sound Settings (Sounds)
Time Stamping Snapshots (Timestamp)
Configuring World Time Settings (World Time)
Setting a Travel Destination
Selecting the Time Display
Setting the Camera’s Clock (Adjust)
Specifying the Date Style (Date Style)
Specifying the Display Language (Language)
Calibrating the Touch Panel (Calibrate TP)
Selecting the Screen Aspect Ratio and Video Output System (Video Out)
Formatting Built-inMemory or a Memory Card (Format)
Resetting the Camera to Factory Defaults (Reset)
Configuring Monitor Screen Settings
Selecting Display Information (DISP)
Appendix
Precautions during Use
.Smoke, abnormal odor, overheating, and other abnormalities
.Water and Foreign Matter
.Dropping and Rough Treatment
.Keep Away From Fire
.Disassembly and Modification
.Locations To Be Avoided
.Backing Up Important Data
.Memory Protection
.Rechargeable Battery
.Battery Life
.Data Error Precautions
.Operating Environment
.Condensation
.Lens
.Caring for your camera
.Old Rechargeable Battery Handling Precautions
.USB-ACadaptor Handling Precautions
.Other Precautions
.Copyrights
Page
Power Supply
Charging
To replace the battery
Battery Precautions
Using the Camera in another Country
Using a Memory Card
To replace the memory card
.Memory Card Handling Precautions
.Discarding or Transferring Ownership of a Memory Card or the Camera
Computer System Requirements for Bundled Software (For Windows)
Reset Initial Default Settings
.Setup Menu
Screen
Eye-Fi
Sounds
Timestamp
When things don’t go right
Troubleshooting
Page
Page
Page
Page
Display Messages
Memory Full
Record Error
RETRY POWER ON
SYSTEM ERROR
There are no files
Number of Snapshots/Movie Recording Time
Specifications
Page
Approximate Battery Life
.Rechargeable lithium ion battery (NP-110)
. USB-ACadaptor (AD-C53U)
CASIO COMPUTER CO.,LTD
http://dp.exilim.com
Contents
Dynamic Photo! A totally new way to enjoy digital
photography
Step 1: Shoot the image into which you want to insert
an built-insubject
Step 2: Create the Dynamic Photo image
If you are inserting a subject into a movie, use “
Complete
Important
Step 3: Have fun with Dynamic Photo
Step 4: Convert a Dynamic Photo Still Image to a Movie
(Movie Converter)
Step 5: Use Dynamic Studio to expand use of Dynamic Photo
images to other applications