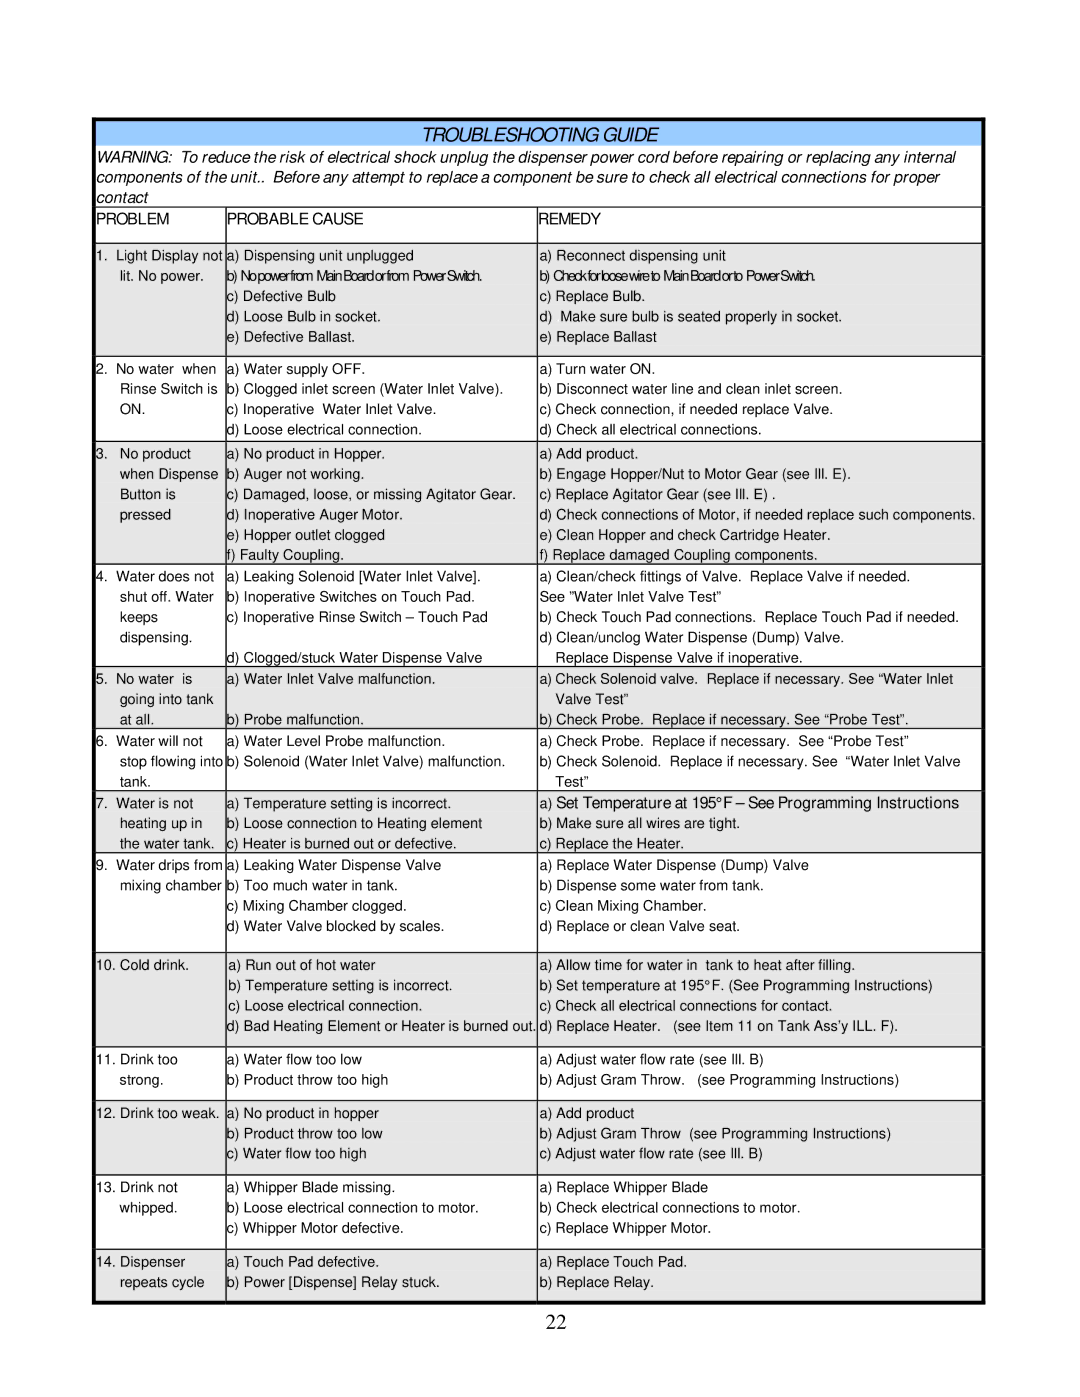
TROUBLESHOOTING GUIDE

WARNING: To reduce the risk of electrical shock unplug the dispenser power cord before repairing or replacing any internal components of the unit.. Before any attempt to replace a component be sure to check all electrical connections for proper contact


PROBLEM

PROBABLE CAUSE

REMEDY


1.

Light Display not

a) Dispensing unit unplugged

a) Reconnect dispensing unit


lit. No power.

b) Nopowerfrom MainBoardorfrom PowerSwitch.

b) Checkforloosewireto MainBoardorto PowerSwitch.


c) Defective Bulb

c) Replace Bulb.


d) Loose Bulb in socket.

d) .Make sure bulb is seated properly in socket.


e) Defective Ballast.

e) Replace Ballast


2. No water when

a) Water supply OFF.

a) Turn water ON.


Rinse Switch is

b) Clogged inlet screen (Water Inlet Valve).

b) Disconnect water line and clean inlet screen.


ON.

c) Inoperative Water Inlet Valve.

c) Check connection, if needed replace Valve.


d) Loose electrical connection.

d) Check all electrical connections.


3.

No product

a) No product in Hopper.

a) Add product.


when Dispense

b) Auger not working.

b) Engage Hopper/Nut to Motor Gear (see Ill. E).


Button is

c) Damaged, loose, or missing Agitator Gear.

c) Replace Agitator Gear (see Ill. E) .


pressed

d) Inoperative Auger Motor.

d) Check connections of Motor, if needed replace such components.


e) Hopper outlet clogged

e) Clean Hopper and check Cartridge Heater.


f) Faulty Coupling.

f) Replace damaged Coupling components.


4.

Water does not

a) Leaking Solenoid [Water Inlet Valve].

a) Clean/check fittings of Valve. Replace Valve if needed.


shut off. Water

b) Inoperative Switches on Touch Pad.

See ”Water Inlet Valve Test”


keeps

c) Inoperative Rinse Switch – Touch Pad

b) Check Touch Pad connections. Replace Touch Pad if needed.


dispensing.


d) Clean/unclog Water Dispense (Dump) Valve.


d) Clogged/stuck Water Dispense Valve

Replace Dispense Valve if inoperative.


5.

No water is

a) Water Inlet Valve malfunction.

a) Check Solenoid valve. Replace if necessary. See “Water Inlet


going into tank


Valve Test”


at all.

b) Probe malfunction.

b) Check Probe. Replace if necessary. See “Probe Test”.


6.

Water will not

a) Water Level Probe malfunction.

a) Check Probe. Replace if necessary. See “Probe Test”


stop flowing into

b) Solenoid (Water Inlet Valve) malfunction.

b) Check Solenoid. Replace if necessary. See “Water Inlet Valve


tank.


Test”


7.

Water is not

a) Temperature setting is incorrect.

a) Set Temperature at 195°F – See Programming Instructions


heating up in

b) Loose connection to Heating element

b) Make sure all wires are tight.


the water tank.

c) Heater is burned out or defective.

c) Replace the Heater.


9. Water drips from

a) Leaking Water Dispense Valve

a) Replace Water Dispense (Dump) Valve


mixing chamber

b) Too much water in tank.

b) Dispense some water from tank.


c) Mixing Chamber clogged.

c) Clean Mixing Chamber.


d) Water Valve blocked by scales.

d) Replace or clean Valve seat.


10. Cold drink.

a) Run out of hot water

a) Allow time for water in tank to heat after filling.


b) Temperature setting is incorrect.

b) Set temperature at 195°F. (See Programming Instructions)


c) Loose electrical connection.

c) Check all electrical connections for contact.


d) Bad Heating Element or Heater is burned out.

d) Replace Heater. (see Item 11 on Tank Ass’y ILL. F).


11. Drink too

a) Water flow too low

a) Adjust water flow rate (see Ill. B)


strong.

b) Product throw too high

b) Adjust Gram Throw.

(see Programming Instructions)


12. Drink too weak.

a) No product in hopper

a) Add product


b) Product throw too low

b) Adjust Gram Throw

(see Programming Instructions)


c) Water flow too high

c) Adjust water flow rate (see Ill. B)


13. Drink not

a) Whipper Blade missing.

a) Replace Whipper Blade


whipped.

b) Loose electrical connection to motor.

b) Check electrical connections to motor.


c) Whipper Motor defective.

c) Replace Whipper Motor.


14. Dispenser

a) Touch Pad defective.

a) Replace Touch Pad.


repeats cycle

b) Power [Dispense] Relay stuck.

b) Replace Relay.


22


Page 22
Image 22
Cecilware GB-IT operation manual Problem Probable Cause Remedy, Set Temperature at 195F See Programming Instructions

GB-IT specifications

The Cecilware GB-IT is a cutting-edge coffee brewing system designed to cater to the needs of cafes, restaurants, and other commercial establishments that require efficiency, speed, and quality in coffee production. This machine stands out for its robust construction and the use of advanced technologies, making it a reliable choice for high-demand environments.

One of the primary features of the Cecilware GB-IT is its dual-purpose capability, functioning as both an automatic brewer and a tea brewer. This versatility allows businesses to serve a wide range of hot beverages without needing multiple machines, ultimately saving space and reducing operational costs. The GB-IT has a generous brewing capacity, typically handling up to 3 gallons of coffee in a single batch, which is essential for busy service periods.

The machine is equipped with a unique digital brew control that allows users to set precise brew times and temperatures. This feature ensures that each cup of coffee is brewed to perfection, providing a consistent flavor profile that loyal customers can rely on. Additionally, the GB-IT comes with programmable volumes, allowing operators to customize the amount of coffee brewed based on their specific needs and customer demand.

Another notable characteristic of the Cecilware GB-IT is its durable construction. Built with high-quality stainless steel, the machine not only has an appealing aesthetic but is also designed to withstand the rigors of daily use in a bustling commercial environment. Its compact footprint allows it to fit seamlessly into any kitchen setup, maximizing counter space while still delivering high performance.

The GB-IT also incorporates advanced safety features, including an automatic shut-off system that activates when the water reservoir runs low or the brewing cycle is complete. This thoughtful design minimizes the risk of overheating and ensures the longevity of the machine.

In terms of maintenance, the Cecilware GB-IT is designed for easy cleaning and servicing, with components that can be easily accessed. This ensures that operators can perform routine maintenance without significant downtime, contributing to overall operational efficiency.

In summary, the Cecilware GB-IT stands as an excellent solution for businesses that prioritize quality, efficiency, and versatility in their beverage offerings. With its advanced features, durable construction, and user-friendly design, it is a worthwhile investment for any establishment looking to elevate their coffee and tea service.