8

Loudspeakers

Ceiling-mount loudspeakers

Introduction — Basic Room Design

Introduction— Installation Overview


9


Installation Overview

Read the user manual

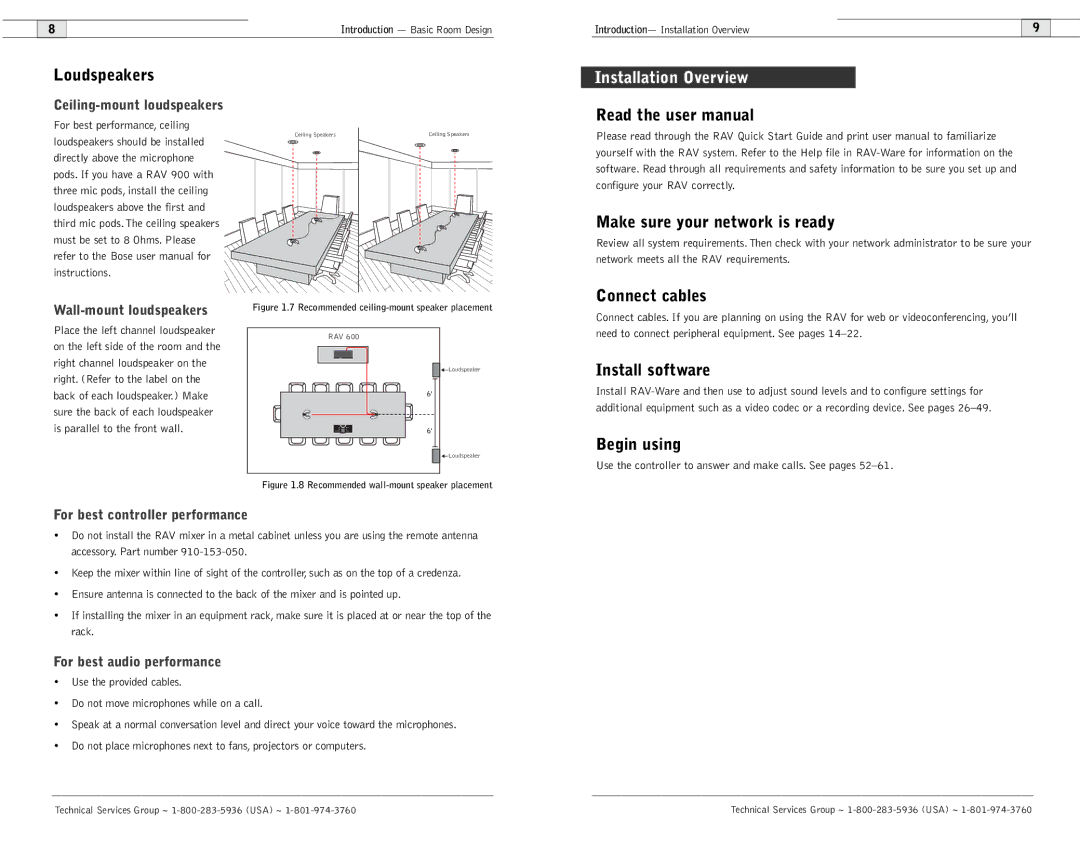
For best performance, ceiling loudspeakers should be installed directly above the microphone pods. If you have a RAV 900 with three mic pods, install the ceiling loudspeakers above the first and third mic pods. The ceiling speakers must be set to 8 Ohms. Please refer to the Bose user manual for instructions.

Ceiling Speakers

Ceiling Speakers

Please read through the RAV Quick Start Guide and print user manual to familiarize yourself with the RAV system. Refer to the Help file in RAV-Ware for information on the software. Read through all requirements and safety information to be sure you set up and configure your RAV correctly.

Make sure your network is ready

Review all system requirements. Then check with your network administrator to be sure your network meets all the RAV requirements.

Connect cables

Wall-mount loudspeakers

Place the left channel loudspeaker on the left side of the room and the right channel loudspeaker on the right. (Refer to the label on the back of each loudspeaker.) Make sure the back of each loudspeaker is parallel to the front wall.

Figure 1.7 Recommended ceiling-mount speaker placement

RAV 600

Loudspeaker

6'

6'

Loudspeaker

Figure 1.8 Recommended wall-mount speaker placement

Connect cables. If you are planning on using the RAV for web or videoconferencing, you’ll need to connect peripheral equipment. See pages 14–22.

Install software

Install RAV-Ware and then use to adjust sound levels and to configure settings for additional equipment such as a video codec or a recording device. See pages 26–49.

Begin using

Use the controller to answer and make calls. See pages 52–61.

For best controller performance

Do not install the RAV mixer in a metal cabinet unless you are using the remote antenna accessory. Part number 910-153-050.

Keep the mixer within line of sight of the controller, such as on the top of a credenza.

Ensure antenna is connected to the back of the mixer and is pointed up.

If installing the mixer in an equipment rack, make sure it is placed at or near the top of the rack.

For best audio performance

Use the provided cables.

Do not move microphones while on a call.

Speak at a normal conversation level and direct your voice toward the microphones.

Do not place microphones next to fans, projectors or computers.

Technical Services Group ~ 1-800-283-5936 (USA) ~ 1-801-974-3760

Technical Services Group ~ 1-800-283-5936 (USA) ~ 1-801-974-3760

Page 7
Image 7
ClearOne comm 600/900 user manual Installation Overview

600/900 specifications

ClearOne’s COMM 600 and COMM 900 series are state-of-the-art audio solutions designed to enhance communication in professional environments. These advanced conferencing systems focus on delivering clear, high-quality audio, ensuring seamless collaboration for users across various sectors including corporate, education, and healthcare.

At the heart of both the COMM 600 and COMM 900 systems is their use of advanced audio technologies. One of the main features is the proprietary AEC (Acoustic Echo Cancellation) and noise reduction technology. This ensures that conversations are free from distractions and interference, allowing for natural communication flow. The systems are equipped with multiple microphones that utilize beamforming technology, which focuses on the person speaking while filtering out background noise. This enhances audio capture, making it ideal for large conference rooms or open office spaces.

Both models support a range of connectivity options, including USB, Bluetooth, and traditional analog inputs. This versatility allows users to connect seamlessly with various devices such as laptops, tablets, and smartphones. The COMM 900 specifically extends these capabilities with support for high-definition video conferencing, making it a comprehensive solution for organizations looking to integrate video alongside audio in their meetings.

Another noteworthy characteristic of these systems is their ease of installation and user-friendly interface. ClearOne has designed the COMM 600 and 900 interfaces to be intuitive, allowing users to set up and operate the systems with minimal technical knowledge. Additionally, integration with popular conferencing platforms is straightforward, further simplifying the user experience.

The scalability of ClearOne’s COMM series is also a significant advantage. Businesses can start with a smaller configuration and easily expand by adding more microphones or integrating additional technologies as their needs grow. This adaptability makes the COMM 600 and COMM 900 ideal for environments that may evolve over time.

In conclusion, the ClearOne COMM 600 and 900 series offers robust audio solutions designed for modern communication needs. With their advanced sound technologies, versatile connectivity options, and user-friendly interfaces, these systems help organizations foster effective collaboration and enhance productivity in any meeting space. Whether for small team discussions or large conferences, ClearOne delivers quality audio performance that supports today’s dynamic communication landscape.