Page
Page
D470V/D480V
Trademarks
About this Manual
Important Safety Instructions
Instructions for Care and Operation
Power Safety
Battery Precautions
Related Documents
Contents
Part Lists
Vcore
XII
Overview
Introduction
System Specifications
System Specifications
System Specifications 1
Environmental Spec
Top View
External Locator Top View
Left Side View
Front View
External Locator Right Side & Rear Views
Right Side View
Rear View
Bottom View
External Locator Bottom View
Mainboard Top Key Parts
Mainboard Overview Top Key Parts
Mainboard Bottom Key Parts
Mainboard Overview Bottom Key Parts
Mainboard Top Connectors
Mainboard Overview Top Connectors
Mainboard Bottom Connectors
Mainboard Overview Bottom Connectors
Disassembly
Disassembly
Maintenance Precautions
To remove the LCD Assembly
Disassembly Steps
To remove the TouchPad
To remove the Sub Woofer
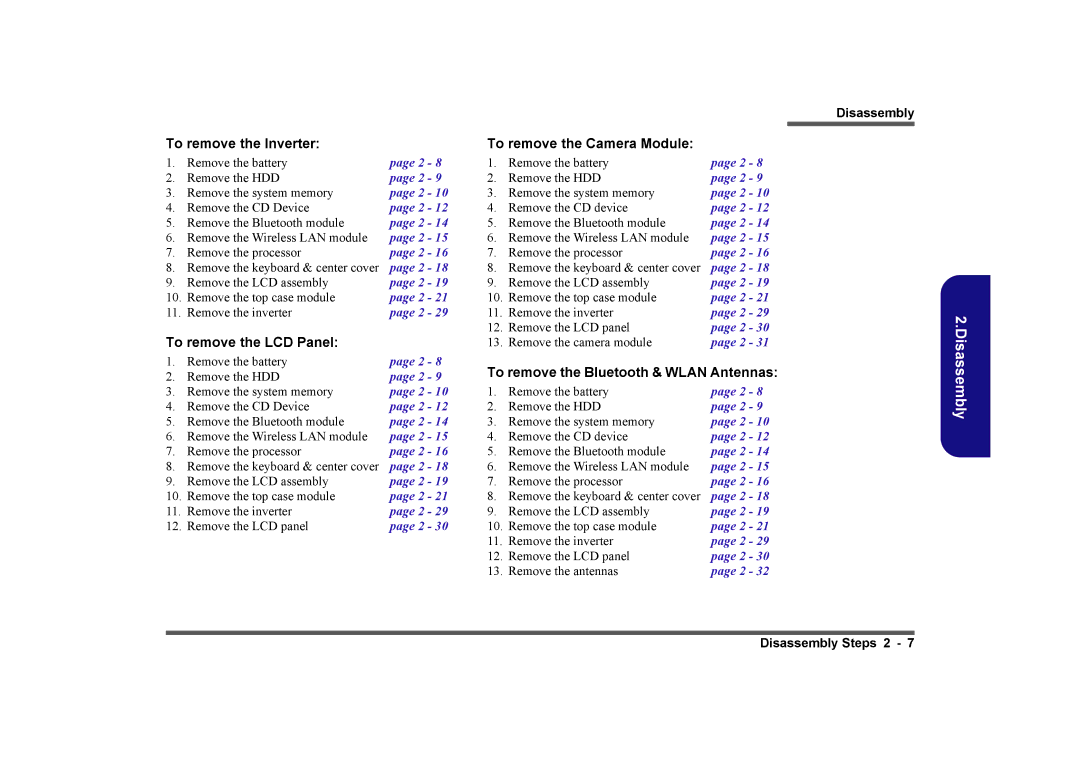
To remove the LCD Panel
Battery Removal
Removing the Battery
Hard Disk Upgrade Process
Removing the Hard Disk Drive Assembly
Memory Socket Cover Removal
Removing the System Memory RAM
Contact Warning
Removing Installing a RAM Module
Removing the CD Device
Removing the CD Device
CD Device Removal
Removal
Removing the Bluetooth Module
Wireless LAN Module Removal
Removing the Wireless LAN Module
Processor Removal
Removing the Processor
Processor Removal Cont’d
Disassembly
Keyboard & Center Cover Removal
Removing the Keyboard & Center Cover
LCD Assembly Removal
Removing the LCD Assembly
An elongated Heat Sink
LCD Assembly Removal cont’d
Removing the Top Case Module
Top Case Module Removal
109
TouchPad Removal
Removing the TouchPad
LED Board Removal
Removing the LED Board
Modem Removal
Removing the Modem
Mainboard Removal
Removing the Mainboard
Sub Woofer Removal
Removing the Sub Woofer
Card Reader Assembly Removal
Removing the Card Reader Assembly
Pcmcia Module Removal
Removing the Pcmcia Module
Inverter Removal
Removing the Inverter
LCD Panel Removal
Removing the LCD Panel
Camera Module Removal
Removing the Camera Module
Bluetooth & Wlan Antenna Removal
Removing the Bluetooth/WLAN Antennas
Appendix a Part Lists
Part List Illustration Location
Part List Illustration Location
Top D470V
Top D470V
Bottom D470V
Bottom D470V
LCD 17 D470V
CD-ROM Drive D470V
CD-ROM Drive D470V
CD-RW Drive D470V
CD-RW Drive D470V
DVD-ROM Drive D470V
DVD-ROM Drive D470V
Combo Drive D470V
Combo Drive D470V
HDD Drive D470V
Hard Disk Drive D470V
Top D480V
Top D480V
Bottom D480V
Bottom D480V
LCD 17 D480V
CD-ROM Drive D480V
CD-ROM Drive D480V
CD-RW Drive D480V
CD-RW Drive D480V
DVD-ROM Drive D480V
DVD-ROM Drive D480V
Combo Drive D480V
Combo Drive D480V
HDD Drive D480V
Hard Disk Drive D480V
Schematic Diagrams
Appendix BSchematic Diagrams
Sheet 1 System Block Diagram
System Block Diagram
Sheet 2 Socket 478 1
VIDPWRGD38
PMCPUPERF#15
Sheet 3 Socket 478 & ITP
Socket 478 & ITP 2
TMPSMDATA24
TMPSMCLK24
Sheet 4 Clock Generator
Clock Generator
30 AAD18/AHSYNC
M648FX-1 Host/AGP 1
Vahsync 30 AAD30/BHSYNC
30 AAD17/AVSYNC Vavsync 30 AAD31/BVSYNC
Sheet 6 M648FX-2 Memory for DDR
M648FX-2 Memory for DDR 2
Sheet 7 M648FX-3 CRT Out 3
M648FX-3 & CRT Out 3
Sheet 8 M648FX-4 Power
M648FX-4 Power 4
Sheet 9 DDR Memory Dimm
DDR Memory Dimm
RSRAS#
RSWE#
Sheet 10
DDR SSTL-2 Termination
Termination
RMA0..14 6,7
Lvds Interface SiS302LV
30 AAD0..15
30 AAD19..26
Ledpwr
ACINLED24
LL2C
10,30
963-1 PCI/IDE/HyperZip 1
Sheet 14 963-2 Misc Signals
Misc Signals 2
Sheet 15 of 42 963-3 USB I/F
USB I/F 3
1394MA2/EESK
1394MA0/EEDO
Sheet 16 963-4 Power & RTC
Power & RTC 4
+3VS
HDD/Combo Connector
+5VS
Fddvcc
Cirrx
USB Port
DATA2
DATA2+
Sheet 19
Sheet 20 Pcmcia Power MDC Interface
Pcmcia Power & MDC Interface
Phyclk
Phylps
TPBIAS1
PD0..7
LPC Super I/O
LPT/COM Port
Cursen
Battemp
Incursen
WAKE-UP
LAN RTL8100SB
LAN RTL8100SB-32/RTL8100C
Audio Codec ALC650
Mspkr ROUT+
Hpsense
Mspkl
EXTGPI224
Sheet 28 System Power Control
System Power Control
S3AUXSW#
Pson
Sheet 29 of 42 Fan Control
Fan Control and SpeedStep
SpeedStep
15,28 PSON#
Sheet 30 Mobility M10-P
Mobility M10-P
AAD30/BHSYNC
AAD31/BVSYNC
DMAA0 MEMMAA2 MDB0
MDA0
DMAB0
DMAA2
VGA DDR Dram Channel a
Sheet 32
Channel a
VGA DDR Dram Channel B
Sheet 33
Channel B
Sheet 34
VGA DDR Dram Termination
Sheet 35 Mobility M10-P Power
Mobility M10-P Power
VID4 VID3
Sheet 36
VID2 VID1 VID0 VID5
Pwrgoodvid
Sheet 37 +1.2V, +1.5V
+1.2V, +1.5V
Sheet 38
+2.5V, +1.25V
+2.5V, +1.25V
Susb
Sheet 39 of 42 +3V, +5V, +12V
+3V, +5V, +12V
Acin
PWRSW#24
Sheet 40 Charger
Charger
Board & Hot Key
Sheet 41 Board & Hot Key
PWRS10
TouchPad & SwitchBoard
TouchPad & Switchboard
Sheet 42
Schematic Diagrams