Self Help
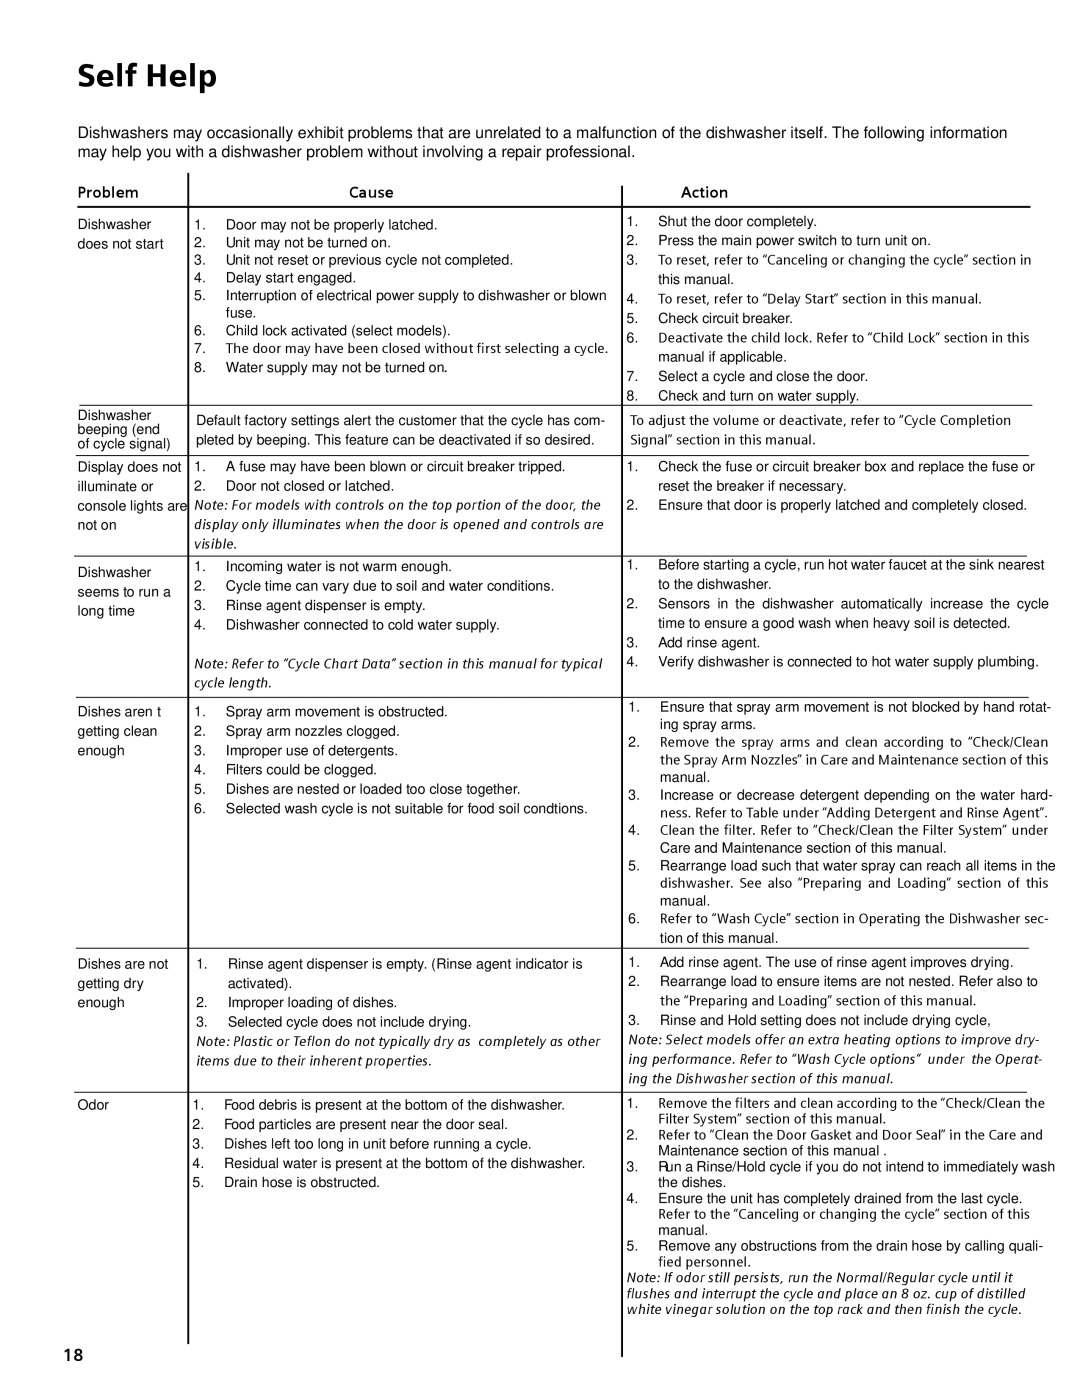
Dishwashers may occasionally exhibit problems that are unrelated to a malfunction of the dishwasher itself. The following information may help you with a dishwasher problem without involving a repair professional.
| Problem |
| Cause |
| Action | |||||
|
|
|
|
|
|
|
|
|
|
|
| Dishwasher | 1. | Door may not be properly latched. | 1. | Shut the door completely. | |||||
| does not start | 2. | Unit may not be turned on. | 2. | Press the main power switch to turn unit on. | |||||
|
|
| 3. | Unit not reset or previous cycle not completed. | 3. | To reset, refer to “Canceling or changing the cycle” section in | ||||
|
|
| 4. | Delay start engaged. |
| this manual. | ||||
|
|
| 5. | Interruption of electrical power supply to dishwasher or blown | 4. | To reset, refer to “Delay Start” section in this manual. | ||||
|
|
|
| fuse. | 5. | Check circuit breaker. | ||||
|
|
| 6. | Child lock activated (select models). | ||||||
|
|
| 6. | Deactivate the child lock. Refer to “Child Lock” section in this | ||||||
|
|
| 7. | The door may have been closed without first selecting a cycle. | ||||||
|
|
|
| manual if applicable. | ||||||
|
|
| 8. | Water supply may not be turned on. |
| |||||
|
|
| 7. | Select a cycle and close the door. | ||||||
|
|
|
|
| ||||||
|
|
|
|
| 8. | Check and turn on water supply. |
| |||
| Dishwasher | Default factory settings alert the customer that the cycle has com- | To adjust the volume or deactivate, refer to “Cycle Completion | |||||||
| beeping (end | |||||||||
| pleted by beeping. This feature can be deactivated if so desired. | Signal” section in this manual. | ||||||||
| of cycle signal) | |||||||||
|
|
|
|
|
|
|
| |||
| Display does not | 1. | A fuse may have been blown or circuit breaker tripped. | 1. | Check the fuse or circuit breaker box and replace the fuse or | |||||
| illuminate or | 2. | Door not closed or latched. |
| reset the breaker if necessary. | |||||
| console lights are | Note: For models with controls on the top portion of the door, the | 2. | Ensure that door is properly latched and completely closed. | ||||||
| not on | display only illuminates when the door is opened and controls are |
|
|
|
|
|
| ||
|
|
| visible. |
|
|
|
|
|
| |
|
|
|
|
|
|
|
| |||
| Dishwasher | 1. | Incoming water is not warm enough. | 1. | Before starting a cycle, run hot water faucet at the sink nearest | |||||
| 2. | Cycle time can vary due to soil and water conditions. |
| to the dishwasher. | ||||||
| seems to run a |
| ||||||||
| 3. | Rinse agent dispenser is empty. | 2. | Sensors in the dishwasher automatically increase the cycle | ||||||
| long time | |||||||||
| 4. | Dishwasher connected to cold water supply. |
| time to ensure a good wash when heavy soil is detected. | ||||||
|
|
|
| |||||||
|
|
|
|
| 3. | Add rinse agent. | ||||
|
|
| Note: Refer to “Cycle Chart Data” section in this manual for typical | 4. | Verify dishwasher is connected to hot water supply plumbing. | |||||
|
|
| cycle length. |
|
|
|
|
|
| |
|
|
|
|
|
|
|
| |||
| Dishes aren’t | 1. | Spray arm movement is obstructed. | 1. | Ensure that spray arm movement is not blocked by hand rotat- | |||||
|
| ing spray arms. | ||||||||
| getting clean | 2. | Spray arm nozzles clogged. |
| ||||||
| 2. Remove the spray arms and clean according to “Check/Clean | |||||||||
| enough | 3. | Improper use of detergents. | |||||||
|
| the Spray Arm Nozzles” in Care and Maintenance section of this | ||||||||
|
|
| 4. | Filters could be clogged. |
| |||||
|
|
|
| manual. | ||||||
|
|
| 5. | Dishes are nested or loaded too close together. |
| |||||
|
|
| 3. Increase or decrease detergent depending on the water hard- | |||||||
|
|
| 6. | Selected wash cycle is not suitable for food soil condtions. | ||||||
|
|
|
| ness. Refer to Table under “Adding Detergent and Rinse Agent”. | ||||||
|
|
|
|
| 4. | Clean the filter. Refer to “Check/Clean the Filter System” under | ||||
|
|
|
|
|
| Care and Maintenance section of this manual. | ||||
|
|
|
|
| 5. | Rearrange load such that water spray can reach all items in the | ||||
|
|
|
|
|
| dishwasher. See also “Preparing and Loading” section of this | ||||
|
|
|
|
|
| manual. | ||||
|
|
|
|
| 6. | Refer to “Wash Cycle” section in Operating the Dishwasher sec- | ||||
|
|
|
|
|
| tion of this manual. |
| |||
| Dishes are not | 1. | Rinse agent dispenser is empty. (Rinse agent indicator is | 1. | Add rinse agent. The use of rinse agent improves drying. | |||||
| getting dry |
| activated). | 2. | Rearrange load to ensure items are not nested. Refer also to | |||||
| enough | 2. | Improper loading of dishes. |
| the “Preparing and Loading” section of this manual. | |||||
|
|
| 3. | Selected cycle does not include drying. | 3. | Rinse and Hold setting does not include drying cycle, | ||||
Note: Plastic or Teflon do not typically dry as completely as other
items due to their inherent properties.
Odor | 1. | Food debris is present at the bottom of the dishwasher. | 1. | Remove the filters and clean according to the “Check/Clean the |
| 2. | Food particles are present near the door seal. |
| Filter System” section of this manual. |
| 2. | Refer to “Clean the Door Gasket and Door Seal” in the Care and | ||
| 3. | Dishes left too long in unit before running a cycle. | ||
|
| Maintenance section of this manual . | ||
| 4. | Residual water is present at the bottom of the dishwasher. |
| |
| 3. | Run a Rinse/Hold cycle if you do not intend to immediately wash | ||
| 5. | Drain hose is obstructed. |
| the dishes. |
|
|
| 4. | Ensure the unit has completely drained from the last cycle. |
|
|
|
| Refer to the “Canceling or changing the cycle” section of this |
|
|
|
| manual. |
|
|
| 5. | Remove any obstructions from the drain hose by calling quali- |
|
|
|
| fied personnel. |
|
|
| Note: If odor still persists, run the Normal/Regular cycle until it | |
|
|
| flushes and interrupt the cycle and place an 8 oz. cup of distilled | |
|
|
| white vinegar solution on the top rack and then finish the cycle. | |
18