ASSEMBLY STEP 1

Assemble the Rail and Install the Trolley

To avoid installation difficulties, do not run the garage door opener until instructedto do so.

The front rail has a cut out "window" at the door end

(see illustration). The hole above this windowis larger on the top of the raft than on the bottom. A smaller hole 3-1/2" (8.9 cm) away is close to the rail edge. Rotate the back rail so it has a

similar hole close to the oppositeedge, about 4-3/4" (12 cm) from the far end.

1.Assemble the trolley by sliding the inner trolley into the outer trolley.

2.Removethe straight door arm and hanging bracket packaged inside the front rail and set aside for Installation Steps5 and 9. NOTE: To prevent INJURY while unpacking the rail carefully remove the straight door arm stored within the rail section.

3.Align the rail sections on a flat surface as shown and slide the tapered ends into the larger ones. Tabs along the side will lock into place.

4.Placethe motor unit on packing material to protect the cover, and rest the back end of the rail on top. For convenience,put a support under the front end of the rail.

5.As a temporary stop, insert a screwdriver into the hole 10" (25 cm) from the front end of the rail, as shown.

6.Checkto be sure there are 4 plastic wear pads inside the inner trolley. If they becameloose during shipping, check all packing material. Snapthem back into position as shown.

7.Slide the trolley assembly along the rail from the back end to the screwdriver.

To prevent INJURY from pinching, keep hands and fingers away from the joints while assembling the rail.

Outer

Trolley

Inner

Trolley

Wear Pads

RAIL (TOP)

KEEP LARGER

HOLEON TOP

Window Cut-Out

ASSEMBLY STEP 2

Fasten the Rail to the Motor Unit

1.Insert a 1/4"-20xl-3/4" bolt into the cover protection bolt hole on the back end of the rail as shown. Tighten securely with a 1/4"-20 lock nut. DO NOTovertighten.

2.Removethe two bolts from the top of the motor unit.

3.Placethe "U" bracket,flat side down, on the motor unit and align the bracket holes with the bolt holes. Fastenwith the previously removed bolts.

4.Align the rail assemblywith the top of the motor unit. Slide the rail end onto the "U" bracket, all the way to the stops that protrude on the top and sides of the bracket.

HARDWARESHOWN ACTUALSIZE


Lock Nut

Bolt 1/4"-20xl-3/4"

1/4"-20

To avoid SERIOUSdamage to garagedoor opener, use ONLY those bolts/fasteners mounted in the top of the opener.

Bolts

I

"U" Bracket

Bolt

I

Cover

Protection

Bolt Hole _

I

SLIDE RAIL TOSTOPS

I

ON TOP AND SIDES


OFBRACKET

Lock Nut i


Page 8
Image 8
Craftsman 139.3043 Assemble the Rail and Install the Trolley, Fasten the Rail to the Motor Unit, Inner Trolley, Rail TOP

139.3043 specifications

The Craftsman 139.3043 garage door opener stands out as a robust and reliable solution for homeowners looking to enhance the functionality and security of their garage spaces. This model is designed with the latest technologies and features, making it one of the preferred choices in the market.

One of the key features of the Craftsman 139.3043 is its powerful motor, which provides a smooth and quiet operation. With a lifting capacity that accommodates most standard residential garage doors, this opener ensures that users can operate their doors seamlessly without unnecessary noise. The blend of power and quiet functionality enhances the overall user experience, making it ideal for homes with bedrooms or living areas adjacent to the garage.

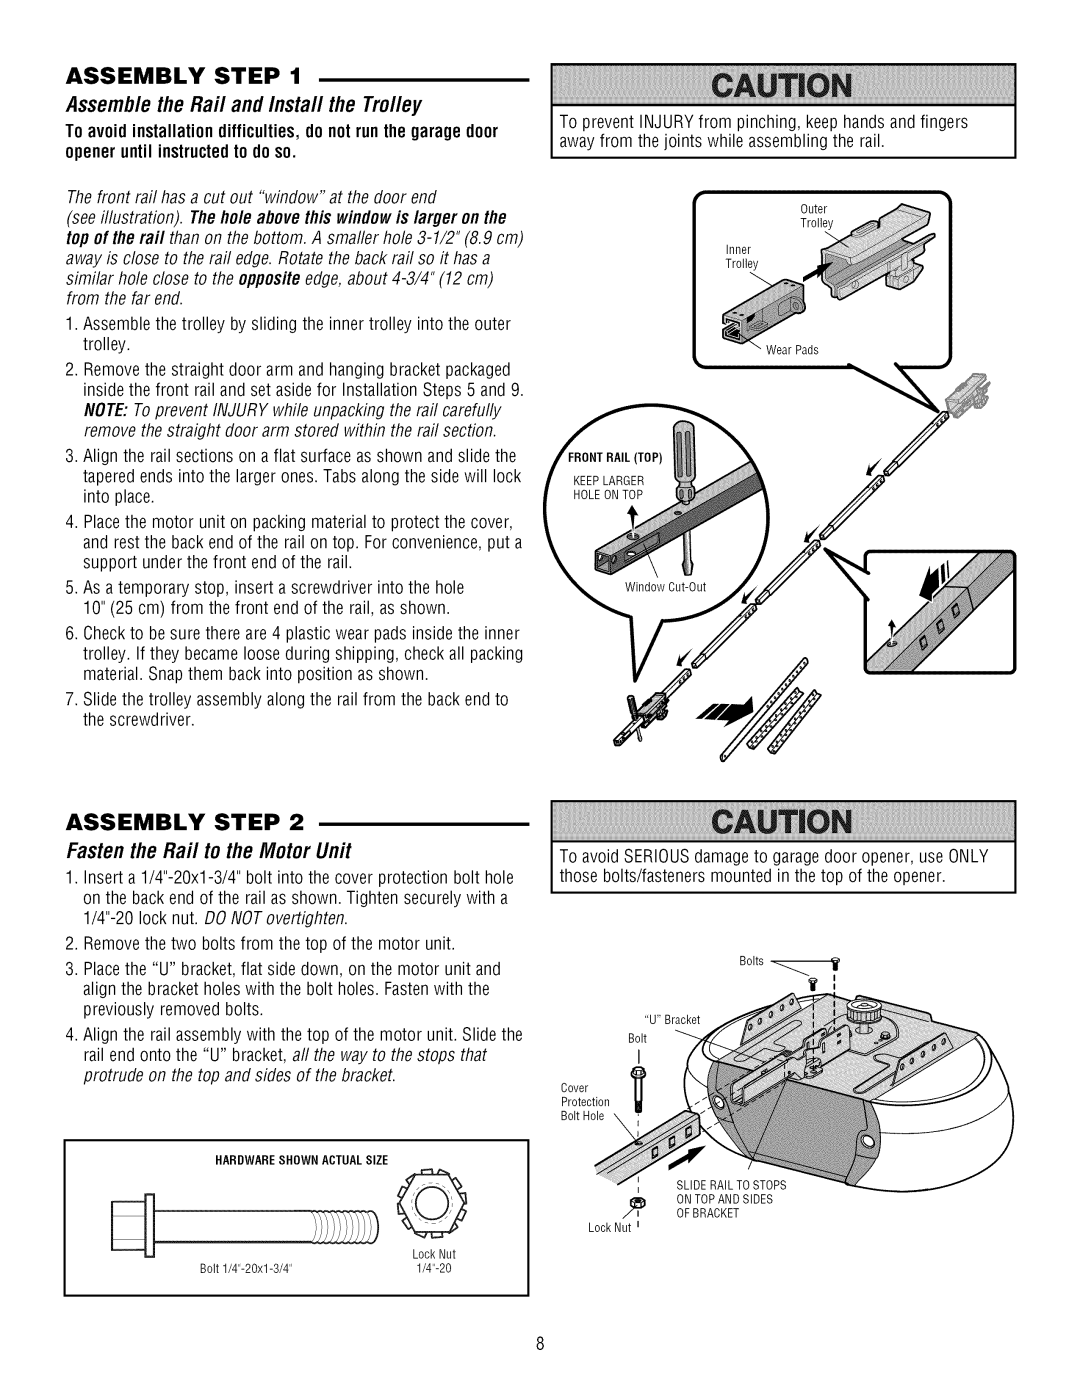
The opener also boasts a durable rail system, designed for easy installation and longevity. The straightforward design simplifies the installation process, enabling a typical DIY enthusiast to set it up without the need for professional assistance. Additionally, the sturdy construction of the rail system ensures that it can withstand the rigors of daily use.

Safety and security are paramount with the Craftsman 139.3043. It incorporates advanced safety features, such as the automatic reverse function, which prevents accidents by reversing the door's motion when an obstacle is detected. This feature adds peace of mind for families with children and pets. Furthermore, the built-in security technology includes a rolling code system that changes the access code each time the remote is used, thus protecting against potential unauthorized access.

The Craftsman 139.3043 is equipped with remote control capabilities, allowing users to open and close their garage doors from a distance. The remote is designed to be user-friendly, with buttons that are easy to operate. Additionally, many models include a smartphone app integration, empowering users to control their garage door via their mobile devices, providing convenience and modern accessibility.

Another notable characteristic is the vibrant LED lighting that illuminates the garage space when the door is in use. This not only enhances visibility but also contributes to the overall safety of the area, preventing accidents in dimly lit environments.

In summary, the Craftsman 139.3043 garage door opener combines power, ease of use, advanced safety features, and modern technology. Its reliable performance and user-friendly elements make it a top choice for homeowners seeking an effective solution to their garage door needs.