INSTALACION, PASO 11

Instalar el controlde la puerta

INTRODUCCION

NOTA:Antiguos accesorios Craftsman o de terceras marcas no son compatibles.

Elabre-puerta de garaje es compatible hasta con dos controles.

Instalar el control donde la puerta quede a la vista, a una altura minima de 5 pies (1.5 m), donde los niSos no puedan alcanzarlo y est_ alejado de las partes m6viles de la puerta.

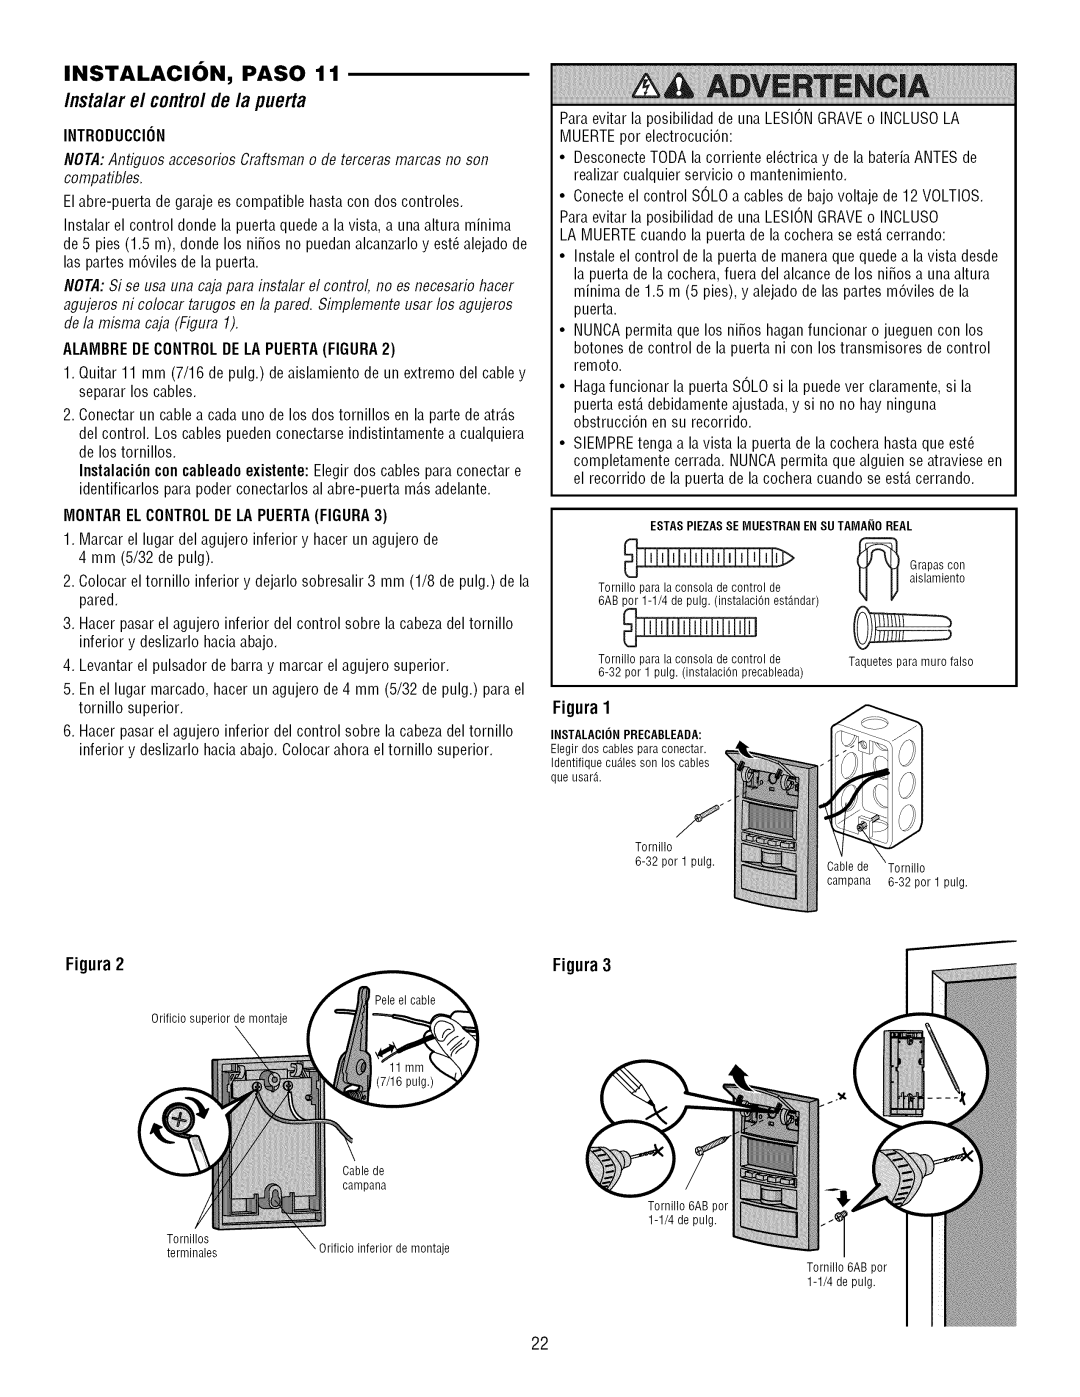
NOTA:Si se usa una caja para instalar el control, no es necesario hacer agujeros ni colocar tarugos en la pared. Simplemente usar los agujeros de la misma caja (Figura 1).

ALAMBREDE CONTROLDE LA PUERTA(FIGURA2)

1.Quitar 11 mm (7/16 de pulg.) de aislamiento de un extremo del cable y separar los cables.

2.Conectar un cable a cada uno de los dos tornillos en la parte de atr_.s

del control. Los cables pueden conectarse indistintamente a cualquiera de los tornillos.

Instalaci6n concableado existente: Elegir dos cables para conectar e identificarlos para poder conectarlos al abre-puerta m_.sadelante.

MONTAR ELCONTROLDE LA PUERTA(FIGURA3)

Para evitar la posibilidad de una LESIONGRAVEo INCLUSOLA MUERTEpor electrocuci6n:

DesconecteTODA la corriente el_ctrica y de la bateria ANTESde realizar cualquier servicio o mantenimiento.

Conecte el control SOLOa cables de bajo voltaje de 12 VOLTIOS.

Para evitar la posibilidad de una LESIONGRAVEo INCLUSO LA MUERTEcuando la puerta de la cochera se est,. cerrando:

Instale el control de la puerta de maneraque quedea la vista desde la puerta de la cochera, fuera del alcance de los niSos a unaaltura minima de 1.5 m (5 pies), y alejado de las partes m6viles de la puerta.

NUNOApermita que los niSos haganfuncionar o jueguen con los botones de control de la puerta ni con los transmisores de control remoto.

Hagafuncionar la puerta SOLOsi la puede ver claramente, si la puerta est,. debidamente ajustada, y si no no hay ninguna obstrucci6n en su recorrido.

SIEMPREtenga a la vista la puerta de la cochera hasta que est_ completamente cerrada. NUNCApermita que alguien se atraviese en el recorrido de la puerta de la cochera cuando se est,. cerrando.

ESTAS PIEZASSE MUESTRAN EN SU TA[VIA_IOREAL

1.

Marcar el lugar del agujero inferior y hacer un agujero de


4 mm (5/32 de pulg).

2.

Oolocar el tornillo inferior y dejarlo sobresalir 3 mm (1/8 de pulg.) de la


pared.

3.

Hacer pasar el agujero inferior del control sobre la cabeza del tornillo


inferior y deslizarlo hacia abajo.

4.

Levantar el pulsador de barra y marcar el agujero superior.

5.

En el lugar marcado, hacer un agujero de 4 mm (5/32 de pulg.) para el


tornillo superior.

Tllllllllll

Tornillo para la consola de control de

6AB por 1-1/4 de pulg. (instalaciOn est_ndar)

Tornillo para la consola de control de

6-32 por 1 pulg. (instalaciOn precableada)

Figura 1

aislamiento Grapascon

Taquetesparamurofalso

6. Hacer pasar el agujero inferior del control sobre la cabeza del tornillo

inferior y deslizarlo hacia abajo. Oolocar ahora el tornillo superior.

INSTALACII)N PRECABLEADA:

Elegir dos cables para conectar. Identifique cuAles son los cables que usar&.

Tornillo


6-32 por 1 pulg.

e

Tornillo


campana

6-32 por 1 pulg.

Figura2

Figura3


Orificio superior de montaje


Cable de


campana


Tornillo 6AB por


1-1/4 de pulg.

Tornillos


terminales

Orificio inferior de montaje

Tornillo 6AB por 1-1/4 de pulg.

22

Page 63
Image 63
Craftsman 139.3043 owner manual Instalar el controlde la puerta, Introduccion, Alambrede Controlde LA PUERTAFIGURA2

139.3043 specifications

The Craftsman 139.3043 garage door opener stands out as a robust and reliable solution for homeowners looking to enhance the functionality and security of their garage spaces. This model is designed with the latest technologies and features, making it one of the preferred choices in the market.

One of the key features of the Craftsman 139.3043 is its powerful motor, which provides a smooth and quiet operation. With a lifting capacity that accommodates most standard residential garage doors, this opener ensures that users can operate their doors seamlessly without unnecessary noise. The blend of power and quiet functionality enhances the overall user experience, making it ideal for homes with bedrooms or living areas adjacent to the garage.

The opener also boasts a durable rail system, designed for easy installation and longevity. The straightforward design simplifies the installation process, enabling a typical DIY enthusiast to set it up without the need for professional assistance. Additionally, the sturdy construction of the rail system ensures that it can withstand the rigors of daily use.

Safety and security are paramount with the Craftsman 139.3043. It incorporates advanced safety features, such as the automatic reverse function, which prevents accidents by reversing the door's motion when an obstacle is detected. This feature adds peace of mind for families with children and pets. Furthermore, the built-in security technology includes a rolling code system that changes the access code each time the remote is used, thus protecting against potential unauthorized access.

The Craftsman 139.3043 is equipped with remote control capabilities, allowing users to open and close their garage doors from a distance. The remote is designed to be user-friendly, with buttons that are easy to operate. Additionally, many models include a smartphone app integration, empowering users to control their garage door via their mobile devices, providing convenience and modern accessibility.

Another notable characteristic is the vibrant LED lighting that illuminates the garage space when the door is in use. This not only enhances visibility but also contributes to the overall safety of the area, preventing accidents in dimly lit environments.

In summary, the Craftsman 139.3043 garage door opener combines power, ease of use, advanced safety features, and modern technology. Its reliable performance and user-friendly elements make it a top choice for homeowners seeking an effective solution to their garage door needs.