XTi Series Power Amplifiers

Amplificateurs de puissance

Leistungsendstufen

Amplificadores de potencia

2 Setup

2 Installation

2 Installation

2 Configuración

Enceinte du

Lautsprecher

Enceinte du

Lautsprecher

Canal 2

Kanal 2

Canal 1

Kanal 1

Channel 2


Altoparlante

Channel 1


Altoparlante


Loudspeaker


del Canal 2

Loudspeaker


del Canal 1


Canal 1 Kanal 1

Canal 2

Kanal 2

Table de mixage

Mischpult

Mezcladora

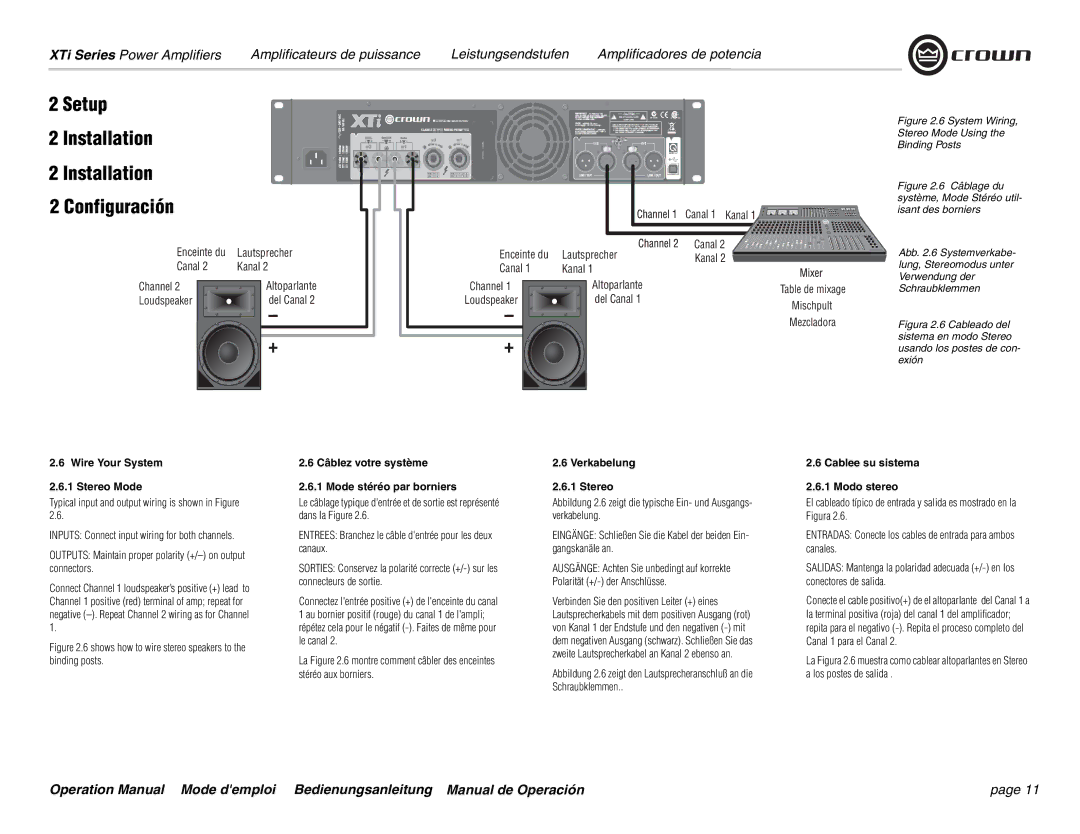
Figure 2.6 System Wiring,

Stereo Mode Using the

Binding Posts

Figure 2.6 Câblage du système, Mode Stéréo util- isant des borniers

Abb. 2.6 Systemverkabe- lung, Stereomodus unter Verwendung der Schraubklemmen

Figura 2.6 Cableado del sistema en modo Stereo usando los postes de con- exión

2.6 Wire Your System

2.6.1 Stereo Mode

Typical input and output wiring is shown in Figure 2.6.

INPUTS: Connect input wiring for both channels.

OUTPUTS: Maintain proper polarity (+/–) on output connectors.

Connect Channel 1 loudspeaker’s positive (+) lead to Channel 1 positive (red) terminal of amp; repeat for negative (–). Repeat Channel 2 wiring as for Channel 1.

Figure 2.6 shows how to wire stereo speakers to the binding posts.

2.6 Câblez votre système

2.6.1 Mode stéréo par borniers

Le câblage typique d'entrée et de sortie est représenté dans la Figure 2.6.

ENTREES: Branchez le câble d'entrée pour les deux canaux.

SORTIES: Conservez la polarité correcte (+/-) sur les connecteurs de sortie.

Connectez l'entrée positive (+) de l'enceinte du canal 1 au bornier positif (rouge) du canal 1 de l'ampli; répétez cela pour le négatif (-). Faites de même pour le canal 2.

La Figure 2.6 montre comment câbler des enceintes stéréo aux borniers.

2.6 Verkabelung

2.6.1 Stereo

Abbildung 2.6 zeigt die typische Ein- und Ausgangs- verkabelung.

EINGÄNGE: Schließen Sie die Kabel der beiden Ein- gangskanäle an.

AUSGÄNGE: Achten Sie unbedingt auf korrekte Polarität (+/-) der Anschlüsse.

Verbinden Sie den positiven Leiter (+) eines Lautsprecherkabels mit dem positiven Ausgang (rot) von Kanal 1 der Endstufe und den negativen (-) mit dem negativen Ausgang (schwarz). Schließen Sie das zweite Lautsprecherkabel an Kanal 2 ebenso an.

Abbildung 2.6 zeigt den Lautsprecheranschluß an die Schraubklemmen..

2.6 Cablee su sistema

2.6.1 Modo stereo

El cableado típico de entrada y salida es mostrado en la Figura 2.6.

ENTRADAS: Conecte los cables de entrada para ambos canales.

SALIDAS: Mantenga la polaridad adecuada (+/-) en los conectores de salida.

Conecte el cable positivo(+) de el altoparlante del Canal 1 a la terminal positiva (roja) del canal 1 del amplificador; repita para el negativo (-). Repita el proceso completo del Canal 1 para el Canal 2.

La Figura 2.6 muestra como cablear altoparlantes en Stereo a los postes de salida .

Operation Manual Mode d'emploi Bedienungsanleitung Manual de Operación

page 11

Page 11
Image 11
Crown Audio XTi 4000 Wire Your System Stereo Mode, Câblez votre système Mode stéréo par borniers, Verkabelung Stereo

XTi 4000 specifications

The Crown Audio XTi 4000 is a professional power amplifier designed to deliver high performance and reliability for a range of audio applications, including live events, installations, and sound reinforcement. Renowned for its rugged design and robust features, the XTi 4000 is engineered to provide exceptional sound quality and ease of use, making it a favorite among audio professionals.

One of the standout features of the XTi 4000 is its impressive power output. With a maximum output of 4000 watts at 4 ohms, this amplifier is capable of driving large speakers in demanding environments, ensuring that audiences experience crystal-clear sound reproduction. The XTi 4000 is equipped with onboard DSP (Digital Signal Processing), which allows users to tailor the sound with precision. This DSP includes adjustable crossover, EQ settings, and limiting, enabling users to optimize the amplifier's performance to suit specific venue requirements or speaker configurations.

The XTi 4000 is also designed with advanced protection circuitry, which safeguards both the amplifier and connected speakers from potential damage due to overheating, overloading, or short circuits. This ensures that the amplifier can operate continuously under high-stress conditions, a critical requirement for professionals who rely on consistent performance during events.

In terms of connectivity, the XTi 4000 features multiple input options, including XLR and 1/4-inch TRS connectors, providing compatibility with various audio sources. The rear panel is equipped with Speakon and binding post outputs, allowing for secure connections to speakers. Additionally, the amplifier's lightweight and compact design makes it easy to transport and install, enhancing its versatility in various setups.

One of the most user-friendly aspects of the XTi 4000 is its front-panel LCD display, which offers easy access to menu navigation for adjusting settings. Users can also control the amplifier remotely via the optional Ethernet connection, using Crown's Integrated Control Software to monitor and adjust parameters without being physically present at the amplifier.

In summary, the Crown Audio XTi 4000 is a powerful, versatile, and reliable amplifier that combines advanced technology with user-friendly features. Ideal for both live sound and installation applications, it delivers exceptional performance, sound quality, and protection, making it a top choice for audio professionals seeking a dependable amplification solution. Whether for a concert, theater production, or installation in a venue, the XTi 4000 stands out as a robust and capable power amplifier.