XTi Series Power Amplifiers

Amplificateurs de puissance

Leistungsendstufen

Amplificadores de potencia

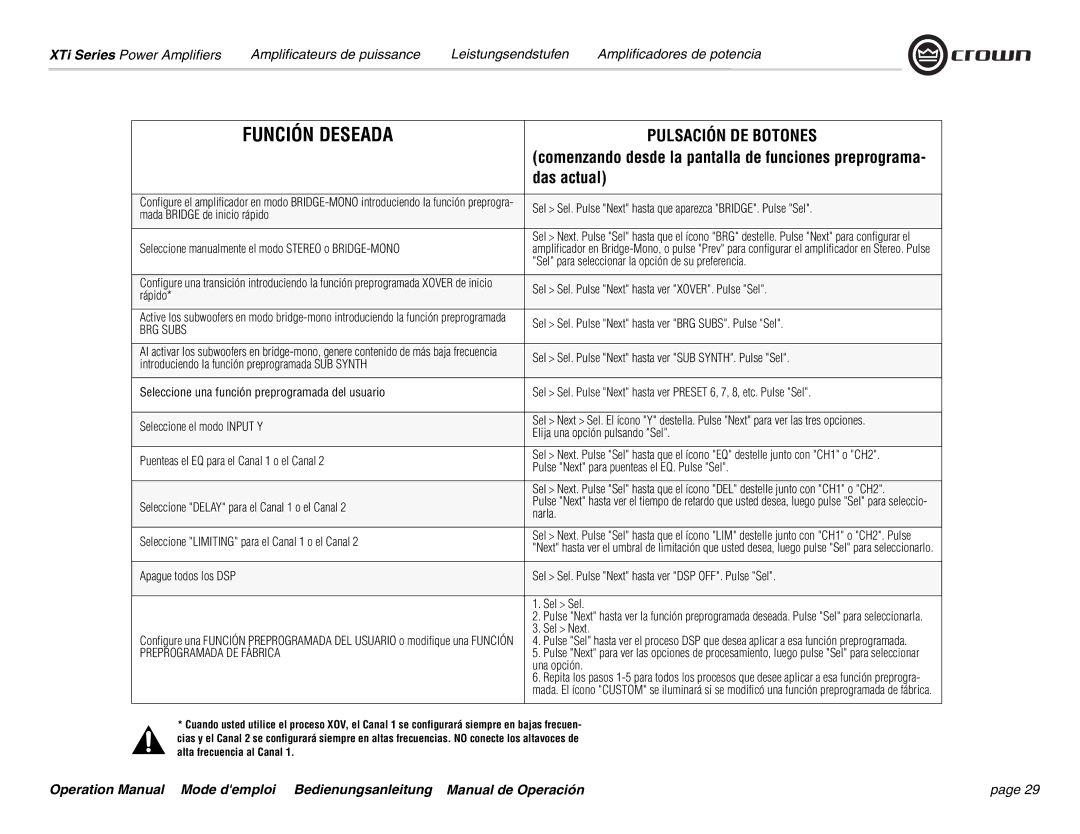
FUNCIÓN DESEADA

PULSACIÓN DE BOTONES


(comenzando desde la pantalla de funciones preprograma-


das actual)


Configure el amplificador en modo BRIDGE-MONO introduciendo la función preprogra-

Sel > Sel. Pulse "Next" hasta que aparezca "BRIDGE". Pulse "Sel".

mada BRIDGE de inicio rápido


Sel > Next. Pulse "Sel" hasta que el ícono "BRG" destelle. Pulse "Next" para configurar el

Seleccione manualmente el modo STEREO o BRIDGE-MONO

amplificador en Bridge-Mono, o pulse "Prev" para configurar el amplificador en Stereo. Pulse


"Sel" para seleccionar la opción de su preferencia.


Configure una transición introduciendo la función preprogramada XOVER de inicio

Sel > Sel. Pulse "Next" hasta ver "XOVER". Pulse "Sel".

rápido*


Active los subwoofers en modo bridge-mono introduciendo la función preprogramada

Sel > Sel. Pulse "Next" hasta ver "BRG SUBS". Pulse "Sel".

BRG SUBS


Al activar los subwoofers en bridge-mono, genere contenido de más baja frecuencia

Sel > Sel. Pulse "Next" hasta ver "SUB SYNTH". Pulse "Sel".

introduciendo la función preprogramada SUB SYNTH


Seleccione una función preprogramada del usuario

Sel > Sel. Pulse "Next" hasta ver PRESET 6, 7, 8, etc. Pulse "Sel".


Seleccione el modo INPUT Y

Sel > Next > Sel. El ícono "Y" destella. Pulse "Next" para ver las tres opciones.

Elija una opción pulsando "Sel".


Puenteas el EQ para el Canal 1 o el Canal 2

Sel > Next. Pulse "Sel" hasta que el ícono "EQ" destelle junto con "CH1" o "CH2".

Pulse "Next" para puenteas el EQ. Pulse "Sel".


Sel > Next. Pulse "Sel" hasta que el ícono "DEL" destelle junto con "CH1" o "CH2".

Seleccione "DELAY" para el Canal 1 o el Canal 2

Pulse "Next" hasta ver el tiempo de retardo que usted desea, luego pulse "Sel" para seleccio-

narla.


Seleccione "LIMITING" para el Canal 1 o el Canal 2

Sel > Next. Pulse "Sel" hasta que el ícono "LIM" destelle junto con "CH1" o "CH2". Pulse

"Next" hasta ver el umbral de limitación que usted desea, luego pulse "Sel" para seleccionarlo.


Apague todos los DSP

Sel > Sel. Pulse "Next" hasta ver "DSP OFF". Pulse "Sel".


1. Sel > Sel.


2. Pulse "Next" hasta ver la función preprogramada deseada. Pulse "Sel" para seleccionarla.


3. Sel > Next.

Configure una FUNCIÓN PREPROGRAMADA DEL USUARIO o modifique una FUNCIÓN

4. Pulse "Sel" hasta ver el proceso DSP que desea aplicar a esa función preprogramada.

PREPROGRAMADA DE FÁBRICA

5. Pulse "Next" para ver las opciones de procesamiento, luego pulse "Sel" para seleccionar


una opción.


6. Repita los pasos 1-5 para todos los procesos que desee aplicar a esa función preprogra-


mada. El ícono "CUSTOM" se iluminará si se modificó una función preprogramada de fábrica.


*Cuando usted utilice el proceso XOV, el Canal 1 se configurará siempre en bajas frecuen- cias y el Canal 2 se configurará siempre en altas frecuencias. NO conecte los altavoces de alta frecuencia al Canal 1.

Operation Manual Mode d'emploi Bedienungsanleitung Manual de Operación

page 29

Page 29
Image 29
Crown Audio XTi 4000 operation manual Función Deseada, Pulsación DE Botones

XTi 4000 specifications

The Crown Audio XTi 4000 is a professional power amplifier designed to deliver high performance and reliability for a range of audio applications, including live events, installations, and sound reinforcement. Renowned for its rugged design and robust features, the XTi 4000 is engineered to provide exceptional sound quality and ease of use, making it a favorite among audio professionals.

One of the standout features of the XTi 4000 is its impressive power output. With a maximum output of 4000 watts at 4 ohms, this amplifier is capable of driving large speakers in demanding environments, ensuring that audiences experience crystal-clear sound reproduction. The XTi 4000 is equipped with onboard DSP (Digital Signal Processing), which allows users to tailor the sound with precision. This DSP includes adjustable crossover, EQ settings, and limiting, enabling users to optimize the amplifier's performance to suit specific venue requirements or speaker configurations.

The XTi 4000 is also designed with advanced protection circuitry, which safeguards both the amplifier and connected speakers from potential damage due to overheating, overloading, or short circuits. This ensures that the amplifier can operate continuously under high-stress conditions, a critical requirement for professionals who rely on consistent performance during events.

In terms of connectivity, the XTi 4000 features multiple input options, including XLR and 1/4-inch TRS connectors, providing compatibility with various audio sources. The rear panel is equipped with Speakon and binding post outputs, allowing for secure connections to speakers. Additionally, the amplifier's lightweight and compact design makes it easy to transport and install, enhancing its versatility in various setups.

One of the most user-friendly aspects of the XTi 4000 is its front-panel LCD display, which offers easy access to menu navigation for adjusting settings. Users can also control the amplifier remotely via the optional Ethernet connection, using Crown's Integrated Control Software to monitor and adjust parameters without being physically present at the amplifier.

In summary, the Crown Audio XTi 4000 is a powerful, versatile, and reliable amplifier that combines advanced technology with user-friendly features. Ideal for both live sound and installation applications, it delivers exceptional performance, sound quality, and protection, making it a top choice for audio professionals seeking a dependable amplification solution. Whether for a concert, theater production, or installation in a venue, the XTi 4000 stands out as a robust and capable power amplifier.