Instrucciones de Operación del

Control Remoto

1.Envío de Señales: El control remoto debe apuntarse directamente al sensor infrarrojo ubicado debajo del panel de control al iniciar un comando. Cuando la unidad está encendida y se presione un botón del control remoto, sonará un pitido (en la unidad principal) confirmado que la señal fue enviada/recibida. Todas las selecciones de programación que aparecen en la pantalla del control remoto también aparecerán en la pantalla de la unidad principal cuando ambas unidades estén encendidas. Si la unidad principal no responde a un comando enviado, intente nuevamente.

Si la unidad principal todavía no responde;

Verifique lo siguiente:

¿Están el receptor y el control remoto dentro del rango de funcionamiento requerido de 7 metros (23 pies)?

•¿Está el receptor en la unidad principal parcialmente bloqueado y/o obstruido?

¿Están las pilas correctamente instaladas dentro del control remoto (positivo + / negativo -)?

Verifique las pilas. Si están débiles, cámbielas.

2.Ajuste del Reloj (Control Remoto): Al instalar las pilas por primera vez, el reloj muestra "0:00" parpadeando. Presione el botón MIN para ajustar la hora correcta (minutos). Cada vez que presione el botón MIN la indicación avanza en incrementos de 10 minutos. La indicación se acepta automáticamente (deja de parpadear) después de 5 segundos. Mantenga presionado el botón HOUR para ajustar la hora correcta (horas). (La hora comenzará a parpadear). Cada vez que presione el botón HOUR la indicación avanza en incrementos de 1 hora. La indicación se acepta automáticamente (deja de parpadear) después de 5 segundos. Cuando la unidad principal se enciende con el control remoto, el reloj de la unidad principal se ajusta automáticamente con la hora del control remoto.

3.Ajuste de Modo: presione el botón "Mode" para seleccionar el modo de operación. Cada vez que se presiona el botón, se avanza a un modo diferente (Auto-Cool-Dry-Fan).

4. Ajuste de Temperatura: Presione los botones

+

del control remoto para


C/F seleccionar la temperatura

-

deseada. Cada vez que se

presione un botón, la temperatura aumentará/disminuirá 1º C/F. La temperatura seleccionada se indicará en la pantalla del control remoto. Cuando la unidad principal se enciende con el control remoto, la temperatura de la unidad principal se ajusta automáticamente a la temperatura del control remoto. El rango de temperatura es desde 16º C a 31º C (60,8º F a 88º F).

5. Velocidad del Ventilador:

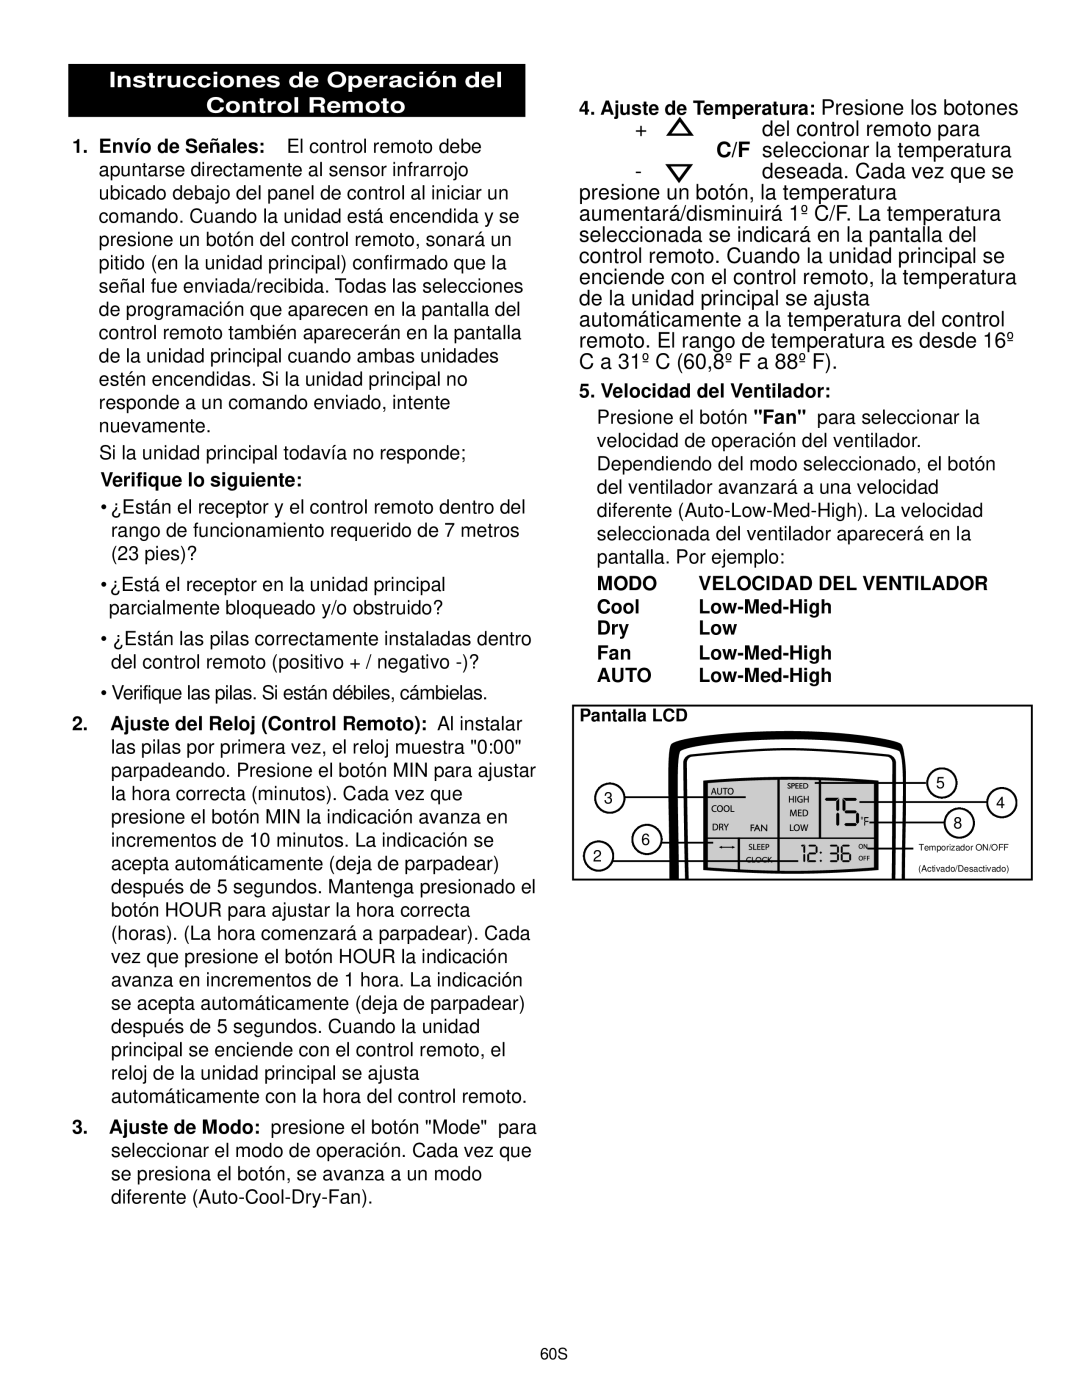
Presione el botón "Fan" para seleccionar la velocidad de operación del ventilador. Dependiendo del modo seleccionado, el botón del ventilador avanzará a una velocidad diferente (Auto-Low-Med-High). La velocidad seleccionada del ventilador aparecerá en la pantalla. Por ejemplo:

MODO

VELOCIDAD DEL VENTILADOR

Cool

Low-Med-High

Dry

Low

Fan

Low-Med-High

AUTO

Low-Med-High

Pantalla LCD


3

5

4

6

8

Temporizador ON/OFF

2

(Activado/Desactivado)


60S

Page 10
Image 10
Danby DCAP 12030, DPAC9030 Instrucciones de Operación del Control Remoto, Verifique lo siguiente, Velocidad del Ventilador

DPAC9030, DCAP 12030 specifications

The Danby DCAP 12030 and DPAC9030 are two popular portable air conditioners that cater to homeowners seeking efficient cooling solutions. Designed with various features and technologies, these units enhance indoor comfort while maintaining energy efficiency.

The Danby DCAP 12030 is a 12,000 BTU portable air conditioner suitable for medium-sized rooms up to 550 square feet. Its sleek design and smooth-rolling casters make it easy to move from room to room. One of its standout features is its digital display, which allows users to set the desired temperature and operate the unit with ease. This model also includes a programmable 24-hour timer, enabling users to set specific times for the unit to turn on or off. Notably, the DCAP 12030 offers three fan speeds and a dehumidification mode, helping to maintain comfortable humidity levels in your home.

On the other hand, the Danby DPAC9030 is a 9,000 BTU portable air conditioner designed for slightly smaller spaces, ideal for rooms up to 400 square feet. This unit features an impressive energy efficiency rating, which translates to lower electricity bills. The DPAC9030 incorporates a built-in dehumidifier function that removes up to 2.4 pints of moisture per hour, making it especially useful in humid climates. Its user-friendly remote control allows for seamless operation from across the room.

Both models are equipped with advanced technologies such as auto-restart functionality, which resumes operation automatically after a power outage, preventing discomfort in extreme weather. Each unit also features a washable air filter, contributing to cleaner indoor air quality by trapping dust and allergens. The compact design and integrated carry handles make both units a practical choice for users who require versatility in their HVAC systems.

In conclusion, the Danby DCAP 12030 and DPAC9030 offer a range of features and technologies designed to provide efficient cooling in portable formats. With their ease of use, energy efficiency, and effectiveness in controlling humidity levels, both models stand out as excellent choices for enhancing indoor comfort. Whether for a living room, bedroom, or even a home office, these portable air conditioners are engineered to meet the diverse needs of today’s homeowners.