W . d e l l . c o m s u p p o r t . d e l l . c o m
Dell OptiPlex Quick Reference Guide
January NX484
Contents
Resolving Software and Hardware
Using the Drivers and Utilities Media
Quick Reference Guide
Finding Information
What Are You Looking For? Find It Here
Desktop System Software DSS
Dell Product Information Guide
What Are You Looking For? Find It Here Warranty information
License
Microsoft Windows License Label
Operating System Media
What Are You Looking For?
Your Service Tag
System and installs the updates
Appropriate for your configuration
Setting Up Your Computer
Problem
Windows XP
Quick Reference Guide
Quick Reference Guide
Quick Reference Guide
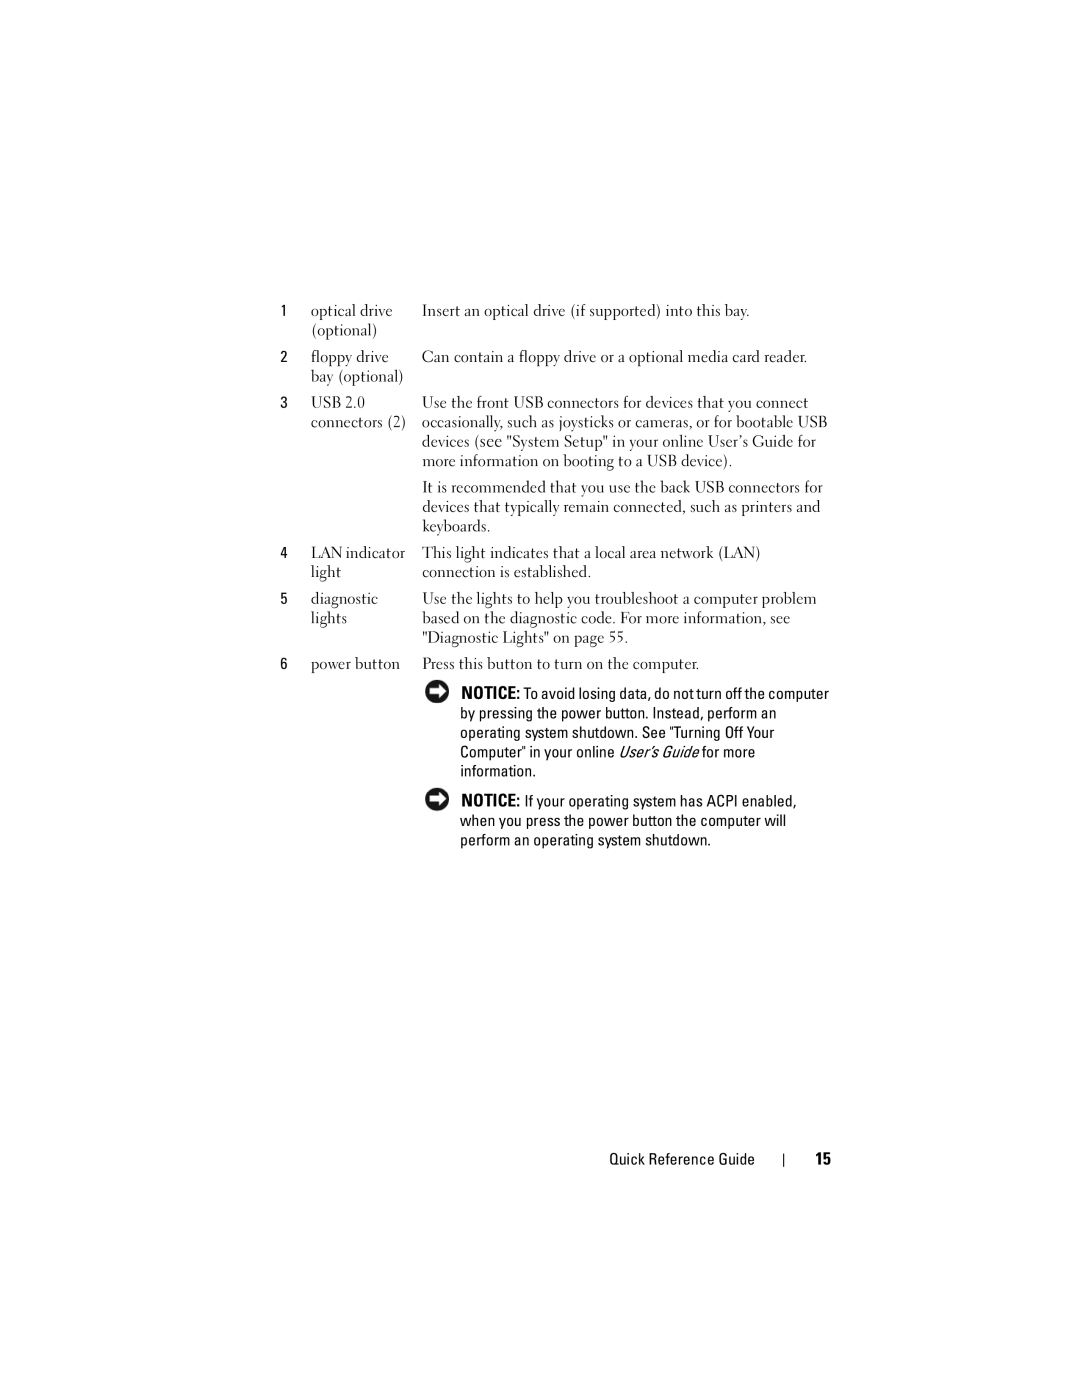
Mini Tower Computer Front View
System Views
Operating system shutdown. See Turning Off Your
By pressing the power button. Instead, perform an
Online User’s Guide for instructions
No light The computer is turned off
Mini Tower Computer Back View
Available in Japan is 100
Mini Tower Computer Back-Panel Connectors
Connector
Desktop Computer Front View
Mode
Information
Perform an operating system shutdown
State
Desktop Computer Back View
Switch
Desktop Computer Back-Panel Connectors
Off The computer is not detecting a physical
User’s Guide
Network and the computer
Or 1000-Mbps network and the computer
PS2/serial adapter is used
Small Form Factor Computer Front View
Computer by pressing the power button. Instead
Your Computer in your online User’s Guide for
Instructions for more information
Saving mode, see Power Management in your online User’s
Small Form Factor Computer Back View
Small Form Factor Computer Back-Panel Connectors
Monitors, use the y-cable that came with your computer
Monitor to the connector on the graphics card
Removing the Computer Cover
Before You Begin
Adapter is used
Quick Reference Guide
Mini Tower Computer
Page
Desktop Computer
Page
Small Form Factor Computer
Security cable slot Cover release latch
Inside Your Computer
Switch optional Card slots
Hard drive
Front I/O panel Quick Reference Guide
System Board Components
Mini Tower Computer Quick Reference Guide
Jumper Settings
Pswd
Jumper Setting Description
Switch optional
Drive release latch Optical drive
Chassis intrusion System board
Memory module Power connector Connectors
Desktop Computer Quick Reference Guide
Small Form Factor Computer
Chassis intrusion Hard drive
Switch optional System board
Fancpu CPU
Small Form Factor Computer Jumper Setting Description
Solving Problems
Dell Diagnostics
Insert the Drivers and Utilities media
Option Function
Tab Function
Your power light may indicate a computer problem
Power Light Problem Description Suggested Resolution
System Lights
Contacting Dell, see your online
Diagnostic Lights
See your online User’s Guide
Assistance. For information on
Light Pattern Problem Description
If the problem persists, contact Dell
Modules without error
Reinstall an additional
Have identified a faulty
Module or reinstalled all
Beep Codes
Code Cause
Resolving Software and Hardware Incompatibilities
Starting System Restore
Undoing the Last System Restore
Restoring Your Operating System
Restoring the Computer to an Earlier Operating State
Creating a Restore Point
Enabling System Restore
Reinstalling Your Microsoft Windows Operating System
Before You Begin
Booting From the Operating System Media
Windows XP Setup
Press the arrow keys to select CD-ROM, and press Enter
Quick Reference Guide
Windows Vista
Using the Drivers and Utilities Media
Using Windows Device Driver Rollback
Manually Reinstalling Drivers
Quick Reference Guide
Index
Error messages beep codes, 59 system lights
Index
Index
Index
Guide de référence rapide du Dell OptiPlex
Remarques, avis et précautions
109
Configuration de votre ordinateur
105
Retrait du capot de lordinateur 107
132
126
127
130
Recherche dinformations
Guide dutilisation du Dell OptiPlex
Express
Étiquette de licence Microsoft
Windows
Dexploitation Remarque Le support Operating
Obligatoirement expédié avec tous les
Ordinateurs
De support approprié
Configuration Vos sélections Guide de référence rapide
Dépannage, articles de techniciens
En ligne
Licône en forme de flèche
Configuration de votre ordinateur
Que recherchez-vous ? Cherchez ici
Windows Des fichiers
Branchez le clavier et la souris
Branchez les haut-parleurs
Guide de référence rapide
Ordinateur mini-tour Vue frontale
Vues du système
Page
Éteint Lordinateur est éteint
Vert fixe Lordinateur fonctionne normalement
Dénergie
Ordinateur mini-tour Vue arrière
Est de 100
Ordinateur mini-tour Connecteurs du panneau arrière
Page
Ordinateur de bureau Vue frontale
Guide de référence rapide
Ordinateur de bureau Vue arrière
Dun sélecteur de tension
Ordinateur de bureau Connecteurs du panneau arrière
Connecteur de réseau
100
101
Ordinateur compact Vue frontale
102
Orange clignotant ou fixe Reportez-vous à la section
103
104
Ordinateur compact Vue arrière
Ordinateur compact Connecteurs du panneau arrière
105
Et lordinateur
Remarque Ne branchez pas un câble téléphonique au
106
107
Retrait du capot de lordinateur
Avant de commencer
Avant dintervenir à lintérieur de votre ordinateur
108
109
Ordinateur mini-tour
Emplacement pour Loquet du capot
110
Câble de sécurité Capot de lordinateur
111
Ordinateur de bureau
112
113
Ordinateur compact
De sécurité Capot de lordinateur
Emplacement pour câble Loquet du capot
Lintérieur de votre ordinateur
114
Panneau dE/S avant Guide de référence rapide
115
Loquet de fermeture Lecteur optique
Assemblage du
116
Composants de la carte système
SLOT4 Pswd
117
Paramètres des cavaliers
118
Ordinateur mini-tour Cavalier Paramètre
Dintrusion dans le Châssis optionnel Assemblage du
119
Module de mémoire Dalimentation
120
Connecteur de haut Support du Parleur Intspkr Processeur UC
Connecteurs pour
121
Ordinateur de bureau Cavalier Paramètre Description
122
123
124
SLOT1
125
Résolution des problèmes
126
Ordinateur compact Cavalier Paramètre Description
Quand utiliser Dell Diagnostics
Démarrage de Dell Diagnostics à partir de votre disque dur
127
128
Menu principal de Dell Diagnostics
129
Option Fonction
Voyants du système
130
Onglet Fonction
131
Voyant Description du problème
Comment contacter Dell, reportez
Voyants de diagnostic
132
Voyants
133
134
Aucun module de mémoire na été détecté
135
136
Résolution des incompatibilités logicielles et matérielles
Codes sonores
137
Lancement de la Restauration du système
Restauration du système dexploitation
Windows XP Cliquez sur Démarrer→ Aide et support
138
Création dun point de restauration
Cliquez sur Restauration du système
139
Annulation de la dernière restauration du système
140
Réinstallation du système dexploitation Microsoft Windows
Cliquez sur Performances et maintenance
Cliquez sur longlet Restauration du système
141
142
Installation de Windows XP
Personnaliser votre logiciel, puis cliquez sur Suivant
143
144
Utilisation du support Drivers and Utilities
Suivant
Non, pas cette fois-ci et cliquez sur Suivant
145
Réinstallation des pilotes et des utilitaires
Identification des pilotes
Cliquez sur Propriétés→ Gestionnaire de périphériques
Réinstallation manuelle des pilotes
Cliquez sur longlet Pilotes → Restauration des pilotes
146
147
148
149
150
151
152
Guía de referencia rápida de Dell OptiPlex
Notas, avisos y precauciones
155
156
157
Localización de información
158
Etiqueta de licencia de Microsoft Windows
159
160
Operativo
Posible que no se entregue con el
161
162
Configuración del ordenador
163
Conecte el teclado y el ratón
164
Conecte los altavoces
165
Vistas del sistema
Ordenador de minitorre vista posterior
166
LAN
167
168
169
170
171
Ordenador de minitorre conectores del panel posterior
172
173
Ordenador de sobremesa vista anterior
174
Más información
Apagará mediante el sistema operativo
175
Ordenador de sobremesa vista posterior
176
Tener un interruptor de selección de voltaje
De 100
Ordenador de sobremesa conectores del panel posterior
177
Red
178
Ordenador de formato reducido vista anterior
179
PS2/serie opcional
180
Lugar, apague el ordenador mediante el sistema
Pulsar el botón de alimentación el ordenador se
Ámbar sólido o parpadeante consulte el apartado
181
182
Ordenador de formato reducido vista posterior
183
El ordenador
000 Mbps y el ordenador
184
185
Cómo quitar la cubierta del ordenador
Antes de empezar
Antes de trabajar en el interior de su ordenador
186
187
Ordenador de minitorre
188
Ranura para cable de Pestillo de liberación
Seguridad De la cubierta
189
Ordenador de sobremesa
190
Ranura para cable de
Seguridad De la cubierta Cubierta del Ordenador
191
Ordenador de formato reducido
192
Interior de su ordenador
193
Unidad óptica Unidad de disco La unidad Flexible
Ensamblaje de
194
Componentes de la placa base
195
Puenteado No puenteado
Configuración de puentes
196
Ordenador de minitorre Puente Posición
En el chasis opcional Tarjetas
197
Unidad óptica Fuente de La unidad
Interruptor de intrusión
198
199
Ordenadores de formato reducido
200
Ordenador de sobremesa Puente Posición Descripción
201
Seguro de liberación Unidad óptica
De la unidad
202
203
Solución de problemas
204
Ordenadores de formato reducido Puente Posición Descripción
205
Cuándo utilizar los Dell Diagnostics Diagnósticos Dell
206
Menú principal de Dell Diagnostics Diagnósticos Dell
207
Opción Función
Ficha Función
208
209
Indicadores luminosos del sistema
Indicadores de diagnóstico
210
Información del producto
211
Patrón de luz Descripción del problema
212
213
214
Códigos de sonido
215
Cómo resolver incompatibilidades de software y hardware
Cómo restaurar el sistema operativo
Windows XP Haga clic en Inicio→ Ayuda y soporte técnico
Creación de un punto de restauración
Haga clic en Restaurar sistema
216
Inicio de la función Restaurar sistema
217
Siguiente
Haga clic en Rendimiento y mantenimiento
218
Activación de la función Restaurar sistema
219
220
Arranque desde el CD Operating System Sistema operativo
Instalación de Windows XP
221
Presione cualquier tecla para arrancar desde el CD
222
Cómo identificar los controladores
223
Reinstalación de controladores y utilidades
Reinstalación manual de controladores
224
225
226
Índice
227
228
229
230