Using the Preset Menu

Changing the Preset Settings

Procedure

1.Press the button !3to put the CD player in the stopped mode.

2.Press the PRESET button !0.

The /ENTER button !7light.

3.An item that can be set as a preset appears on the display

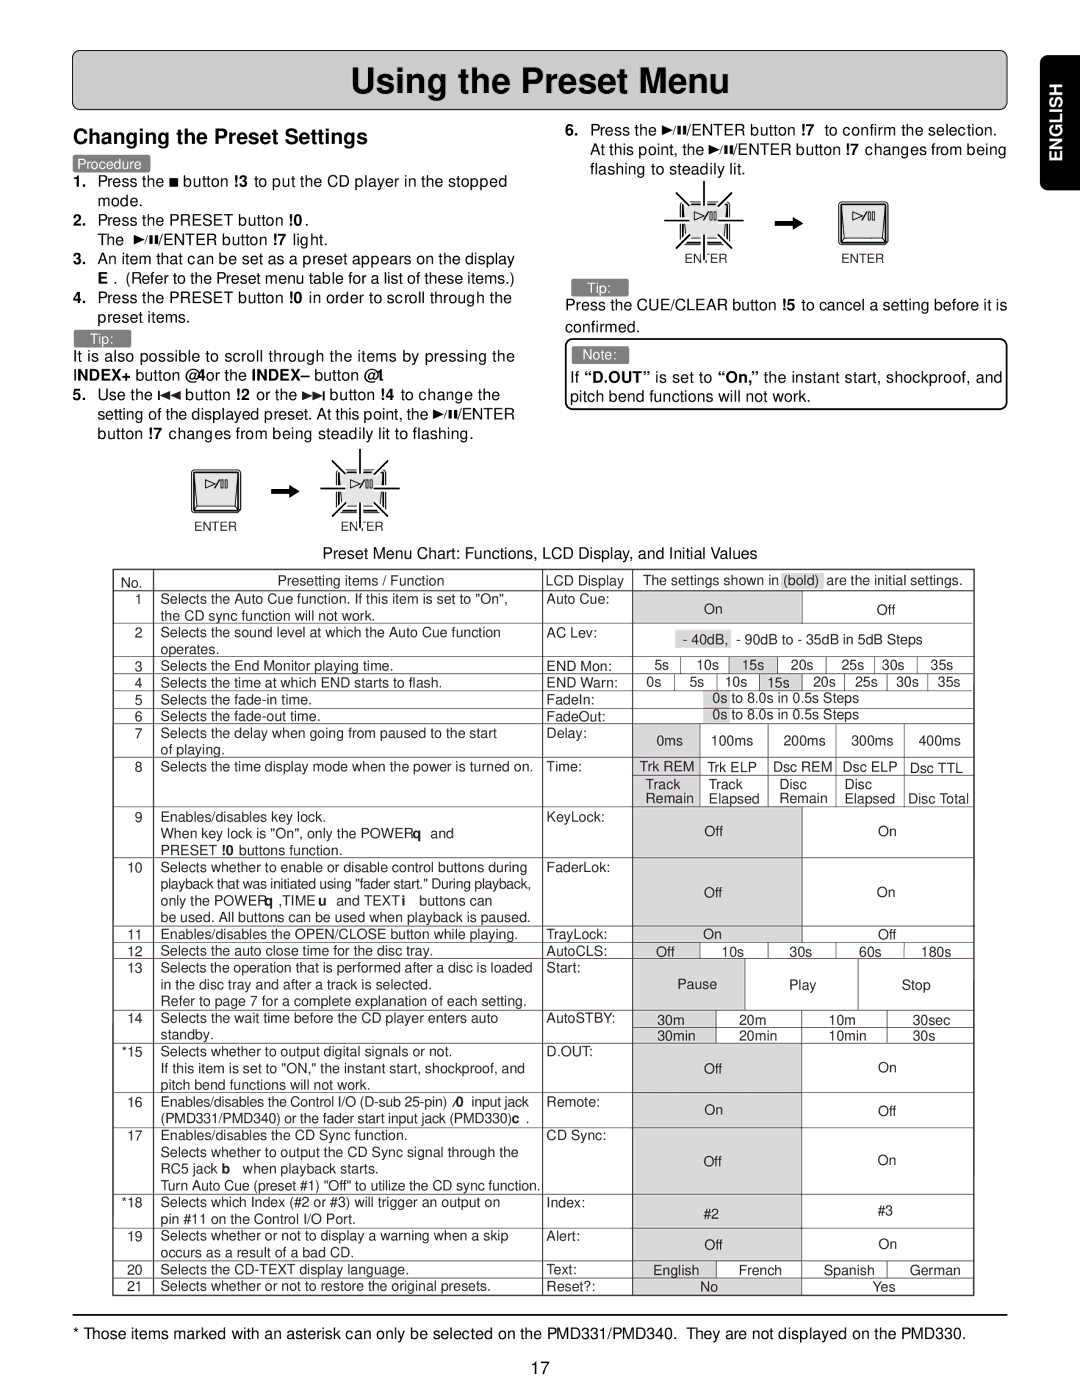
. (Refer to the Preset menu table for a list of these items.)

4.Press the PRESET button !0in order to scroll through the preset items.

Tip:

It is also possible to scroll through the items by pressing the INDEX+ button @4or the INDEX–button @1.

5.Use the button !2or the button !4to change the setting of the displayed preset. At this point, the /ENTER button !7changes from being steadily lit to flashing.

6.Press the /ENTER button !7to confirm the selection. At this point, the /ENTER button !7changes from being flashing to steadily lit.

ENTERENTER

Tip:

Press the CUE/CLEAR button !5to cancel a setting before it is confirmed.

Note:

If “D.OUT” is set to “On,” the instant start, shockproof, and pitch bend functions will not work.

ENGLISH

ENTERENTER

Preset Menu Chart: Functions, LCD Display, and Initial Values


No.

Presetting items / Function

LCD Display

The settings shown in

(bold)


are the initial settings.


1

Selects the Auto Cue function. If this item is set to "On",

Auto Cue:


On


Off


the CD sync function will not work.


2

Selects the sound level at which the Auto Cue function

AC Lev:


- 90dB to - 35dB in 5dB Steps


- 40dB,


operates.


3

Selects the End Monitor playing time.

END Mon:

5s


10s


15s


20s


25s


30s


35s


4

Selects the time at which END starts to flash.

END Warn:

0s


5s


10s


15s


20s


25s


30s

35s


5

Selects the fade-in time.

FadeIn:


0s

to 8.0s in 0.5s Steps


6

Selects the fade-out time.

FadeOut:


0s

to 8.0s in 0.5s Steps


7

Selects the delay when going from paused to the start

Delay:

0ms


100ms


200ms


300ms


400ms


of playing.


8

Selects the time display mode when the power is turned on. Time:

Trk REM


Trk ELP

Dsc REM

Dsc ELP


Dsc TTL


Track


Track


Disc


Disc


Remain


Elapsed


Remain


Elapsed


Disc Total


9

Enables/disables key lock.

KeyLock:


Off


On


When key lock is "On", only the POWER q and


PRESET !0buttons function.


10

Selects whether to enable or disable control buttons during

FaderLok:


playback that was initiated using "fader start." During playback,


Off


On


only the POWERq,TIME u and TEXT i buttons can


be used. All buttons can be used when playback is paused.


11

Enables/disables the OPEN/CLOSE button while playing.

TrayLock:


On


Off


12

Selects the auto close time for the disc tray.

AutoCLS:

Off


10s


30s


60s


180s


13

Selects the operation that is performed after a disc is loaded

Start:


in the disc tray and after a track is selected.


Pause


Play


Stop


Refer to page 7 for a complete explanation of each setting.


14

Selects the wait time before the CD player enters auto

AutoSTBY:

30m


20m


10m


30sec


standby.


30min


20min


10min


30s


*15

Selects whether to output digital signals or not.

D.OUT:


On


If this item is set to "ON," the instant start, shockproof, and


Off


pitch bend functions will not work.


16

Enables/disables the Control I/O (D-sub 25-pin) ⁄0input jack

Remote:


On


Off


(PMD331/PMD340) or the fader start input jack (PMD330)c.


17

Enables/disables the CD Sync function.

CD Sync:


Selects whether to output the CD Sync signal through the


Off


On


RC5 jack b when playback starts.


Turn Auto Cue (preset #1) "Off" to utilize the CD sync function.

*18

Selects which Index (#2 or #3) will trigger an output on

Index:


#2

#3


pin #11 on the Control I/O Port.


19

Selects whether or not to display a warning when a skip

Alert:


Off

On


occurs as a result of a bad CD.


20

Selects the CD-TEXT display language.

Text:

English


French

Spanish


German

21

Selects whether or not to restore the original presets.

Reset?:


No

Yes


* Those itemsmarked with an asterisk can only be selected on the PMD331/PMD340. They are not displayed on the PMD330.

17

Page 21
Image 21
Denon PMD331, PMD340, PMD330 manual Using the Preset Menu, Changing the Preset Settings

PMD330, PMD340, PMD331 specifications

Denon, a prominent name in the audio equipment industry, has gained reputation for its professional portable digital audio players, specifically the PMD340, PMD330, and PMD331 models. These devices are designed to cater to the needs of audio professionals, offering a blend of advanced technologies, robust construction, and user-friendly features.

The Denon PMD340 is a versatile digital audio recorder that excels in various recording environments. One of its standout features is its ability to record in multiple formats, including MP3, WAV, and BWF, making it a flexible option for different audio needs. This model is equipped with a built-in stereo microphone, which ensures high-quality sound capture right out of the box. Additionally, the PMD340 supports both compact flash memory and SD cards, providing ample storage options for lengthy recordings. Its intuitive user interface includes an LCD screen, allowing users to easily navigate through settings and monitor recording levels.

The PMD330, though similar in some aspects, was designed with a primary focus on robust field recording capabilities. This model boasts a durable, portable design, making it ideal for outdoor recording applications. One of the key features of the PMD330 is its advanced noise canceling technology, which significantly reduces background noise, ensuring clear sound quality even in challenging environments. The recorder also offers the convenience of remote control operation, allowing users to manage recordings from a distance.

Meanwhile, the Denon PMD331 is a step-up from its predecessors, featuring enhanced connectivity options. This model not only supports USB connections but also includes digital inputs and outputs, allowing for seamless integration with various audio equipment. The PMD331 is particularly favored for its four-channel recording capability, making it an ideal choice for multi-source audio capture. Its playback features are equally impressive, offering pitch control and variable speed functions, which make it suitable for professional music production and live performance applications.

In summary, the Denon PMD340, PMD330, and PMD331 models stand out for their specific features tailored to diverse recording demands. With their robust design, superior audio quality, and various recording formats, these devices are essential tools for audio professionals seeking reliable and high-performance recording solutions. Each model brings its unique strengths to the table, making them versatile options for anyone looking to capture high-quality audio.