OWNER’S MANUAL

VENTING INSTALLATION

Continued

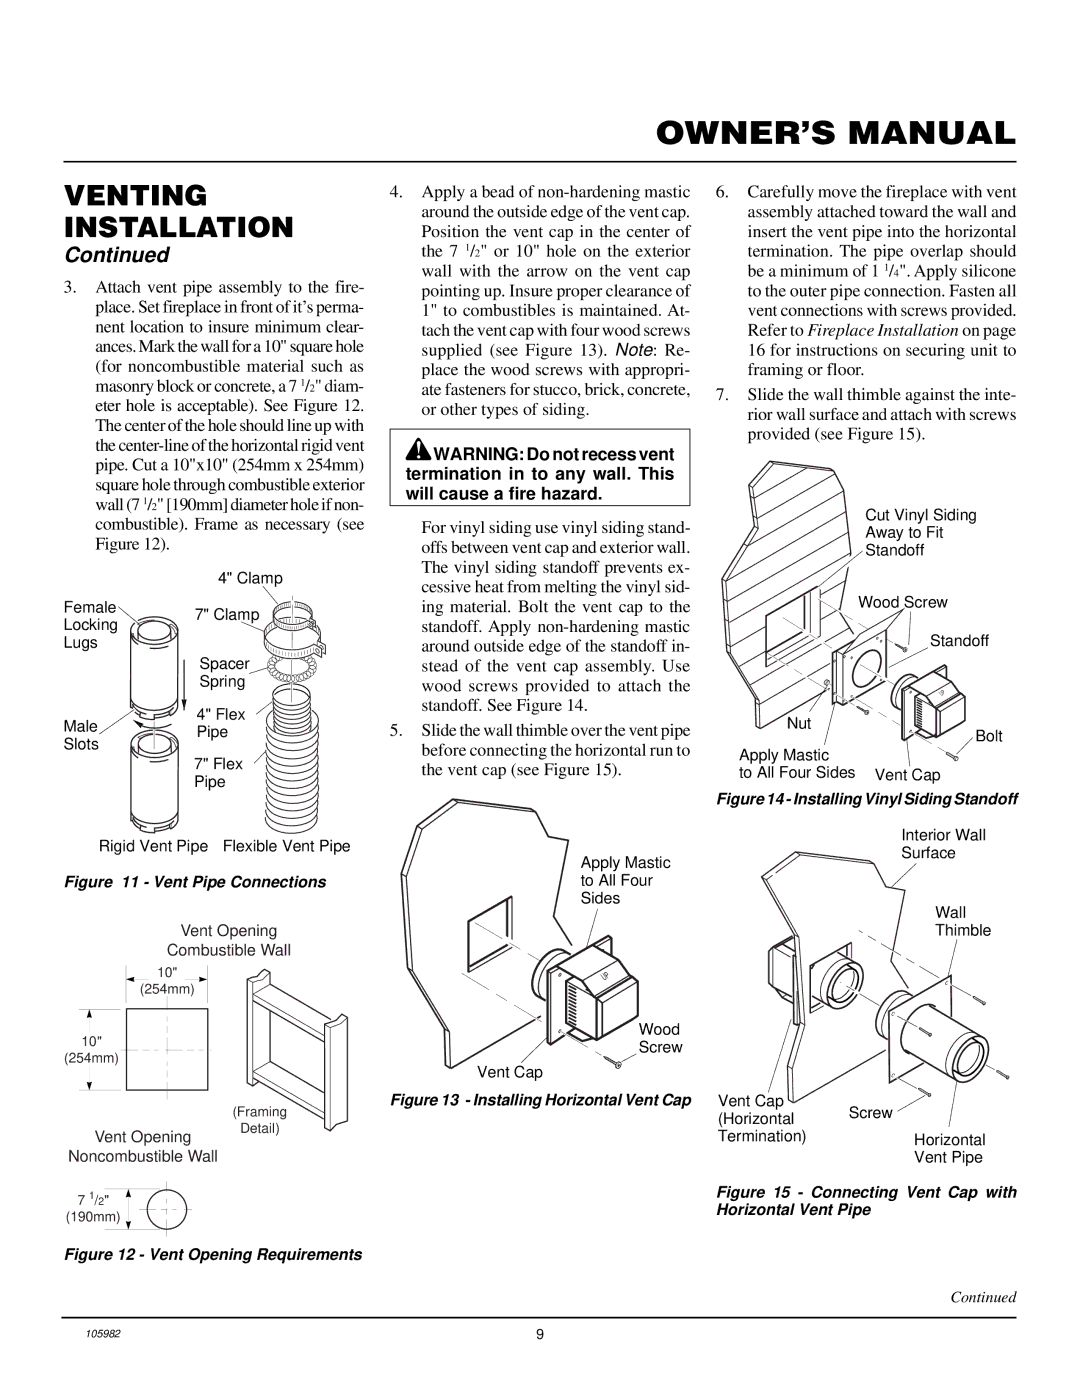
3.Attach vent pipe assembly to the fire- place. Set fireplace in front of it’s perma- nent location to insure minimum clear- ances. Mark the wall for a 10" square hole (for noncombustible material such as masonry block or concrete, a 7 1/2" diam- eter hole is acceptable). See Figure 12. The center of the hole should line up with the center-line of the horizontal rigid vent pipe. Cut a 10"x10" (254mm x 254mm) square hole through combustible exterior wall (7 1/2" [190mm] diameter hole if non- combustible). Frame as necessary (see Figure 12).


4" Clamp

Female

7" Clamp

Locking


Lugs


Spacer


Spring

4.Apply a bead of non-hardening mastic around the outside edge of the vent cap. Position the vent cap in the center of the 7 1/2" or 10" hole on the exterior wall with the arrow on the vent cap pointing up. Insure proper clearance of 1" to combustibles is maintained. At- tach the vent cap with four wood screws supplied (see Figure 13). Note: Re- place the wood screws with appropri- ate fasteners for stucco, brick, concrete, or other types of siding.

WARNING: Do not recess vent termination in to any wall. This will cause a fire hazard.

For vinyl siding use vinyl siding stand- offs between vent cap and exterior wall. The vinyl siding standoff prevents ex- cessive heat from melting the vinyl sid- ing material. Bolt the vent cap to the standoff. Apply non-hardening mastic around outside edge of the standoff in- stead of the vent cap assembly. Use wood screws provided to attach the

6.Carefully move the fireplace with vent assembly attached toward the wall and insert the vent pipe into the horizontal termination. The pipe overlap should be a minimum of 1 1/4". Apply silicone to the outer pipe connection. Fasten all vent connections with screws provided. Refer to Fireplace Installation on page 16 for instructions on securing unit to framing or floor.

7.Slide the wall thimble against the inte- rior wall surface and attach with screws provided (see Figure 15).

Cut Vinyl Siding

Away to Fit

Standoff

Wood Screw

Standoff

Male

4" Flex

Pipe

Slots


7" Flex


Pipe

standoff. See Figure 14.

5.Slide the wall thimble over the vent pipe before connecting the horizontal run to the vent cap (see Figure 15).

UP

Nut

Apply Mastic

to All Four Sides Vent Cap

Bolt

Rigid Vent Pipe Flexible Vent Pipe

Figure 11 - Vent Pipe Connections

Vent Opening

Combustible Wall

10"

(254mm)

10"

(254mm)

(Framing

Apply Mastic to All Four Sides

UP

Wood

Screw

Vent Cap

Figure 13 - Installing Horizontal Vent Cap

Figure 14 - Installing Vinyl Siding Standoff

Interior Wall

Surface

Wall

Thimble

Vent Cap

(Horizontal

Screw

Vent Opening

Detail)

Termination)

Horizontal

Noncombustible Wall

7 1/2" (190mm)

Figure 12 - Vent Opening Requirements

Vent Pipe

Figure 15 - Connecting Vent Cap with Horizontal Vent Pipe

Continued

105982

9

Page 9
Image 9
Desa CDV34NA, CDV34PA installation manual Vent Pipe Connections

CDV34PA, CDV34NA specifications

Desa CDV34NA and CDV34PA are two prominent models in the Desa vent-free gas fireplace series, renowned for their efficiency, craftsmanship, and modern design. These fireplaces offer an ambient warmth while combining style with practicality, making them a popular choice for homeowners looking to enhance their living spaces.

One of the key features of the CDV34NA and CDV34PA is the vent-free technology. This innovative design allows for the direct burning of gas without the necessity of a chimney or venting system. As a result, these fireplaces can be installed in various locations within the home, providing flexibility that traditional fireplaces cannot match. The absence of a flue system also means that no heat is lost during the exhaust process, allowing for maximum energy efficiency.

Both models are equipped with advanced safety features. They include an Oxygen Depletion Sensor (ODS) that automatically shuts off the unit if oxygen levels fall below a safe threshold. This technology not only ensures the safety of users but also enhances peace of mind while operating the fireplace. Additionally, the CDV34 series features a built-in thermocouple that regulates the temperature, providing an added layer of safety by preventing overheating.

When it comes to aesthetics, the CDV34NA and CDV34PA do not disappoint. They feature a modern, sleek design that complements a variety of interior decors. Available in stylish finishes, these units can seamlessly blend into contemporary homes or traditional settings. The large viewing windows provide a captivating view of the flames, creating an inviting ambiance ideal for any gathering.

Performance-wise, both models deliver impressive heating capabilities. With adjustable heat output settings, users can customize the warmth to suit their preferences. The units operate quietly, enhancing the overall comfort of the environment without disruptive fan noise. Additionally, the CDV34NA model runs on natural gas, while the CDV34PA uses propane, providing options based on the homeowner's available gas supply.

In conclusion, the Desa CDV34NA and CDV34PA are exceptional options for those seeking a versatile and stylish heating solution. With their vent-free technology, enhanced safety features, and elegant design, these fireplaces are perfect for adding warmth and character to any indoor space. Whether for new constructions or renovations, these models offer the right blend of function and form for today's discerning homeowners.