INSTALLATION

Built-In Fireplace Installation (Cont.)

Removing Brick Liner Retainer

Assembling Trim

Optional Mantel Installation

9

INSTALLATION

Continued

IMPORTANT: Noncombustible materials such as brick, tile, etc. may overlap the front facing, but should never cover any necessary openings like louvered slots.

WARNING: Do not allow noncombustible materials to cover any necessary openings like louvered slots.

WARNING: Never modify or cover the louvered slots on the front of the firebox.

WARNING: Use only noncombustible mortar or adhesives when overlapping the front facing with noncombustible facing material.

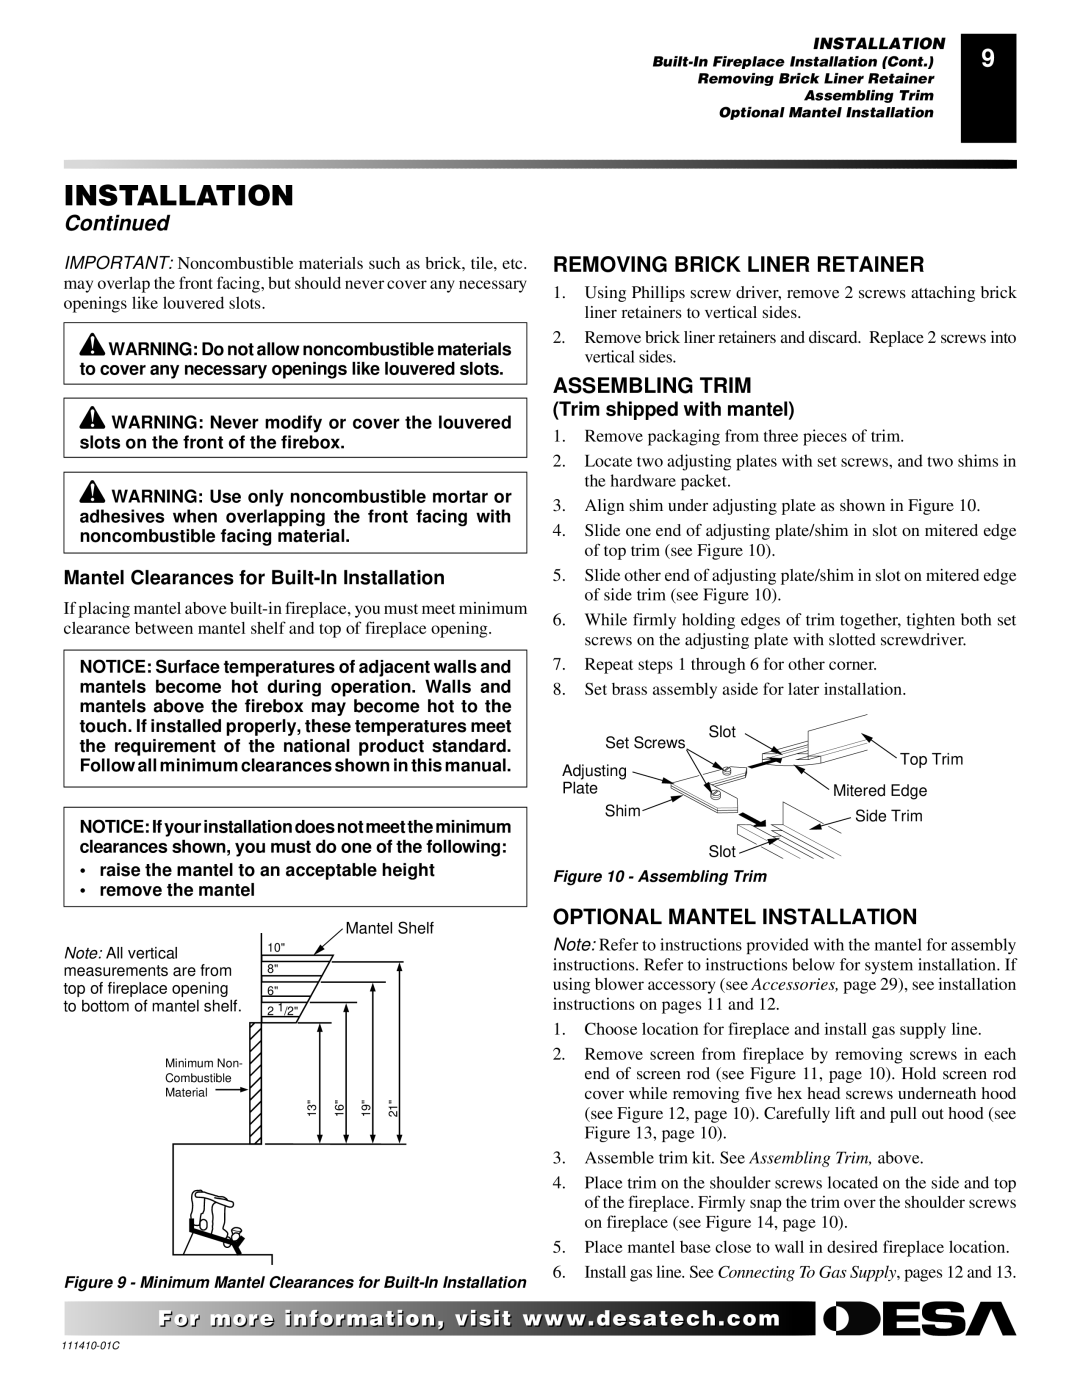
Mantel Clearances for Built-In Installation

If placing mantel above built-in fireplace, you must meet minimum clearance between mantel shelf and top of fireplace opening.

NOTICE: Surface temperatures of adjacent walls and mantels become hot during operation. Walls and mantels above the firebox may become hot to the touch. If installed properly, these temperatures meet the requirement of the national product standard. Follow all minimum clearances shown in this manual.

NOTICE: If your installation does not meet the minimum clearances shown, you must do one of the following:

raise the mantel to an acceptable height

remove the mantel

REMOVING BRICK LINER RETAINER

1.Using Phillips screw driver, remove 2 screws attaching brick liner retainers to vertical sides.

2.Remove brick liner retainers and discard. Replace 2 screws into vertical sides.

ASSEMBLING TRIM

(Trim shipped with mantel)

1.Remove packaging from three pieces of trim.

2.Locate two adjusting plates with set screws, and two shims in the hardware packet.

3.Align shim under adjusting plate as shown in Figure 10.

4.Slide one end of adjusting plate/shim in slot on mitered edge of top trim (see Figure 10).

5.Slide other end of adjusting plate/shim in slot on mitered edge of side trim (see Figure 10).

6.While firmly holding edges of trim together, tighten both set screws on the adjusting plate with slotted screwdriver.

7.Repeat steps 1 through 6 for other corner.

8.Set brass assembly aside for later installation.

Set Screws

Slot

Top Trim

Adjusting


Plate

Mitered Edge

Shim

Side Trim


Slot

Figure 10 - Assembling Trim

Note: All vertical measurements are from top of fireplace opening to bottom of mantel shelf.

Minimum Non-

Combustible

Material

10"

8"

6"

2 1/2"

13"

16"

Mantel Shelf

19"


21"


OPTIONAL MANTEL INSTALLATION

Note: Refer to instructions provided with the mantel for assembly instructions. Refer to instructions below for system installation. If using blower accessory (see Accessories, page 29), see installation instructions on pages 11 and 12.

1.

Choose location for fireplace and install gas supply line.

2.

Remove screen from fireplace by removing screws in each


end of screen rod (see Figure 11, page 10). Hold screen rod


cover while removing five hex head screws underneath hood


(see Figure 12, page 10). Carefully lift and pull out hood (see


Figure 13, page 10).

3.

Assemble trim kit. See Assembling Trim, above.

4.

Place trim on the shoulder screws located on the side and top


of the fireplace. Firmly snap the trim over the shoulder screws


on fireplace (see Figure 14, page 10).

5.

Place mantel base close to wall in desired fireplace location.

6.

Install gas line. See Connecting To Gas Supply, pages 12 and 13.

Figure 9 - Minimum Mantel Clearances for Built-In Installation

For morevisit www..com

111410-01C

Page 9
Image 9
Desa CF26NT Removing Brick Liner Retainer, Assembling Trim, Optional Mantel Installation, Trim shipped with mantel

CF26NT specifications

Desa CF26NT is a modern gas fireplace that showcases a blend of contemporary design and efficient heating technology. Established to elevate the aesthetic appeal of homes while ensuring optimal warmth, the CF26NT stands out with its sleek lines and sophisticated finish. With a focus on user experience, this fireplace is not just a source of heat but a centerpiece that enhances any living space.

One of the main features of the Desa CF26NT is its innovative design, which allows it to fit seamlessly into various interior styles. The fireplace is built with a large viewing window, providing an expansive view of the flames. This not only adds to the ambiance but also creates a sense of openness in the room. The minimalist frame and clean edges contribute to a modern aesthetic, making it a perfect addition to contemporary living areas.

In terms of technology, the CF26NT utilizes advanced gas burning systems, which ensure efficient fuel use and lower emissions. This fireplace is designed to provide consistent heat output while minimizing the environmental impact. With adjustable flame heights, users can customize the intensity of the fire, allowing for a personalized heating experience that can cater to different occasions.

Moreover, the Desa CF26NT is equipped with a user-friendly control system that allows for effortless operation. The intuitive interface enables users to easily adjust the temperature and flame settings, ensuring comfort at their fingertips. For added convenience, many models come with remote control options, allowing users to operate the fireplace from the comfort of their seating area.

Another noteworthy characteristic of the CF26NT is its safety features. The fireplace includes an automatic shut-off system that activates in case of any malfunction or overheating, providing peace of mind for homeowners. Additionally, the unit is designed with insulated materials, ensuring that the exterior remains cool to the touch, making it safe for households with children and pets.

In conclusion, the Desa CF26NT is an exceptional choice for anyone looking to enhance their home with a stylish, efficient, and safe gas fireplace. Its combination of modern design, innovative technology, and user-centric features make it a standout option in the market for gas fireplaces today. Whether for heating or aesthetic purposes, the CF26NT promises to deliver an exceptional experience.