Permanently connected machines:
If the machine is intended to be permanently connected, all wiring must be done by a qualified electrician and conform to the National Electric Code and all local codes and ordinances.
*THREE PHASE OPERATION: Three phase machines are not supplied with a power cord and must be permanently connected to a building’s electrical system. Extension cords cannot be used with a three phase machine.
*LVC MAGNETIC MOTOR CONTROL: If you purchased a machine that has a Low Voltage Magnetic Motor Control System, refer to its instruction manual for installation guidance.
EXTENSION CORDS
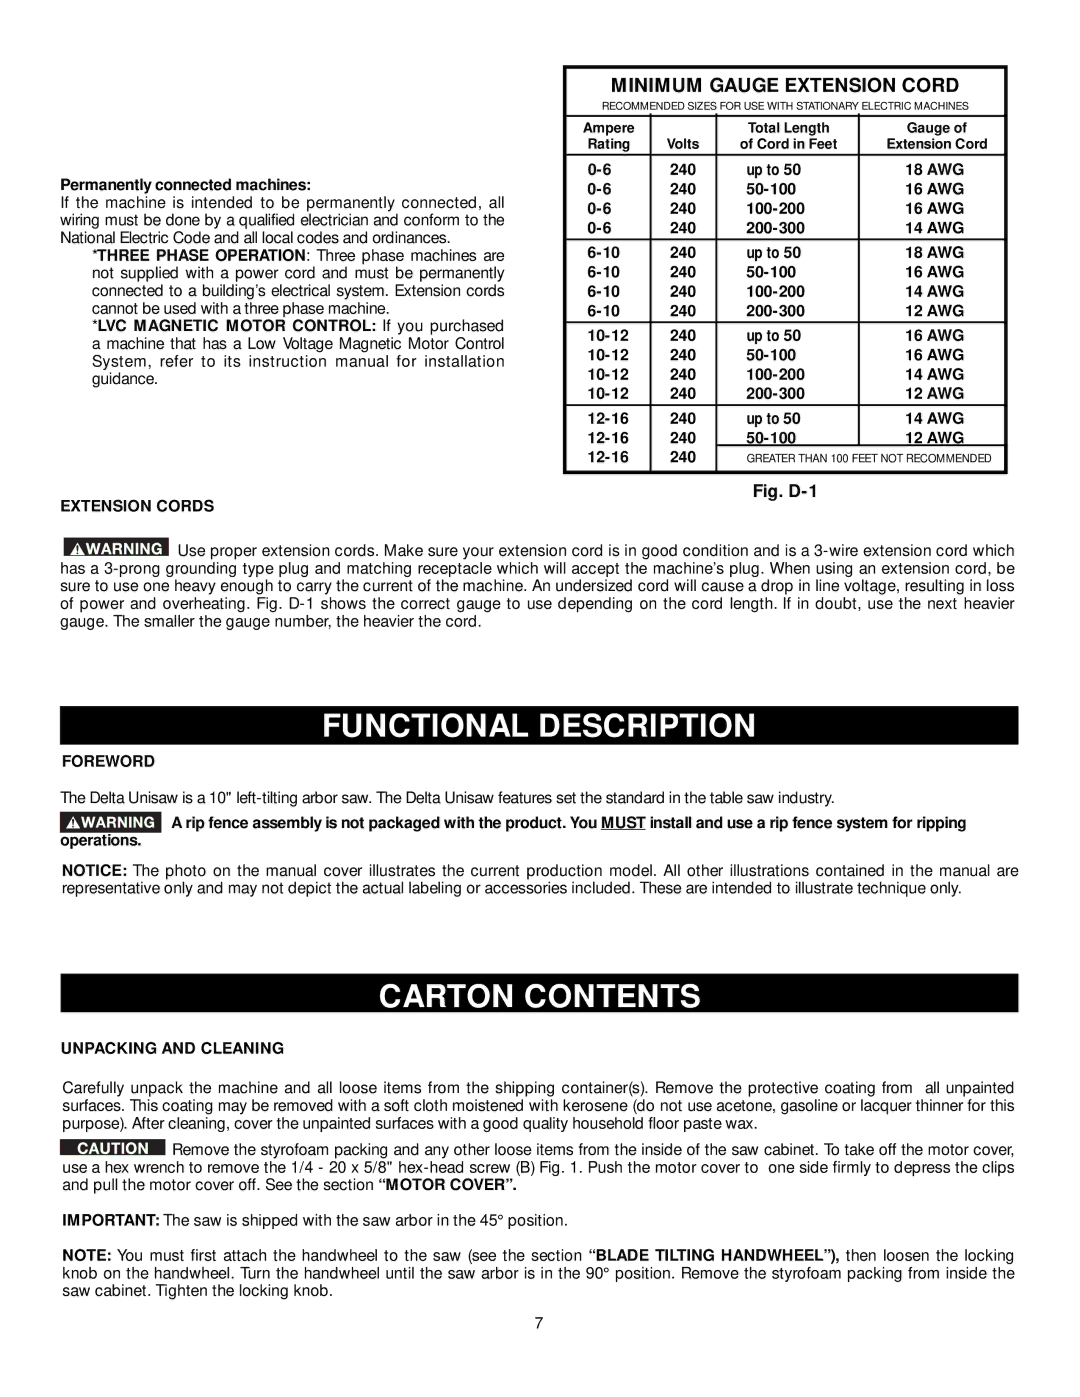
MINIMUM GAUGE EXTENSION CORD
RECOMMENDED SIZES FOR USE WITH STATIONARY ELECTRIC MACHINES
Ampere |
| Total Length | Gauge of |
Rating | Volts | of Cord in Feet | Extension Cord |
240 | up to 50 | 18 AWG | |
240 | 16 AWG | ||
240 | 16 AWG | ||
240 | 14 AWG | ||
240 | up to 50 | 18 AWG | |
240 | 16 AWG | ||
240 | 14 AWG | ||
240 | 12 AWG | ||
|
|
|
|
240 | up to 50 | 16 AWG | |
240 | 16 AWG | ||
240 | 14 AWG | ||
240 | 12 AWG | ||
|
|
|
|
240 | up to 50 | 14 AWG | |
240 | 12 AWG | ||
240 | GREATER THAN 100 FEET NOT RECOMMENDED | ||
|
|
|
|
Fig. D-1
![]() Use proper extension cords. Make sure your extension cord is in good condition and is a
Use proper extension cords. Make sure your extension cord is in good condition and is a
FUNCTIONAL DESCRIPTION
FOREWORD
The Delta Unisaw is a 10"
![]() A rip fence assembly is not packaged with the product. You MUST install and use a rip fence system for ripping operations.
A rip fence assembly is not packaged with the product. You MUST install and use a rip fence system for ripping operations.
NOTICE: The photo on the manual cover illustrates the current production model. All other illustrations contained in the manual are representative only and may not depict the actual labeling or accessories included. These are intended to illustrate technique only.
CARTON CONTENTS
UNPACKING AND CLEANING
Carefully unpack the machine and all loose items from the shipping container(s). Remove the protective coating from all unpainted surfaces. This coating may be removed with a soft cloth moistened with kerosene (do not use acetone, gasoline or lacquer thinner for this purpose). After cleaning, cover the unpainted surfaces with a good quality household floor paste wax.
![]() Remove the styrofoam packing and any other loose items from the inside of the saw cabinet. To take off the motor cover, use a hex wrench to remove the 1/4 - 20 x 5/8"
Remove the styrofoam packing and any other loose items from the inside of the saw cabinet. To take off the motor cover, use a hex wrench to remove the 1/4 - 20 x 5/8"
IMPORTANT: The saw is shipped with the saw arbor in the 45° position.
NOTE: You must first attach the handwheel to the saw (see the section “BLADE TILTING HANDWHEEL”), then loosen the locking knob on the handwheel. Turn the handwheel until the saw arbor is in the 90° position. Remove the styrofoam packing from inside the saw cabinet. Tighten the locking knob.
7