M7023.book Seite 10 Dienstag, 24. Juli 2012 10:35 10

Maintenance

3 Maintenance

3.1 Changing the dust filter bag

ATTENTION:

Switch off the appliance before changing the dust filter bag. In this way you avoid dust damaging the appliance.

Change the dust filter bag at the latest when the filter bag change indicator (Fig. 1/3) shows "red.".

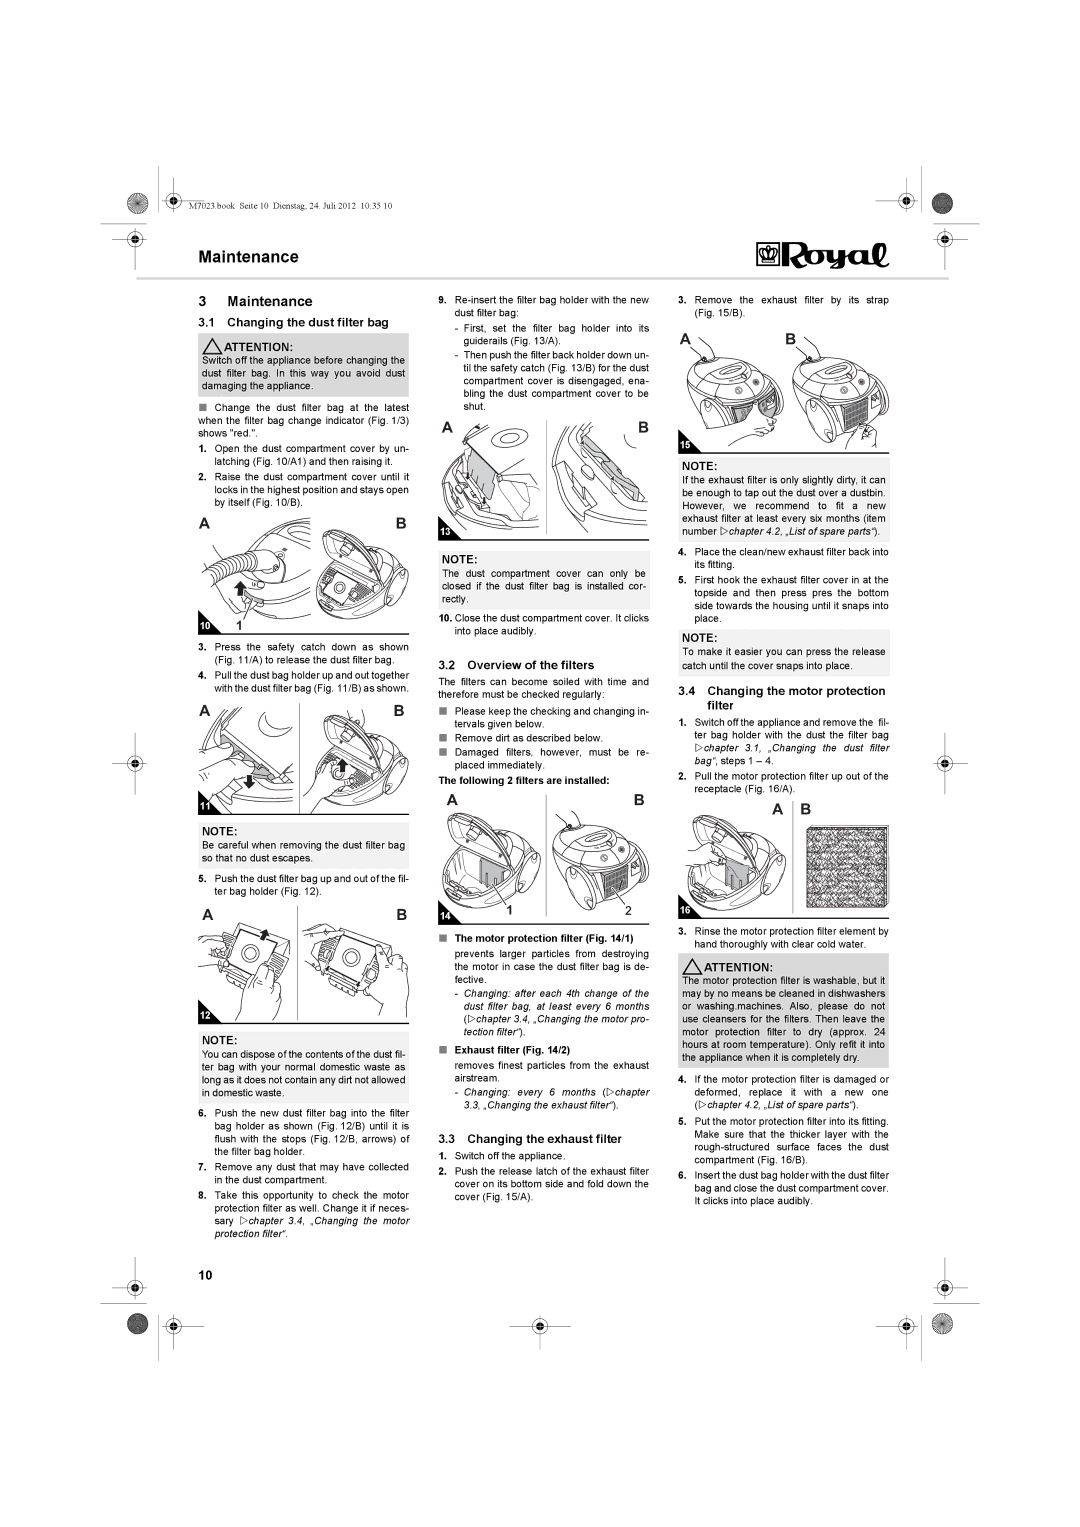
1.Open the dust compartment cover by un- latching (Fig. 10/A1) and then raising it.

2.Raise the dust compartment cover until it locks in the highest position and stays open by itself (Fig. 10/B).

AB

101

3.Press the safety catch down as shown (Fig. 11/A) to release the dust filter bag.

4.Pull the dust bag holder up and out together with the dust filter bag (Fig. 11/B) as shown.

A

B

11


NOTE:


Be careful when removing the dust filter bag so that no dust escapes.

5.Push the dust filter bag up and out of the fil- ter bag holder (Fig. 12).

A

B

12

NOTE:

You can dispose of the contents of the dust fil- ter bag with your normal domestic waste as long as it does not contain any dirt not allowed in domestic waste.

6.Push the new dust filter bag into the filter bag holder as shown (Fig. 12/B) until it is flush with the stops (Fig. 12/B, arrows) of the filter bag holder.

7.Remove any dust that may have collected in the dust compartment.

8.Take this opportunity to check the motor protection filter as well. Change it if neces- sary chapter 3.4, „Changing the motor protection filter“.

9.Re-insert the filter bag holder with the new dust filter bag:

-First, set the filter bag holder into its guiderails (Fig. 13/A).

-Then push the filter back holder down un- til the safety catch (Fig. 13/B) for the dust compartment cover is disengaged, ena- bling the dust compartment cover to be shut.

A

B

13

NOTE:

The dust compartment cover can only be closed if the dust filter bag is installed cor- rectly.

10.Close the dust compartment cover. It clicks into place audibly.

3.2Overview of the filters

The filters can become soiled with time and therefore must be checked regularly:

Please keep the checking and changing in- tervals given below.

Remove dirt as described below.

Damaged filters, however, must be re- placed immediately.

The following 2 filters are installed:

AB

14

1

2

The motor protection filter (Fig. 14/1)

prevents larger particles from destroying the motor in case the dust filter bag is de- fective.

-Changing: after each 4th change of the dust filter bag, at least every 6 months (chapter 3.4, „Changing the motor pro- tection filter“).

Exhaust filter (Fig. 14/2)

removes finest particles from the exhaust airstream.

-Changing: every 6 months (chapter 3.3, „Changing the exhaust filter“).

3.3Changing the exhaust filter

1.Switch off the appliance.

2.Push the release latch of the exhaust filter cover on its bottom side and fold down the cover (Fig. 15/A).

3.Remove the exhaust filter by its strap (Fig. 15/B).

A B

15

NOTE:

If the exhaust filter is only slightly dirty, it can be enough to tap out the dust over a dustbin. However, we recommend to fit a new exhaust filter at least every six months (item number chapter 4.2, „List of spare parts“).

4.Place the clean/new exhaust filter back into its fitting.

5.First hook the exhaust filter cover in at the topside and then press pres the bottom side towards the housing until it snaps into place.

NOTE:

To make it easier you can press the release catch until the cover snaps into place.

3.4Changing the motor protection filter

1.Switch off the appliance and remove the fil- ter bag holder with the dust the filter bag

chapter 3.1, „Changing the dust filter bag“, steps 1 – 4.

2.Pull the motor protection filter up out of the receptacle (Fig. 16/A).

A B

16

3.Rinse the motor protection filter element by hand thoroughly with clear cold water.

ATTENTION:

The motor protection filter is washable, but it may by no means be cleaned in dishwashers or washing.machines. Also, please do not use cleansers for the filters. Then leave the motor protection filter to dry (approx. 24 hours at room temperature). Only refit it into the appliance when it is completely dry.

4.If the motor protection filter is damaged or deformed, replace it with a new one (chapter 4.2, „List of spare parts“).

5.Put the motor protection filter into its fitting. Make sure that the thicker layer with the rough-structured surface faces the dust compartment (Fig. 16/B).

6.Insert the dust bag holder with the dust filter bag and close the dust compartment cover. It clicks into place audibly.

10

Page 10
Image 10
Dirt Devil V101 manual Maintenance

V101 specifications

The Dirt Devil V101 is an innovative vacuum cleaner designed for efficient cleaning in various environments. This compact yet powerful device is particularly recognized for its versatility and ease of use, making it an exceptional choice for households and light commercial cleaning tasks alike.

One of the main features of the V101 is its lightweight design, which allows for effortless maneuvering around furniture and tight spaces. Weighing in at a surprisingly low amount, users can easily carry the vacuum up and down stairs, making it perfect for multi-level homes. The ergonomic handle enhances comfort, reducing strain on the wrist during prolonged cleaning sessions.

Powering the Dirt Devil V101 is a robust motor that delivers impressive suction capabilities. This ensures that the device effectively picks up dust, dirt, and debris from various surfaces, including carpets, hardwood floors, and tile. The adjustable suction power allows users to customize performance based on the cleaning task at hand, whether they are tackling deep-set dirt or gentle dusting.

Another standout feature of the V101 is its multi-cyclonic technology. This innovative design separates dirt and debris from the airflow, preventing clogging and maintaining consistent suction power. Additionally, it requires minimal maintenance, since the filters are washable and reusable, providing cost savings for the user.

The Dirt Devil V101 also caters to pet owners with its specialized attachments designed for pet hair removal. The included turbo brush works effectively on upholstery and carpets, ensuring that even the most stubborn pet hair is removed without hassle. Moreover, the crevice tool extends the versatility of the vacuum, allowing users to reach and clean tight corners and crevices with ease.

The vacuum’s dust cup has a generous capacity and is easy to empty, promoting hassle-free maintenance. Users can quickly detach it, dump the contents, and reattach it without the need for bags, which adds to the convenience of the V101.

In conclusion, the Dirt Devil V101 is an outstanding vacuum cleaner that balances power and portability. With its advanced suction technology, lightweight design, and specialized attachments, it stands out as a go-to option for effective cleaning in any home. Whether dealing with everyday messes or tackling hair from beloved pets, the V101 promises to deliver exceptional results, making it an essential tool for maintaining a clean living space.