4.Plaats de mechanische luchtdistributiekit in de caravan. Deze doos bevat het montagemateriaal voor de

airconditioner en u hebt deze in de caravan nodig.

Het werk aan de buitenzijde is nu klaar. Eventuele kleine correcties kunnen van binnenin worden uitgevoerd.

F.Installatie van de airconditioner

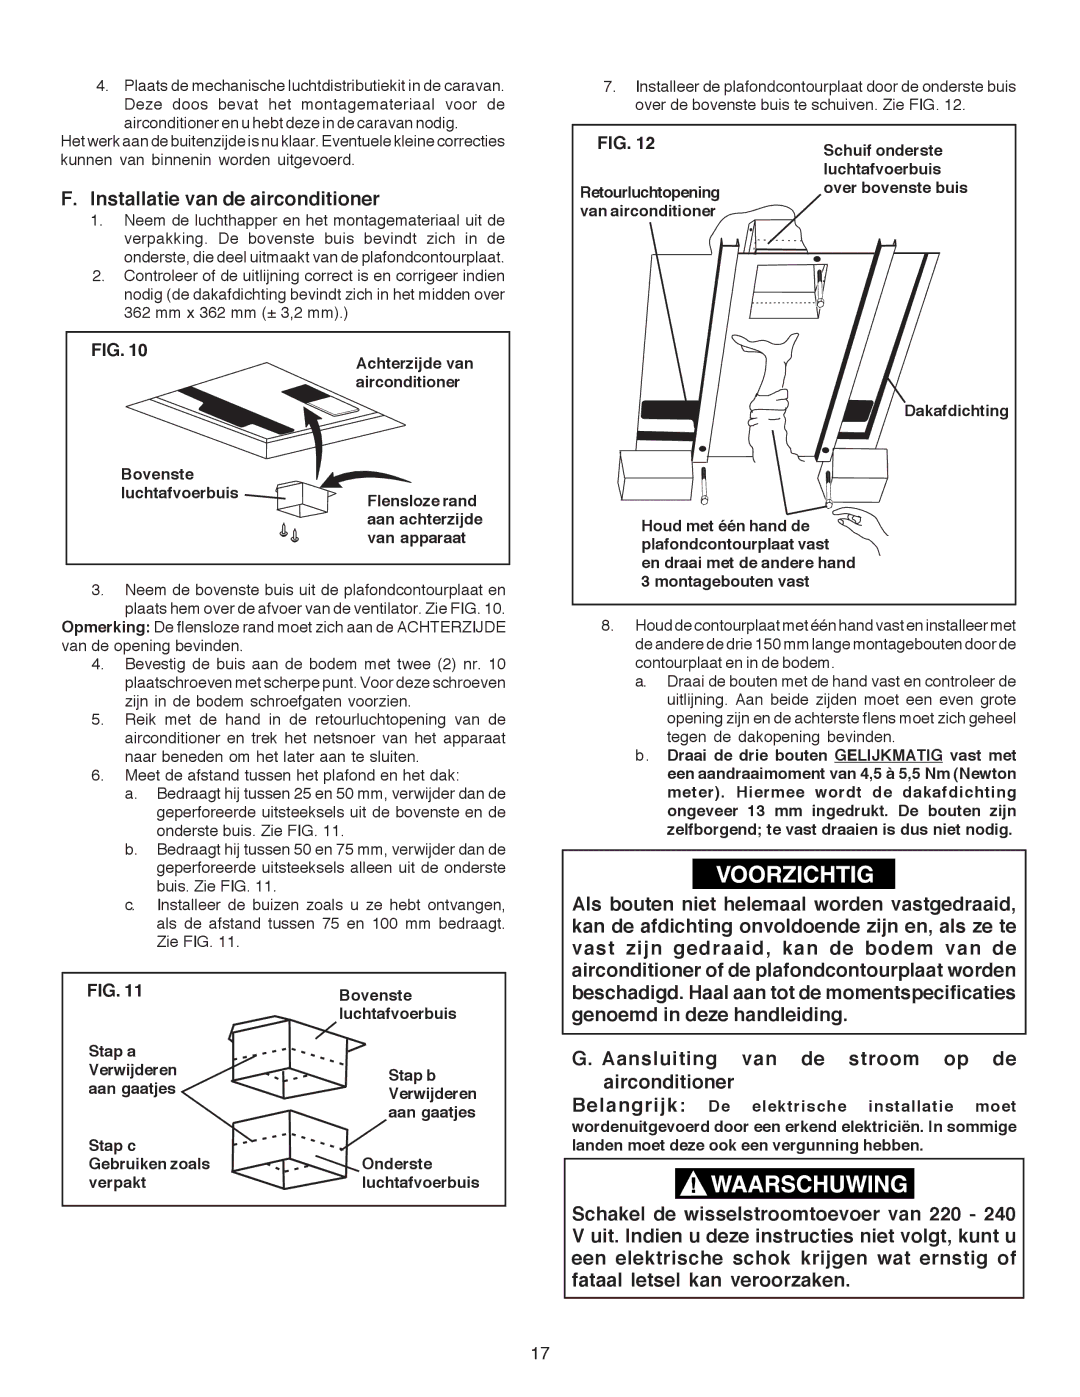
1.Neem de luchthapper en het montagemateriaal uit de verpakking. De bovenste buis bevindt zich in de onderste, die deel uitmaakt van de plafondcontourplaat.

2.Controleer of de uitlijning correct is en corrigeer indien nodig (de dakafdichting bevindt zich in het midden over 362 mm x 362 mm (± 3,2 mm).)

FIG. 10

Achterzijde van airconditioner

7.Installeer de plafondcontourplaat door de onderste buis over de bovenste buis te schuiven. Zie FIG. 12.

FIG. 12

Schuif onderste


luchtafvoerbuis

Retourluchtopening

over bovenste buis

van airconditioner


Dakafdichting

Bovenste luchtafvoerbuis

Flensloze rand aan achterzijde van apparaat

Houd met één hand de plafondcontourplaat vast en draai met de andere hand 3 montagebouten vast

3.Neem de bovenste buis uit de plafondcontourplaat en plaats hem over de afvoer van de ventilator. Zie FIG. 10.

Opmerking: De flensloze rand moet zich aan de ACHTERZIJDE van de opening bevinden.

4.Bevestig de buis aan de bodem met twee (2) nr. 10 plaatschroeven met scherpe punt. Voor deze schroeven zijn in de bodem schroefgaten voorzien.

5.Reik met de hand in de retourluchtopening van de airconditioner en trek het netsnoer van het apparaat naar beneden om het later aan te sluiten.

6.Meet de afstand tussen het plafond en het dak:

a.Bedraagt hij tussen 25 en 50 mm, verwijder dan de geperforeerde uitsteeksels uit de bovenste en de onderste buis. Zie FIG. 11.

b.Bedraagt hij tussen 50 en 75 mm, verwijder dan de geperforeerde uitsteeksels alleen uit de onderste buis. Zie FIG. 11.

c.Installeer de buizen zoals u ze hebt ontvangen, als de afstand tussen 75 en 100 mm bedraagt. Zie FIG. 11.

FIG. 11

Bovenste


luchtafvoerbuis

Stap a


Verwijderen

Stap b

aan gaatjes

Verwijderen


aan gaatjes

Stap c

Onderste

Gebruiken zoals

verpakt

luchtafvoerbuis

8.Houd de contourplaat met één hand vast en installeer met de andere de drie 150 mm lange montagebouten door de contourplaat en in de bodem.

a.Draai de bouten met de hand vast en controleer de uitlijning. Aan beide zijden moet een even grote opening zijn en de achterste flens moet zich geheel tegen de dakopening bevinden.

b.Draai de drie bouten GELIJKMATIG vast met een aandraaimoment van 4,5 à 5,5 Nm (Newton meter). Hiermee wordt de dakafdichting ongeveer 13 mm ingedrukt. De bouten zijn zelfborgend; te vast draaien is dus niet nodig.

Als bouten niet helemaal worden vastgedraaid, kan de afdichting onvoldoende zijn en, als ze te vast zijn gedraaid, kan de bodem van de airconditioner of de plafondcontourplaat worden beschadigd. Haal aan tot de momentspecificaties genoemd in deze handleiding.

G. Aansluiting van de stroom op de airconditioner

Belangrijk: De elektrische installatie moet wordenuitgevoerd door een erkend elektriciën. In sommige landen moet deze ook een vergunning hebben.

Schakel de wisselstroomtoevoer van 220 - 240 V uit. Indien u deze instructies niet volgt, kunt u een elektrische schok krijgen wat ernstig of fataal letsel kan veroorzaken.

17

Page 16
Image 16
Dometic B3200 manual Installatie van de airconditioner, Aansluiting van de stroom op de airconditioner

B3200 specifications

The Dometic B3200 is an advanced air conditioning unit designed specifically for recreational vehicles (RVs), providing efficient cooling and heating capabilities that ensure comfort during your travels. This model has garnered attention for its robust features, reliable performance, and user-friendly operation, making it a favorite among RV enthusiasts.

One of the standout features of the Dometic B3200 is its impressive cooling and heating capacity, which is vital for maintaining a comfortable indoor climate regardless of external weather conditions. The unit can effectively cool an RV space, providing relief during hot summer months, while its heating function ensures warmth during colder seasons. This dual functionality allows users to enjoy their RVs year-round, making it a versatile choice for various climates.

Furthermore, the B3200 incorporates state-of-the-art technology that enhances its efficiency and performance. The unit utilizes a powerful compressor and a high-efficiency fan, which work in tandem to ensure optimal air circulation. This not only contributes to faster cooling and heating but also minimizes energy consumption, allowing users to save on power usage during their trips.

Another key characteristic of the Dometic B3200 is its quiet operation. The design includes sound-dampening technology that reduces noise levels, ensuring that users can enjoy a peaceful environment inside their RV. This feature is particularly appreciated during nighttime or quiet moments, where excessive noise can be disruptive.

The Dometic B3200 is built with durability in mind, featuring a sturdy exterior designed to withstand the rigors of travel and outdoor conditions. The unit is also relatively lightweight, an essential factor for RV owners who need to maintain weight limits to ensure vehicle safety and fuel efficiency.

User-friendliness is another notable aspect of the B3200. The air conditioner comes with an intuitive control panel that allows for easy adjustments to temperature settings and operational modes. This simplicity means that even users unfamiliar with RV systems can operate the unit without hassle.

In summary, the Dometic B3200 is a highly efficient, dual-function air conditioning system that perfects the balance between comfort and convenience. With its state-of-the-art technology, quiet operation, and durable construction, it stands as an ideal choice for any RV owner looking to enhance their travel experience. Whether cruising through summer heat or winter cold, the B3200 ensures that comfort never takes a back seat.