4.Place the Mechanical Air Distribution Box Kit inside the Caravan. This box contains mounting hardware for the air conditioner and will be used inside the Caravan.

This completes the outside work. Minor adjustments can be done from the inside of the Caravan if required.

F.Installing The Air Conditioner

1.Remove air box and mounting hardware from car- ton. The upper duct is shipped inside the lower duct which is part of the ceiling template.

2.Check for correct alignment and adjust the unit as necessary (Roof Gasket centers over 362mm x 362mm (± 3.2mm).

FIG. 10

Rear Of Air


Conditioner

Upper Discharge

Air Duct Edge Without

Flange To

Rear Of Unit

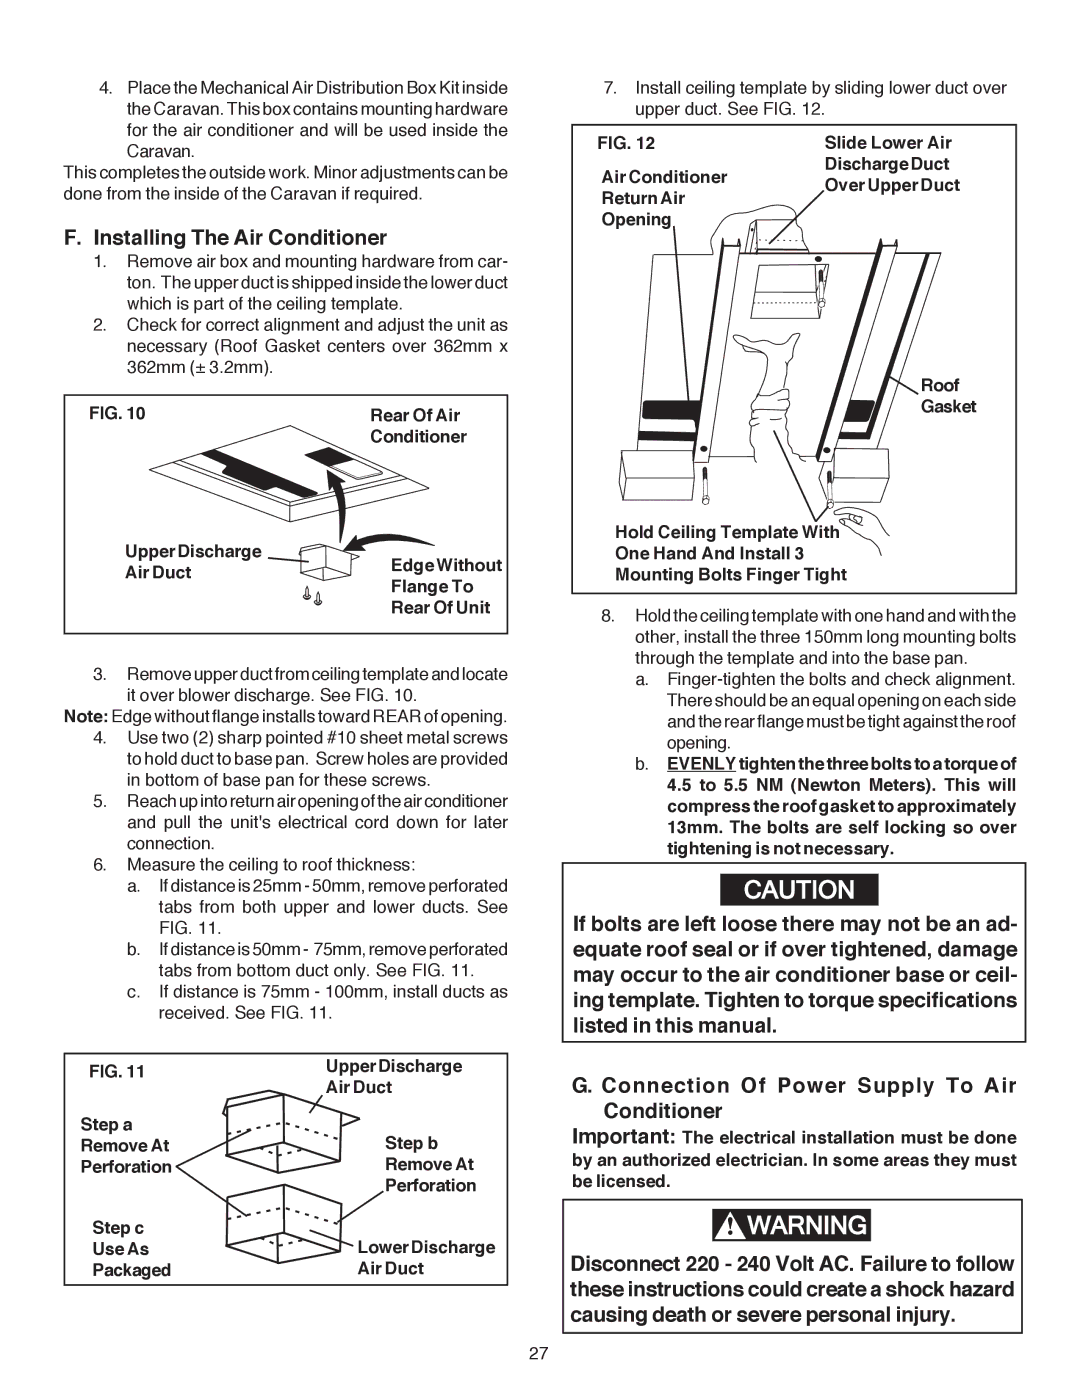
3.Remove upper duct from ceiling template and locate it over blower discharge. See FIG. 10.

Note: Edge without flange installs toward REAR of opening.

4.Use two (2) sharp pointed #10 sheet metal screws to hold duct to base pan. Screw holes are provided in bottom of base pan for these screws.

5.Reach up into return air opening of the air conditioner and pull the unit's electrical cord down for later connection.

6.Measure the ceiling to roof thickness:

a.If distance is 25mm - 50mm, remove perforated tabs from both upper and lower ducts. See FIG. 11.

b.If distance is 50mm - 75mm, remove perforated tabs from bottom duct only. See FIG. 11.

c.If distance is 75mm - 100mm, install ducts as received. See FIG. 11.

FIG. 11

Upper Discharge


Air Duct

Step a

Step b

Remove At

Perforation

Remove At


Perforation

Step c

Lower Discharge

Use As

Packaged

Air Duct

7.Install ceiling template by sliding lower duct over upper duct. See FIG. 12.

FIG. 12

Slide Lower Air

Air Conditioner

Discharge Duct

Over Upper Duct

Return Air

Opening


Roof

Gasket

Hold Ceiling Template With

One Hand And Install 3

Mounting Bolts Finger Tight

8.Hold the ceiling template with one hand and with the other, install the three 150mm long mounting bolts through the template and into the base pan.

a.Finger-tighten the bolts and check alignment. There should be an equal opening on each side and the rear flange must be tight against the roof opening.

b.EVENLYtighten the three bolts to a torque of 4.5 to 5.5 NM (Newton Meters). This will compress the roof gasket to approximately 13mm. The bolts are self locking so over tightening is not necessary.

CAUTION

If bolts are left loose there may not be an ad- equate roof seal or if over tightened, damage may occur to the air conditioner base or ceil- ing template. Tighten to torque specifications listed in this manual.

G. Connection Of Power Supply To Air Conditioner

Important: The electrical installation must be done by an authorized electrician. In some areas they must be licensed.

!WARNING

Disconnect 220 - 240 Volt AC. Failure to follow these instructions could create a shock hazard causing death or severe personal injury.

27

Page 26
Image 26
Dometic B3200 manual Installing The Air Conditioner, Lower Discharge, Over Upper Duct

B3200 specifications

The Dometic B3200 is an advanced air conditioning unit designed specifically for recreational vehicles (RVs), providing efficient cooling and heating capabilities that ensure comfort during your travels. This model has garnered attention for its robust features, reliable performance, and user-friendly operation, making it a favorite among RV enthusiasts.

One of the standout features of the Dometic B3200 is its impressive cooling and heating capacity, which is vital for maintaining a comfortable indoor climate regardless of external weather conditions. The unit can effectively cool an RV space, providing relief during hot summer months, while its heating function ensures warmth during colder seasons. This dual functionality allows users to enjoy their RVs year-round, making it a versatile choice for various climates.

Furthermore, the B3200 incorporates state-of-the-art technology that enhances its efficiency and performance. The unit utilizes a powerful compressor and a high-efficiency fan, which work in tandem to ensure optimal air circulation. This not only contributes to faster cooling and heating but also minimizes energy consumption, allowing users to save on power usage during their trips.

Another key characteristic of the Dometic B3200 is its quiet operation. The design includes sound-dampening technology that reduces noise levels, ensuring that users can enjoy a peaceful environment inside their RV. This feature is particularly appreciated during nighttime or quiet moments, where excessive noise can be disruptive.

The Dometic B3200 is built with durability in mind, featuring a sturdy exterior designed to withstand the rigors of travel and outdoor conditions. The unit is also relatively lightweight, an essential factor for RV owners who need to maintain weight limits to ensure vehicle safety and fuel efficiency.

User-friendliness is another notable aspect of the B3200. The air conditioner comes with an intuitive control panel that allows for easy adjustments to temperature settings and operational modes. This simplicity means that even users unfamiliar with RV systems can operate the unit without hassle.

In summary, the Dometic B3200 is a highly efficient, dual-function air conditioning system that perfects the balance between comfort and convenience. With its state-of-the-art technology, quiet operation, and durable construction, it stands as an ideal choice for any RV owner looking to enhance their travel experience. Whether cruising through summer heat or winter cold, the B3200 ensures that comfort never takes a back seat.