Contents
Revised 6/2003
User Manual
Software Version
Power Wash
Page
Table of contents
2.1.1
2.1.2
2.3.1
3.10.6 Fixture Temperature TEMP
3.10.8 Adjustments and Calibrations ADJU
3.10.9 Default Settings DFSE
3.10.11 Correction of faults EFLD
E-mail support@ElationLighting.com
possible
Never open this fixture while in use
V. Safety Instructions
1. Features and Functions
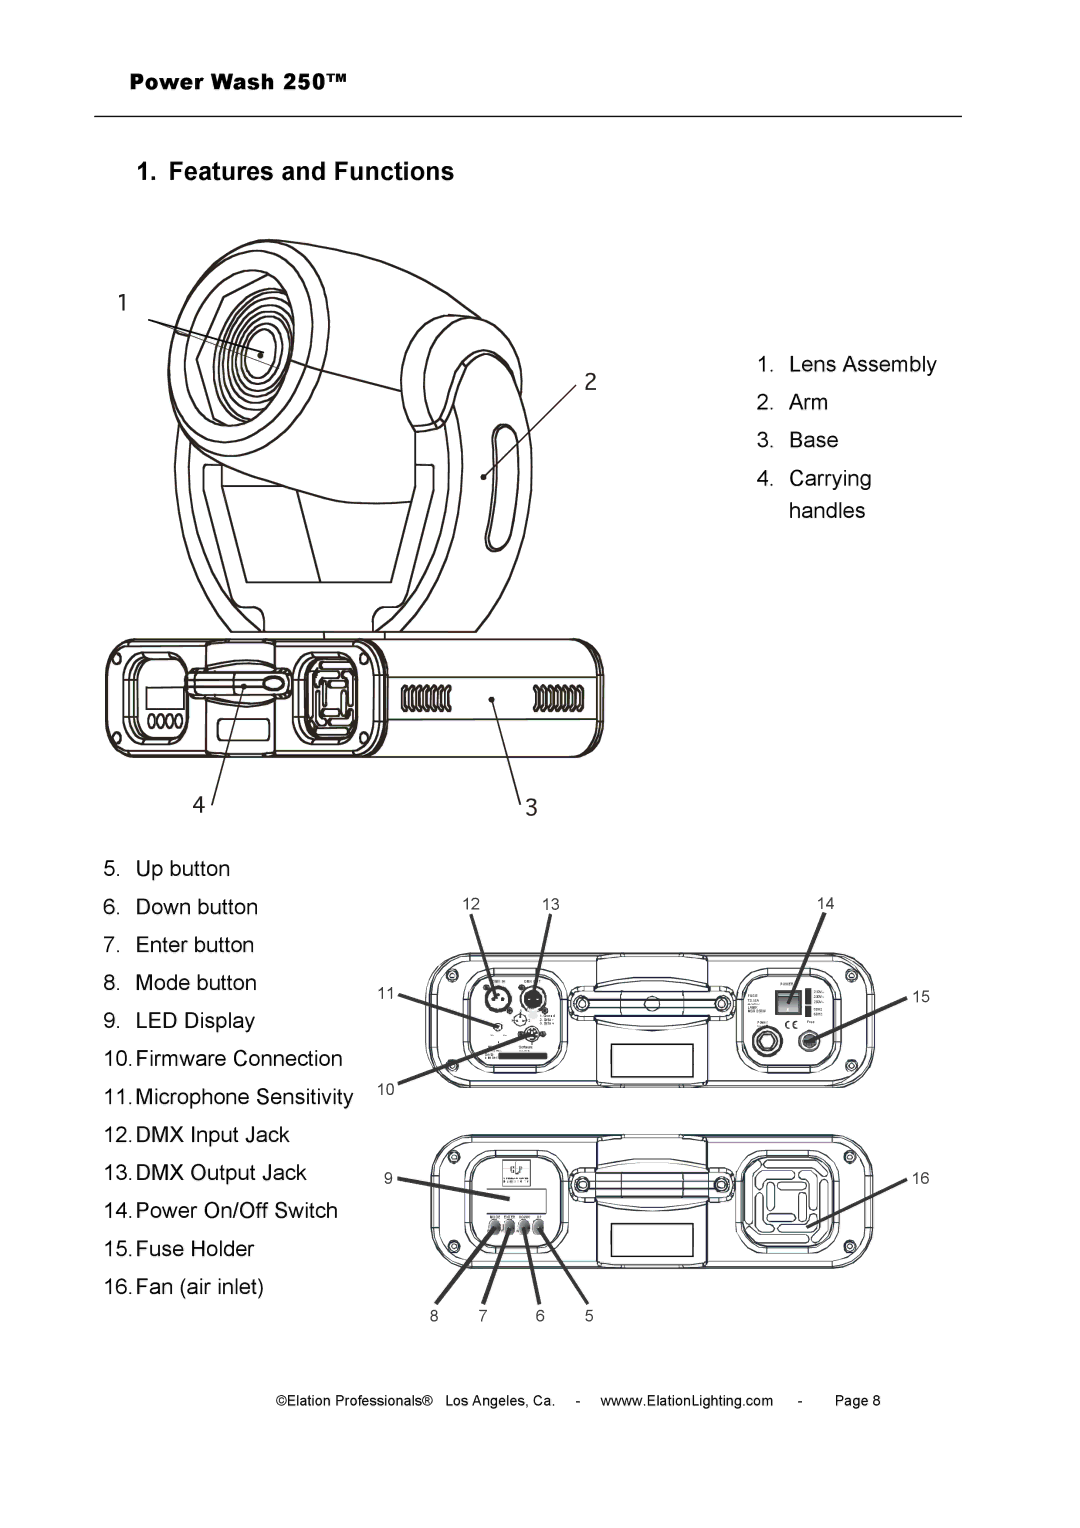
1. Lens Assembly - This high quality lens assembly is fully focusing. Focus the lens by loosening the locking screws mounted on the top and bottom of the head assembly. Then using the screws to grasp the lens assembly, slide the lens back and forth until the desired focus is achieved. Then tighten down on the locking screws to retaining your focus
2. Installation
2.1 Mounting
2.1.1 Clamps
3.2 Securing the POWER WASH
Safety Cable Rigging Point
3.3.2 DMX-512
3.3.1 Power supply
3.3 Connections
controller require a standard 3-pin XLR connector for data input and data output Figure Below. If you are making your own cables, be sure to use standard two conductor shielded cable This cable may be purchased at almost all professional sound and lighting stores. Your cables should be made with a male and female XLR connector on either end of the cable. Also remember that DMX cable must be daisy chained and can not be split
3.9 Fuse Requirements
The fuse requirements are clearly printed on the side of the fixture
SIZE
AFST
TEMP
FANS
ADJU
clre
D001
Test
3.1 Adjust the DMX- Address D001
3.2 The Test Program TEST
LAMP
RESE
TIME
FCOL
RTLT
SPEC
MANU
3.9 Invert Tilt Movement RTLT
LAAU
DLOF
DMXI
DISP
TEMP
FANS
3.10.6 Fixture Temperature TEMP
HIGH
ADJU
DFSE
D001
OFF
FEED
EFLG
3.10.11 Correction of faults EFLD
3.11 Error and Information Messages
4. Operation
Stand alone mode
Master/Slave mode
DMX control mode
the audio submenu. See page 16 for the menu breakdown
5. DMX Channel Selection DMX Protocol
FA..FF
Size
A0..BF
relative movement
6.1 Lamp Change
6. Service and Maintenance
Safety Guidelines
6.2 Removing the Lamp
6.3 Lamp Optimization
The lamp orientation and optimization must be adjusted after every lamp change. This procedure centers the lamp in the reflector. Proper optimization will increase lamp life and ensure a bright crisp output. Improper optimization may add a yellow tint to the lamp output and reduce intensity. The minimum deviation amount is 1.0mm. Running the fixture within a lower deviation can cause damage to the lamp and/or lens
7. Fuse Replacement
8.2 Cleaning Frequency rule-of-thumb
8. Maintenance and Cleaning the POWER WASH 250B
8.1Safety Regulations
Cleaning the Optical System recommended for authorized personal only
Page
9. Power Wash Color Wheel Orientation
Power Wash
10. Technical Specification
2 YEAR 730 DAYS LIMITED WARRANTY
F. No warranty, whether expressed or implied, is given or made with respect to any accessory supplied with products described above. Except to the extent prohibited by applicable law, all implied warranties made by Elation Professionals in connection with this product, including warranties of merchantability or fitness, are limited in duration to the warranty period set forth above. And no warranties, whether expressed or implied, including warranties of merchantability or fitness, shall apply to this product after said period has expired. The consumer’s and or Dealer’s sole remedy shall be such repair or replacement as is expressly provided above and under no circumstances shall Elation Professionals be liable for any loss or damage, direct or consequential, arising out of the use of, or inability to use, this product
Power Wash
Page
Page
Power Wash
Elation Professional