Select the cooking function
•Turn the function selector in any direction to the desired cooking function. The oven cavity light will come on.
Select the temperature
•To set the temperature, turn the temperature selector in a clockwise direction to the desired setting. An indicator light above the temperature selector will come on.
•A thermostat controls the temperature in your appliance. When the temperature is reached, the heating source switches itself off and the indicator light goes out. When the oven temperature falls below the desired setting, the heating source switches on and the indicator light comes on again.
•Once the food is cooked, turn the temperature selector back in an anti-clockwise direction. Do not force it right round in a clockwise direction as this will result in damage to the thermostat.
Note:
•The desired cooking function must be selected before the oven will operate.
Temperature estimations
If a recipe calls for Fahrenheit (°F) or no actual temperatures, use the following table to determine the temperature (°C).
oven | temperature°C | temperature°F |
Low heat | | |
Cool | 80 | 175 |
Very slow | 100-110 | 210-230 |
Slow | 130-140 | 265-285 |
Moderate heat | | |
Moderately slow | 150-160 | 300-320 |
Moderate | 170-180 | 340-355 |
Moderately hot | 190-200 | 375-390 |
High heat | | |
Hot | 200-210 | 390-410 |
Very hot | 220-230 | 430-450 |
Extremely hot | 240-250 | 465-480 |
tips and information
Pre-heating
For best cooking results you must pre-heat your oven and grill. Pre-heating your appliance allows it to reach the required temperature quickly and efficiently as well as cook your food at the correct temperature for the entire cook time.
1. With ‘Rapid Heat’ function
This function allows your oven to reach preset temperature quicker than any other cooking function. Turn the function selector to ‘Rapid Heat’, then set the desired temperature, by rotating your oven temperature selector.
When the indicator light above the temperature selector goes out, the oven has reached the desired temperature. Select the oven function you require for cooking and place the food in the oven.
2. With other oven functions
Set the desired temperature by rotating your oven temperature selector. When the indicator light goes out the oven has reached the desired preset temperature, place your food in the oven, close the door and set the timer if you desire.
3. With ‘Grill’ function
Pre-heat the grill for at least 3 minutes to obtain best results. This will help to seal the natural juices of steak, chops and other meats for a better flavour.
tips and information
Cooling / Vent fan
Your built-in appliance is fitted with a cooling fan. This prevents your kitchen cabinet from overheating and reduces the condensation inside the oven. It will operate whenever you are using your oven and blow warm air across the top of the oven door.
Note:
•If the oven is still hot from cooking, the cooling fan will keep running to cool the oven down and will switch off by itself once cool.
Condensation
•Excess condensation may fog the oven door. This may happen when you are cooking large quantities of food from a cold start. You can minimise condensation by:
–Keeping the amount of water used whilst cooking to a minimum.
–Making sure the oven door is firmly closed.
–Baking custard in a baking dish that is slightly smaller than the water container.
–Cooking casseroles with the lid on.
Note:
•If you are using water in cooking, this will turn to steam and may condense outside your appliance. This is not a problem or fault with your oven.
Your oven is equipped with a 3 button timer that has the following features:
•Timer – you can set a countdown time that will beep when the set time has elapsed.
•Cook time – you can set cooking duration. A timer will count down the preset cooking time, beep when the time has elapsed and turn the appliance off.
•End time – instead of setting a cooking duration you can set a cooking finish time. When the finish time has been reached the timer will beep and turn the appliance off.
•Delayed start cooking time – you can combine the cooking time and end cooking time to switch oven on and off at a specific time during the day.
Selecting the timer
•Press the MODE button until the timer ‘indicator’ begins flashing.
• Set the countdown time you want by using the and
buttons. 5 seconds after the last change the timer |
‘indicator’ will stop flashing and the countdown will start |
in minutes. | |
• To stop the beeper, press any button. | |
cook time | timer |
end time | clock |
MODE | |
Setting the cooking duration
•Select the desired oven function and temperature.
•The oven indicator light will glow and the heating source will come on.
•Press the MODE button until the cook time ‘indicator’ begins flashing.
• Set the cooking duration you want by using the and
 buttons. Five seconds after the last change the cook time ‘indicator’ will stop flashing, and the time of day will be displayed.
Note:
• Remember to add pre-heating time if necessary.
cook time | timer |
end time | clock |
| MODE |
Setting the cooking end time
1.Check that the clock displays the correct time of day.
2.Select the desired oven function and temperature. The oven indicator light will glow and the heating source will come on.
3.Press MODE button until the end time ‘indicator’ begins flashing.
4.Enter the time of day you want to finish cooking by
pressing or  buttons. Five seconds after the last
change, the end time ‘indicator’ will stop flashing and the current time of day will be displayed.
cook time | timer |
end time | clock |
| MODE |
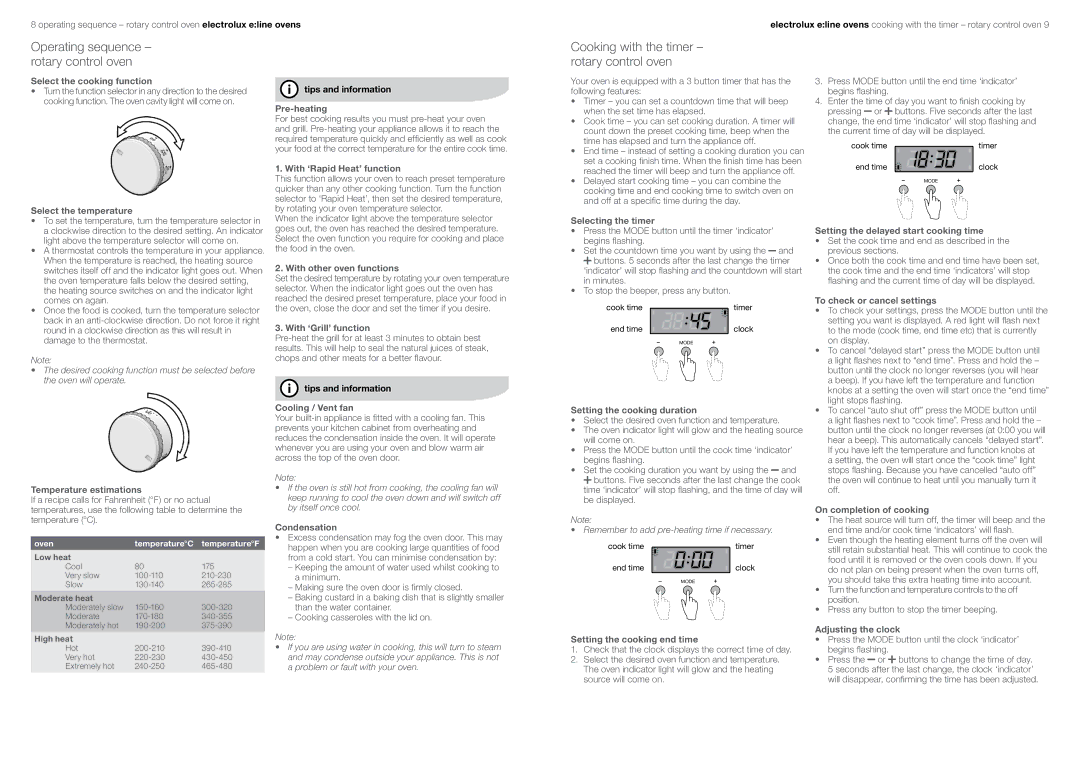
Setting the delayed start cooking time
•Set the cook time and end as described in the previous sections.
•Once both the cook time and end time have been set, the cook time and the end time ‘indicators’ will stop flashing and the current time of day will be displayed.
To check or cancel settings
•To check your settings, press the mode button until the setting you want is displayed. A red light will flash next to the mode (cook time, end time etc) that is currently on display.
•To cancel “delayed start” press the mode button until a light flashes next to “end time”. Press and hold the – button until the clock no longer reverses (you will hear a beep). If you have left the temperature and function knobs at a setting the oven will start once the “end time” light stops flashing.
•To cancel “auto shut off” press the mode button until a light flashes next to “cook time”. Press and hold the – button until the clock no longer reverses (at 0:00 you will hear a beep). This automatically cancels “delayed start”. If you have left the temperature and function knobs at a setting, the oven will start once the “cook time” light stops flashing. Because you have cancelled “auto off” the oven will continue to heat until you manually turn it off.
On completion of cooking
•The heat source will turn off, the timer will beep and the end time and/or cook time ‘indicators’ will flash.
•Even though the heating element turns off the oven will still retain substantial heat. This will continue to cook the food until it is removed or the oven cools down. If you do not plan on being present when the oven turns off, you should take this extra heating time into account.
•Turn the function and temperature controls to the off position.
•Press any button to stop the timer beeping.
Adjusting the clock
•Press the MODE button until the clock ‘indicator’ begins flashing.
•Press the or  buttons to change the time of day.
5 seconds after the last change, the clock ‘indicator’ will disappear, confirming the time has been adjusted.