| GB |
INSTRUCTION MANUAL | HM120N MIXER SET |
Dear customer,
Please read these Operating Instructions through carefully before connecting your device to the mains, in order to avoid damage due to incorrect use. Please pay particular attention to the safety information. If you pass the device on to a third party, these Operating Instructions must also be handed over.

 DESIGN
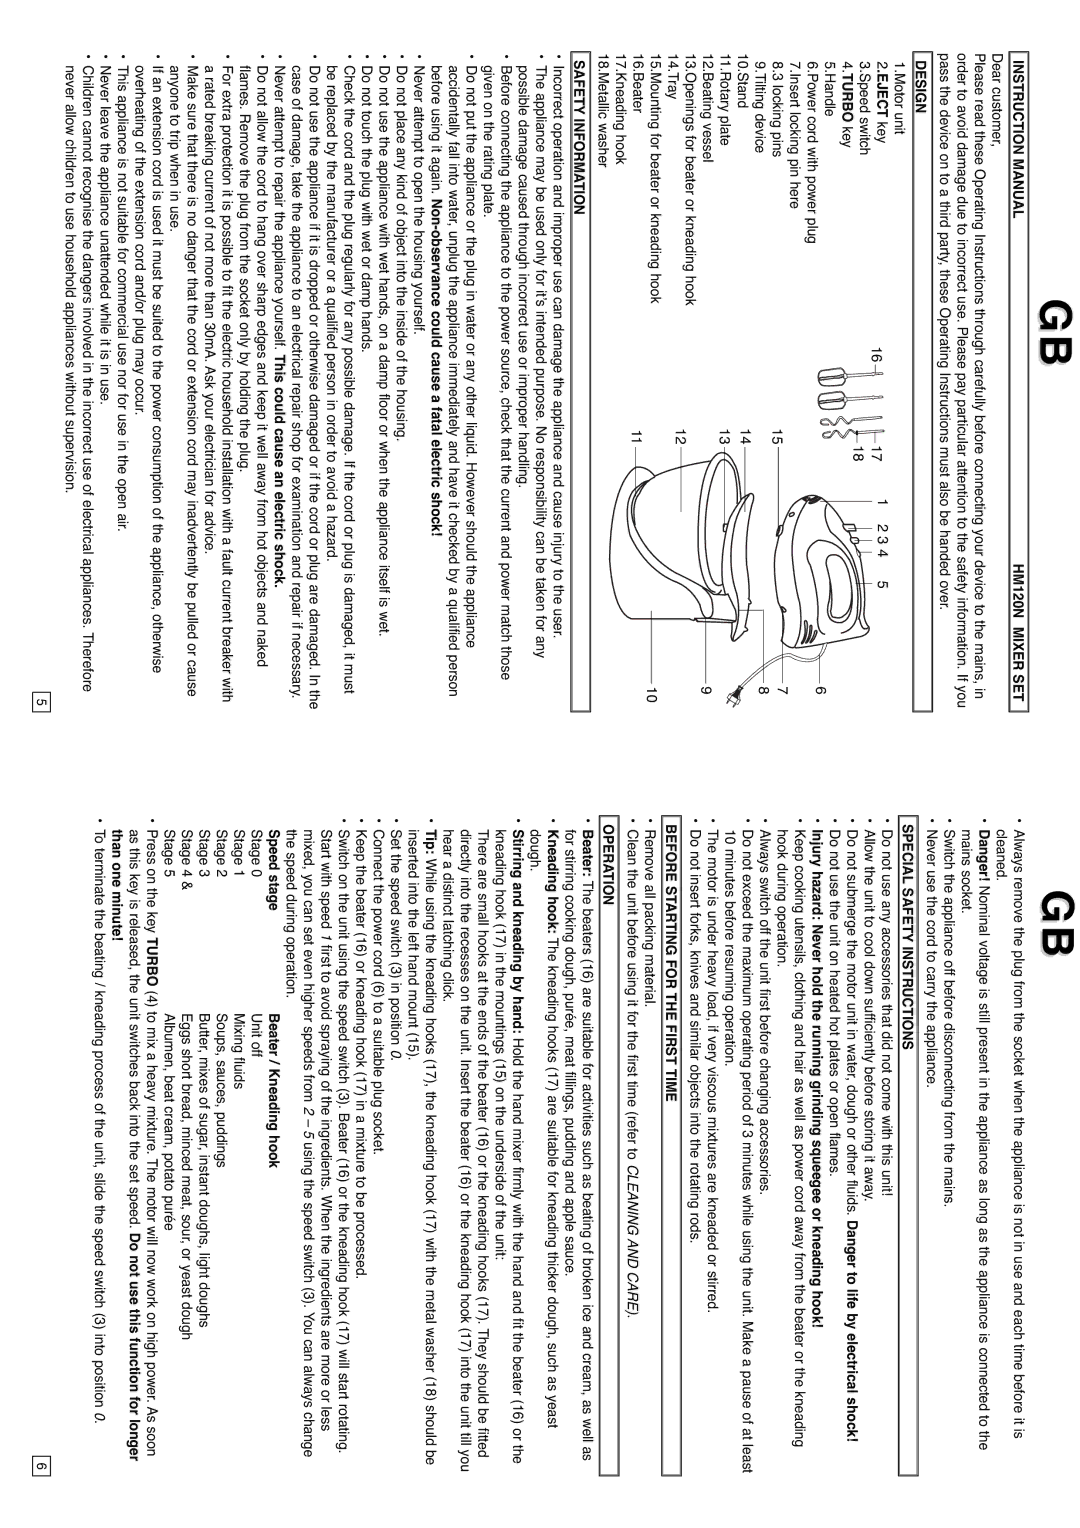
1.Motor unit | | | | |
2.EJECT key | 16 | | 17 | 1 2 3 4 5 |
3.Speed switch | | |
| | 18 | |
4.TURBO key | | | |
| | | |
5.Handle | | | | 6 |
6.Power cord with power plug | | | |
| | | |
7.Insert locking pin here | | | | 7 |
8.3 locking pins | | 15 | |
| | 8 |
9.Tilting device | | 14 | |
10.Stand | | | |
11.Rotary plate | | 13 | | |
12.Beating vessel | | | | 9 |
13.Openings for beater or kneading hook | | 12 | | |
14.Tray | | | |
| | | |
15.Mounting for beater or kneading hook | | | | 10 |
16.Beater | | 11 | | |
17.Kneading hook | | | | |
18.Metallic washer

 SAFETY INFORMATION
•Incorrect operation and improper use can damage the appliance and cause injury to the user.
•The appliance may be used only for it’s intended purpose. No responsibility can be taken for any possible damage caused through incorrect use or improper handling.
•Before connecting the appliance to the power source, check that the current and power match those given on the rating plate.
•Do not put the appliance or the plug in water or any other liquid. However should the appliance accidentally fall into water, unplug the appliance immediately and have it checked by a qualified person before using it again. Non-observance could cause a fatal electric shock!
•Never attempt to open the housing yourself.
•Do not place any kind of object into the inside of the housing.
•Do not use the appliance with wet hands, on a damp floor or when the appliance itself is wet.
•Do not touch the plug with wet or damp hands.
•Check the cord and the plug regularly for any possible damage. If the cord or plug is damaged, it must be replaced by the manufacturer or a qualified person in order to avoid a hazard.
•Do not use the appliance if it is dropped or otherwise damaged or if the cord or plug are damaged. In the case of damage, take the appliance to an electrical repair shop for examination and repair if necessary.
•Never attempt to repair the appliance yourself. This could cause an electric shock.
•Do not allow the cord to hang over sharp edges and keep it well away from hot objects and naked flames. Remove the plug from the socket only by holding the plug.
•For extra protection it is possible to fit the electric household installation with a fault current breaker with a rated breaking current of not more than 30mA. Ask your electrician for advice.
•Make sure that there is no danger that the cord or extension cord may inadvertently be pulled or cause anyone to trip when in use.
•If an extension cord is used it must be suited to the power consumption of the appliance, otherwise overheating of the extension cord and/or plug may occur.
•This appliance is not suitable for commercial use nor for use in the open air.
•Never leave the appliance unattended while it is in use.
•Children cannot recognise the dangers involved in the incorrect use of electrical appliances. Therefore never allow children to use household appliances without supervision.
5
GB
•Always remove the plug from the socket when the appliance is not in use and each time before it is cleaned.
•Danger! Nominal voltage is still present in the appliance as long as the appliance is connected to the mains socket.
•Switch the appliance off before disconnecting from the mains.
•Never use the cord to carry the appliance.

 SPECIAL SAFETY INSTRUCTIONS
•Do not use any accessories that did not come with this unit!
•Allow the unit to cool down sufficiently before storing it away.
•Do not submerge the motor unit in water, dough or other fluids. Danger to life by electrical shock!
•Do not use the unit on heated hot plates or open flames.
•Injury hazard: Never hold the running grinding squeegee or kneading hook!
•Keep cooking utensils, clothing and hair as well as power cord away from the beater or the kneading hook during operation.
•Always switch off the unit first before changing accessories.
•Do not exceed the maximum operating period of 3 minutes while using the unit. Make a pause of at least 10 minutes before resuming operation.
•The motor is under heavy load, if very viscous mixtures are kneaded or stirred.
•Do not insert forks, knives and similar objects into the rotating rods.

 BEFORE STARTING FOR THE FIRST TIME
•Remove all packing material.
•Clean the unit before using it for the first time (refer to CLEANING AND CARE).

 OPERATION
•Beater: The beaters (16) are suitable for activities such as beating of broken ice and cream, as well as for stirring cooking dough, purée, meat fillings, pudding and apple sauce.
•Kneading hook: The kneading hooks (17) are suitable for kneading thicker dough, such as yeast dough.
•Stirring and kneading by hand: Hold the hand mixer firmly with the hand and fit the beater (16) or the kneading hook (17) in the mountings (15) on the underside of the unit:
There are small hooks at the ends of the beater (16) or the kneading hooks (17). They should be fitted directly into the recesses on the unit. Insert the beater (16) or the kneading hook (17) into the unit till you hear a distinct latching click.
•Tip: While using the kneading hooks (17), the kneading hook (17) with the metal washer (18) should be inserted into the left hand mount (15).
•Set the speed switch (3) in position 0.
•Connect the power cord (6) to a suitable plug socket.
•Keep the beater (16) or kneading hook (17) in a mixture to be processed.
•Switch on the unit using the speed switch (3). Beater (16) or the kneading hook (17) will start rotating.
Start with speed 1 first to avoid spraying of the ingredients. When the ingredients are more or less mixed, you can set even higher speeds from 2 – 5 using the speed switch (3). You can always change the speed during operation.
Speed stage | Beater / Kneading hook |
Stage 0 | Unit off |
Stage 1 | Mixing fluids |
Stage 2 | Soups, sauces, puddings |
Stage 3 | Butter, mixes of sugar, instant doughs, light doughs |
Stage 4 & | Eggs short bread, minced meat, sour, or yeast dough |
Stage 5 | Albumen, beat cream, potato purée |
•Press on the key TURBO (4) to mix a heavy mixture. The motor will now work on high power. As soon as this key is released, the unit switches back into the set speed. Do not use this function for longer than one minute!
•To terminate the beating / kneading process of the unit, slide the speed switch (3) into position 0.
6