|
|
|
|
| Installation |
|
| ||||||
|
|
|
|
|
|
|
|
| The flue collar is removable for installations | ||||
|
|
|
|
|
|
|
|
| into fireplaces with low openings. | ||||
|
|
|
|
|
|
|
|
| a) | Remove | the | rear two (2) secondary | |
|
|
|
|
|
|
|
|
|
| air | tube | and | |
|
|
|
|
|
|
|
|
|
| if | installed (see | ||
|
|
|
|
|
|
|
|
|
| INSTALLATION). Remove the secondary air | |||
|
|
|
|
|
|
|
|
|
| tubes by placing a screwdriver (any style | |||
|
|
|
|
|
|
|
|
|
| except flat head) into one of the air holes | |||
|
|
|
|
| USA 16” (406 mm) |
|
| and tapping it with a hammer/mallet to | |||||
|
|
|
|
|
|
| the left. |
|
| ||||
|
|
|
|
| CND 18” (450 mm) |
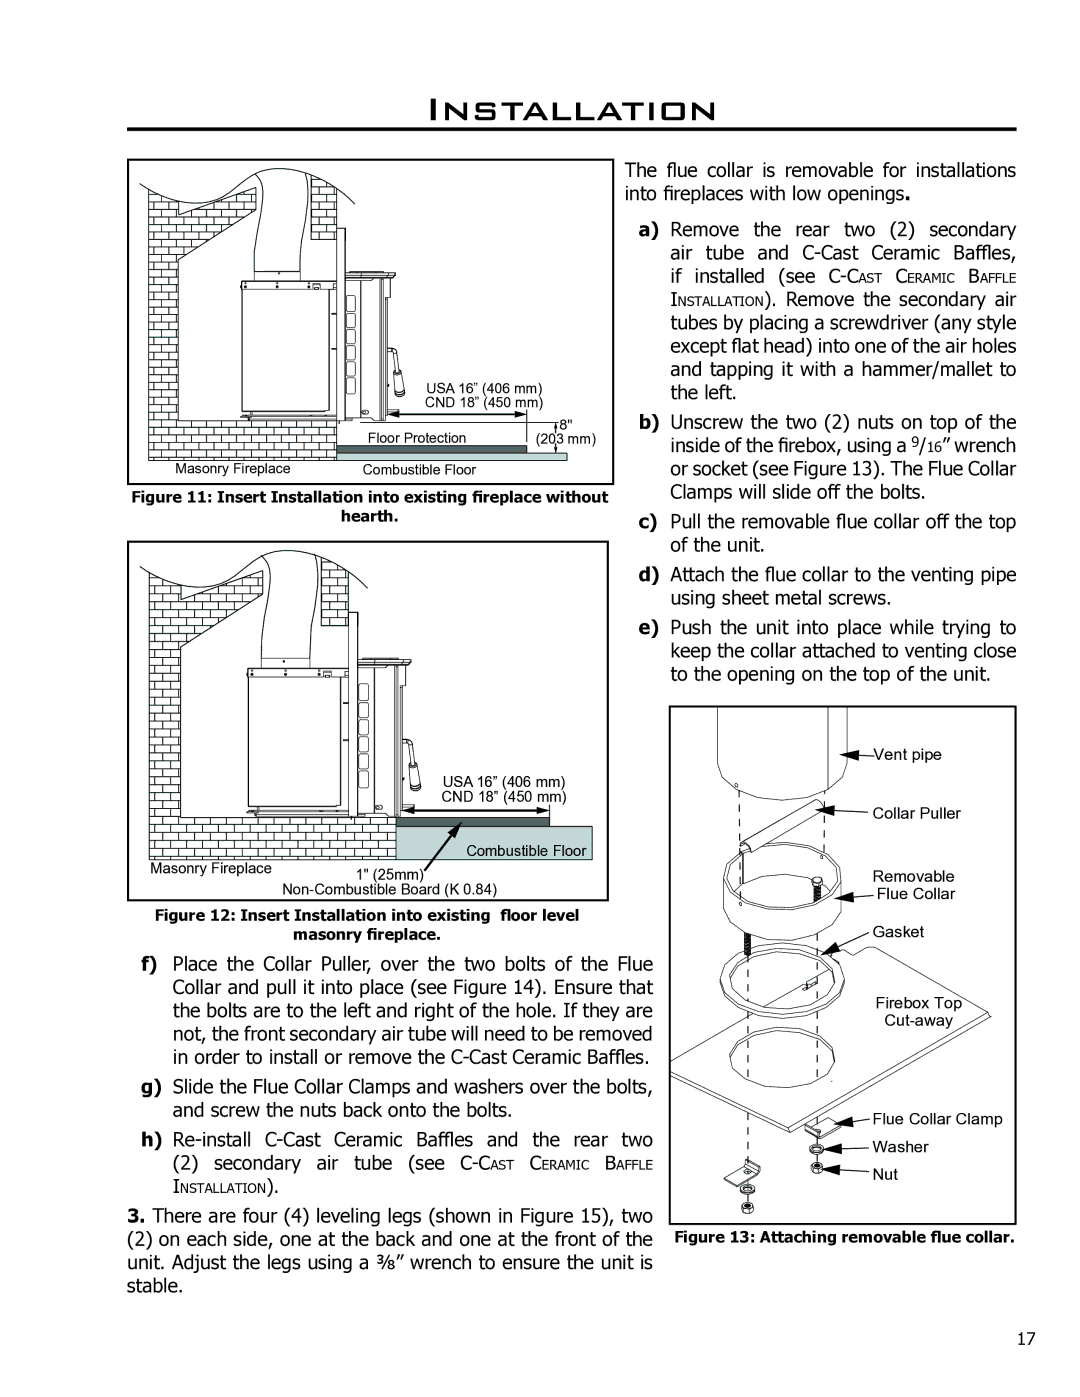
| b) | Unscrew the two (2) nuts on top of the | |||||
|
|
|
| Floor Protection | 8" |
| |||||||
|
|
|
| (203 mm) |
|
| inside of the firebox, using a 9/16” wrench | ||||||
| Masonry Fireplace |
| Combustible Floor |
|
|
| or socket (see Figure 13). The Flue Collar | ||||||
Figure 11: Insert Installation into existing fireplace without |
| Clamps will slide off the bolts. | |||||||||||
|
|
|
| hearth. |
|
|
|
| c) | Pull the removable flue collar off the top | |||
|
|
|
|
|
|
|
|
|
| of the unit. |
| ||
|
|
|
|
|
|
|
|
| d) | Attach the flue collar to the venting pipe | |||
|
|
|
|
|
|
|
|
|
| using sheet metal screws. | |||
|
|
|
|
|
|
|
|
| e) | Push the unit into place while trying to | |||
|
|
|
|
|
|
|
|
|
| keep the collar attached to venting close | |||
|
|
|
|
|
|
|
|
|
| to the opening on the top of the unit. | |||
|
|
|
|
|
|
|
|
|
|
|
|
| Vent pipe |
|
|
|
|
| USA 16” (406 mm) |
|
|
|
|
|
| ||
|
|
|
|
| CND 18” (450 mm) |
|
|
|
|
| Collar Puller | ||
|
|
|
|
|
|
|
|
|
|
|
|
| |
Masonry Fireplace |
|
|
| Combustible Floor |
|
|
|
|
|
| |||
| 1" (25mm) |
|
|
|
|
|
|
| Removable | ||||
|
|
|
|
|
|
|
|
|
|
| |||
|
|
|
|
|
|
|
| Flue Collar | |||||
Figure 12: Insert Installation into existing floor level |
|
|
|
|
| Gasket | |||||||
|
| masonry fireplace. |
|
|
|
|
|
|
| ||||
f) | Place the Collar Puller, over the two bolts of the Flue |
|
|
|
| ||||||||
| Collar and pull it into place (see Figure 14). Ensure that |
|
|
| Firebox Top | ||||||||
| the bolts are to the left and right of the hole. If they are |
|
|
| |||||||||
| not, the front secondary air tube will need to be removed |
|
|
| |||||||||
|
|
|
|
| |||||||||
| in order to install or remove the |
|
|
|
| ||||||||
g) Slide the Flue Collar Clamps and washers over the bolts, |
|
|
|
| |||||||||
| and screw the nuts back onto the bolts. |
|
|
|
|
|
| Flue Collar Clamp | |||||
h) | Baffles and | the rear | two |
|
|
| |||||||
|
|
| Washer | ||||||||||
| (2) | secondary | air | tube | (see |
| CERAMIC | BAFFLE |
|
|
| ||
|
|
|
| Nut | |||||||||
| INSTALLATION). |
|
|
|
|
|
|
|
|
|
| ||
|
|
|
|
|
|
|
|
|
|
|
| ||
3. There are four (4) leveling legs (shown in Figure 15), two | Figure 13: Attaching removable flue collar. | ||||||||||||
(2) on each side, one at the back and one at the front of the | |||||||||||||
unit. Adjust the legs using a 3⁄8” wrench to ensure the unit is |
|
|
|
| |||||||||
stable. |
|
|
|
|
|
|
|
|
|
|
|
| |
17
